
When to Put Out Trail Cameras: A Month-by-Month Calendar
A trail camera can work any month of the year, but what it tells you changes with the season. In summer it shows which bucks made it through the winter. In fall it shows when they move. In late winter it shows who is still alive and where the sheds may drop. Here is a simple calendar of when to put out trail cameras, what to aim for each month, and how often to check them without spooking deer.
Most deer hunters put trail cameras out in early to mid summer (June to July), when bucks are growing antlers in velvet and visiting mineral sites. That gives you 8 to 12 weeks of inventory before season. Move cameras to trails, scrapes and food sources in early fall, focus on scrapes and funnels during the rut (late October to November), then switch to food sources in late season and watch for shed bucks in late winter. Many hunters simply leave cameras out year-round, where legal, and change the spot and goal by season.
- Best start
- June to July
- Summer goal
- Velvet buck inventory
- Early fall
- Food and travel patterns
- Rut
- Scrapes, funnels, video
- Late winter
- Food sources, sheds
- Check every
- 1 to 3 weeks (or cellular)
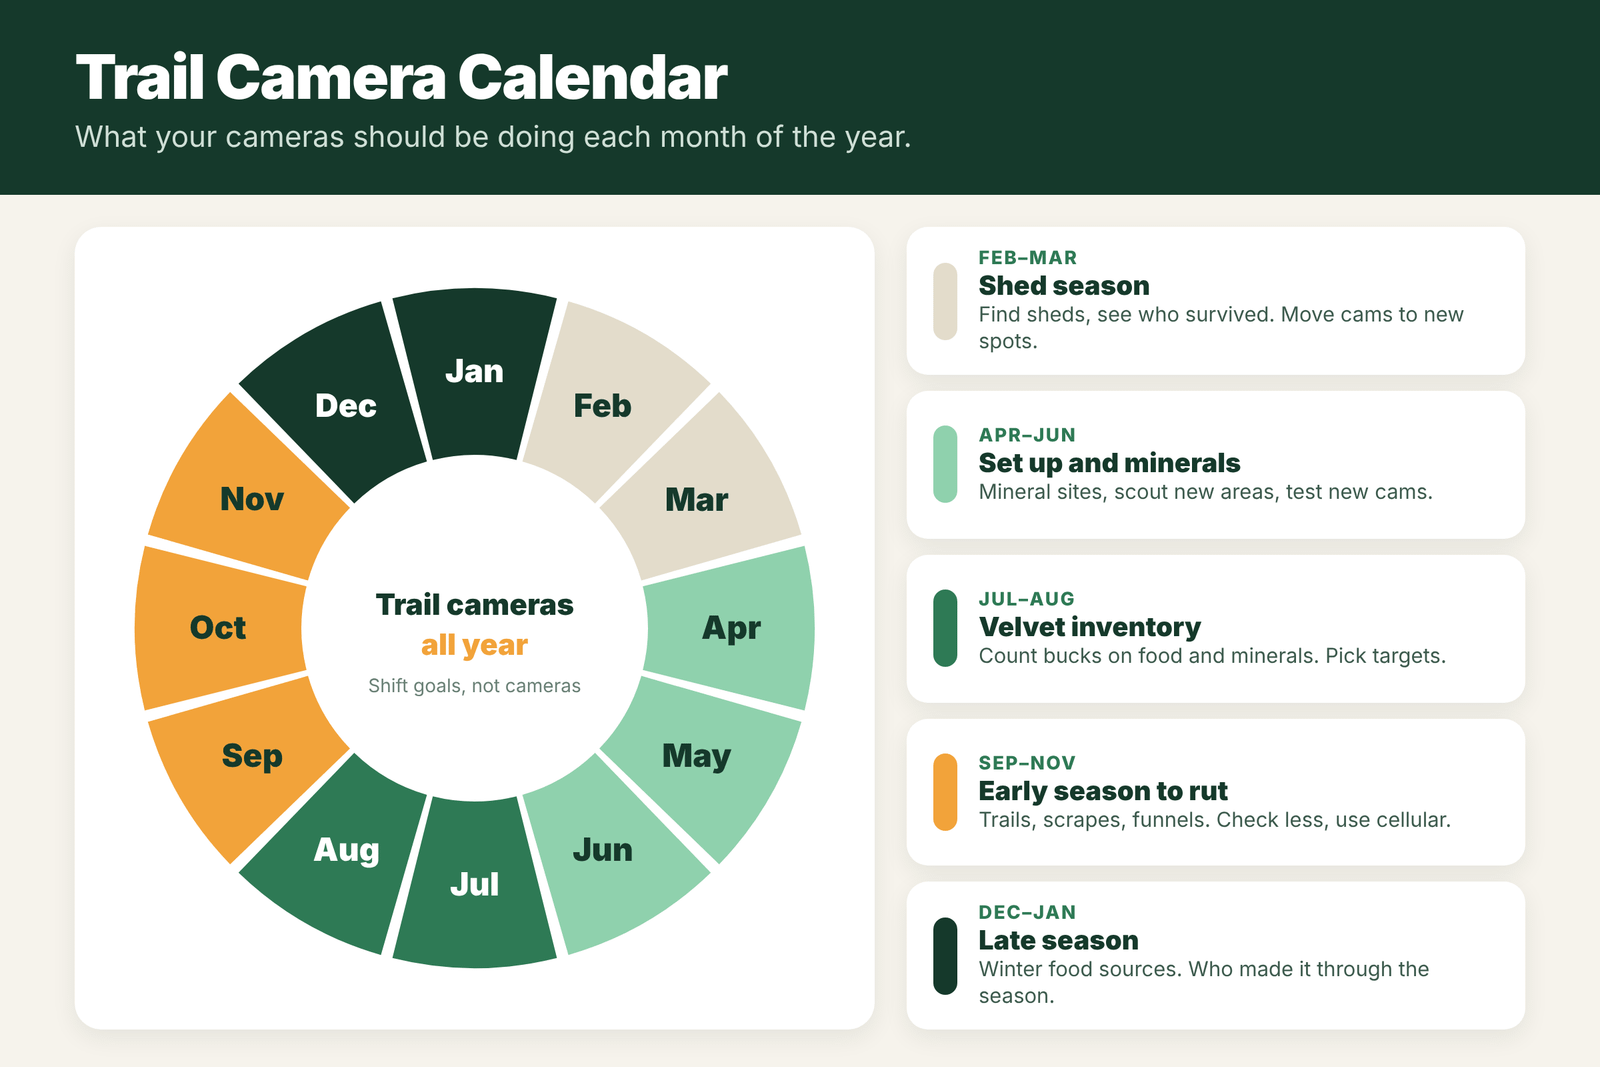
Year-Round Trail Camera Calendar
Seasons shift a little by region, so treat these months as a general guide for whitetails in most of the U.S.:
- January: late season. Cameras on food sources show which bucks survived the season.
- February to March: shed season. Watch for bucks that have dropped antlers, and check bedding and food areas.
- April to May: spring. Deer move to green-up; a good time to scout, clear trails and plan camera spots.
- June to August: summer inventory. Mineral sites (where legal), field edges and water show velvet bucks.
- September: early season. Bucks shed velvet and shift toward fall food. Move cameras to trails between bed and food.
- October to November: pre-rut and rut. Scrapes, funnels and doe areas are the top spots.
- December: post-rut. Bucks return to food and recover. Cameras on food plots and cut crops pay off.
Can you just leave them out? Yes, in most places. See can you leave trail cameras out year round.
Summer Velvet Inventory
Summer is the easiest time to get great buck photos. Bucks are often in bachelor groups, they follow regular routines, and you can visit cameras with less risk of ruining a hunt.
- Where: mineral or salt licks where legal, water, field edges, and soybean or clover fields.
- Settings: photo bursts or short video, and time-lapse on big fields if your camera has it.
- Goal: count bucks, judge age and antler growth, and pick a few to target.
- Tip: watch for heat and direct sun. Face cameras north or south to cut glare and false triggers.
New to setup? Start with how to set up a trail camera.
Early Season Patterns
When bucks shed velvet in late August to September, their routines often change. Bachelor groups break up and some bucks shift their home area.
- Move cameras from summer fields to trails between bedding and food, oak flats dropping acorns, and field corners.
- Look for daylight photos. A buck moving in daylight near a stand you can reach with a good wind is your early-season target.
- Cut back on visits as opening day gets close. This is the time cellular cameras earn their cost.
Rut and Post-Rut
- Pre-rut (mid to late October): scrapes and rub lines. Bucks visit scrapes often, many at night at first, then more in daylight.
- Rut (November in most areas): funnels, pinch points and doe bedding areas. Bucks travel far, so you may see new bucks. Video mode is fun here to catch chasing.
- Post-rut (late November to December): tired bucks go back to food. Food plots, cut corn and beans become the top spots again.
Late Winter and Shed Season
- Keep cameras on food sources through January and February. This is your survivor count after the season.
- When a buck shows up without antlers, the sheds are on the ground. Start looking near his bedding and food. See when is the best time to find deer sheds.
- Use lithium batteries in the cold, and keep snow and ice off the lens.
How Often to Check Trail Cameras
- Summer: every 1 to 2 weeks is fine. Deer are less sensitive to visits.
- Early season and rut: every 2 to 3 weeks or less, at midday, with the wind in your favor and rubber boots on.
- Late season: deer are pressured, so keep visits short and rare.
- Cellular cameras: you only walk in to change batteries or move the camera, which is the biggest advantage in fall.
Every visit leaves scent. The less you go in, the more natural your photos will be.
Month-by-Month Camera Plan
| Month | Main goal | Best camera spots | Suggested mode |
|---|---|---|---|
| March to April | Shed season, see who survived | Food sources, winter trails | Photo, 1 shot |
| May to June | Start inventory, find fawns | Mineral sites (where legal), field edges | Photo, 1 shot, longer delay |
| July to August | Buck inventory in velvet | Minerals, food plots, soybean fields | Photo or time-lapse |
| September | Early season patterns, velvet shed | Food to bedding trails, water | Photo, 2 to 3 shots |
| October | Pre-rut, rubs and scrapes start | Scrapes, rub lines, staging areas | Burst or hybrid |
| November | Rut movement | Funnels, scrapes, doe bedding edges | Burst, hybrid or video |
| December to January | Post-rut, late season food | Standing crops, food plots, south slopes | Photo, time-lapse |
How Many Cameras and Where to Start
You do not need a dozen cameras to learn a lot. A simple rule many hunters use is about one camera per 40 to 80 acres of huntable ground, placed at the spots with the most deer traffic. With two or three cameras, start with your best food source, the main trail between that food and bedding cover, and one scrape or funnel when the rut gets close. Move cameras that show nothing after two weeks. A camera in a dead spot teaches you less than one moved 100 yards to a better trail.
Step-by-Step: Getting Cameras Ready for the Season
- Check every camera at home: fresh lithium batteries, formatted cards, firmware updated.
- Set the date and time and a camera ID for each one.
- Clean the lens and seals, and add silica gel packs.
- Plan spots on a map before you go in: food, bedding, trails and wind.
- Hang cameras at midday with gloves, and walk-test each one.
- Mark the calendar for your first check in about two weeks.
Field Examples
The late starter: a hunter puts cameras out one week before opening day and sees mostly does. The bucks have already shed velvet and changed patterns. Starting in July would have shown which bucks lived there and where they fed.
The summer success: another hunter runs two cameras at a mineral site and a bean field from July. By September, there are photos of five bucks, with notes on which come in daylight. When velvet comes off, cameras move to the trails those bucks used, and two of them show up there in early October.
The rut shift: a camera on a food plot goes quiet in early November. Moving it to a funnel between doe bedding areas shows three new bucks cruising in daylight within a week.
Mistakes With Camera Timing
- Waiting until the season opens. You miss the summer patterns and the chance to see which bucks are around.
- Leaving cameras in the same spot all year. Deer change spots with food and the rut, so your cameras should too.
- Checking too often in the fall. Every visit adds pressure. Cellular cameras help near bedding areas.
- Ignoring local rules. Some states limit cameras on public land or during hunting season. See what states ban trail cameras.
Summer vs Fall Camera Settings
Your settings should change with the season. In summer, deer spend a long time at minerals and food, and you mostly want an inventory of which bucks are around. Use single photos with a 1 to 5 minute delay, or time-lapse over open fields at dawn and dusk. That saves batteries and storage and still catches every buck that visits. In fall, deer move faster and with more purpose, especially bucks in the rut. Switch to a 3-shot burst with a short delay on trails, and consider hybrid or video at scrapes so you can see behavior. In late season, go back to longer delays at food sources, where deer feed for long periods in cold weather. Matching the setting to the season keeps your card from filling with repeats while making sure you do not miss the deer that matter.
What to Do With All That Data
A season of photos is only useful if you can make sense of it. Keep a simple log or spreadsheet with the camera, date, time, deer, wind and temperature. Give each buck a name based on something you can recognize, like a split brow tine or a kink in his left beam. By the end of summer, you may see that one buck shows up on cool evenings with a north wind, while another only appears after dark. Those notes help you choose where and when to hunt. See how to pattern a buck with a trail camera for a step-by-step method.
Frequently Asked Questions
When should I put out trail cameras?
Most hunters put them out in June or July for summer velvet inventory, then move them to trails, scrapes and food sources as the season goes on.
How early before deer season should I put out trail cameras?
About 8 to 12 weeks before opening day is a good target. That gives you time to inventory bucks and learn their patterns before hunting.
Where should trail cameras go during the rut?
On scrapes, funnels, pinch points and near doe bedding areas, where bucks travel while searching for does.
How often should I check my trail camera?
Every 1 to 2 weeks in summer, and every 2 to 3 weeks or less in fall. Cellular cameras let you check photos without walking in.
Can I leave trail cameras out all year?
Yes, in most areas, as long as it is legal where you hunt. Change the spot and settings with the season, and check batteries more often in the cold.
How many trail cameras do I need?
A common rule is about one camera per 40 to 80 acres, at the spots with the most deer traffic. Even two or three cameras can show a lot.
Should I move my trail cameras during the season?
Yes. Move them with the food, the rut and the weather. A camera that shows little after two weeks should be moved.
When do bucks shed their velvet?
Usually late August to September, and their patterns often change at the same time.