
360-Degree Trail Camera: How It Works, Pros, Cons and Setup Tips
Every trail camera has the same blind spot: everything behind it. A buck slips past on the downhill side, a coyote circles around the bait pile, or someone walks up behind your feeder, and the camera never knows. For years the only fix was hanging more cameras.
A 360-degree trail camera takes a different approach. Instead of one fixed view, it turns its lens to look in multiple directions from a single spot. This guide explains how these cameras actually work, where they shine, where they fall short, and how to set one up so you get full coverage instead of a camera full of empty photos.
What Is a 360-Degree Trail Camera?
A 360-degree trail camera is a motion-activated camera that can capture images all the way around its mounting point. The best-known example is the Stealth Cam Revolver series. According to Farm & Fleet’s product listing, the Revolver 360 uses a rotating lens system that covers six distinct zones for panoramic monitoring without blind spots. GUNS Magazine describes the series as offering the equivalent of six cameras worth of coverage in a single device.
You will also see cheaper cellular “security” style cameras advertised with 360-degree views. Many of those are pan-tilt cameras you rotate from an app, which is a different thing from a camera that automatically sweeps its zones when it detects motion. Read the listing carefully before you buy.
How a 360-Degree Trail Camera Works
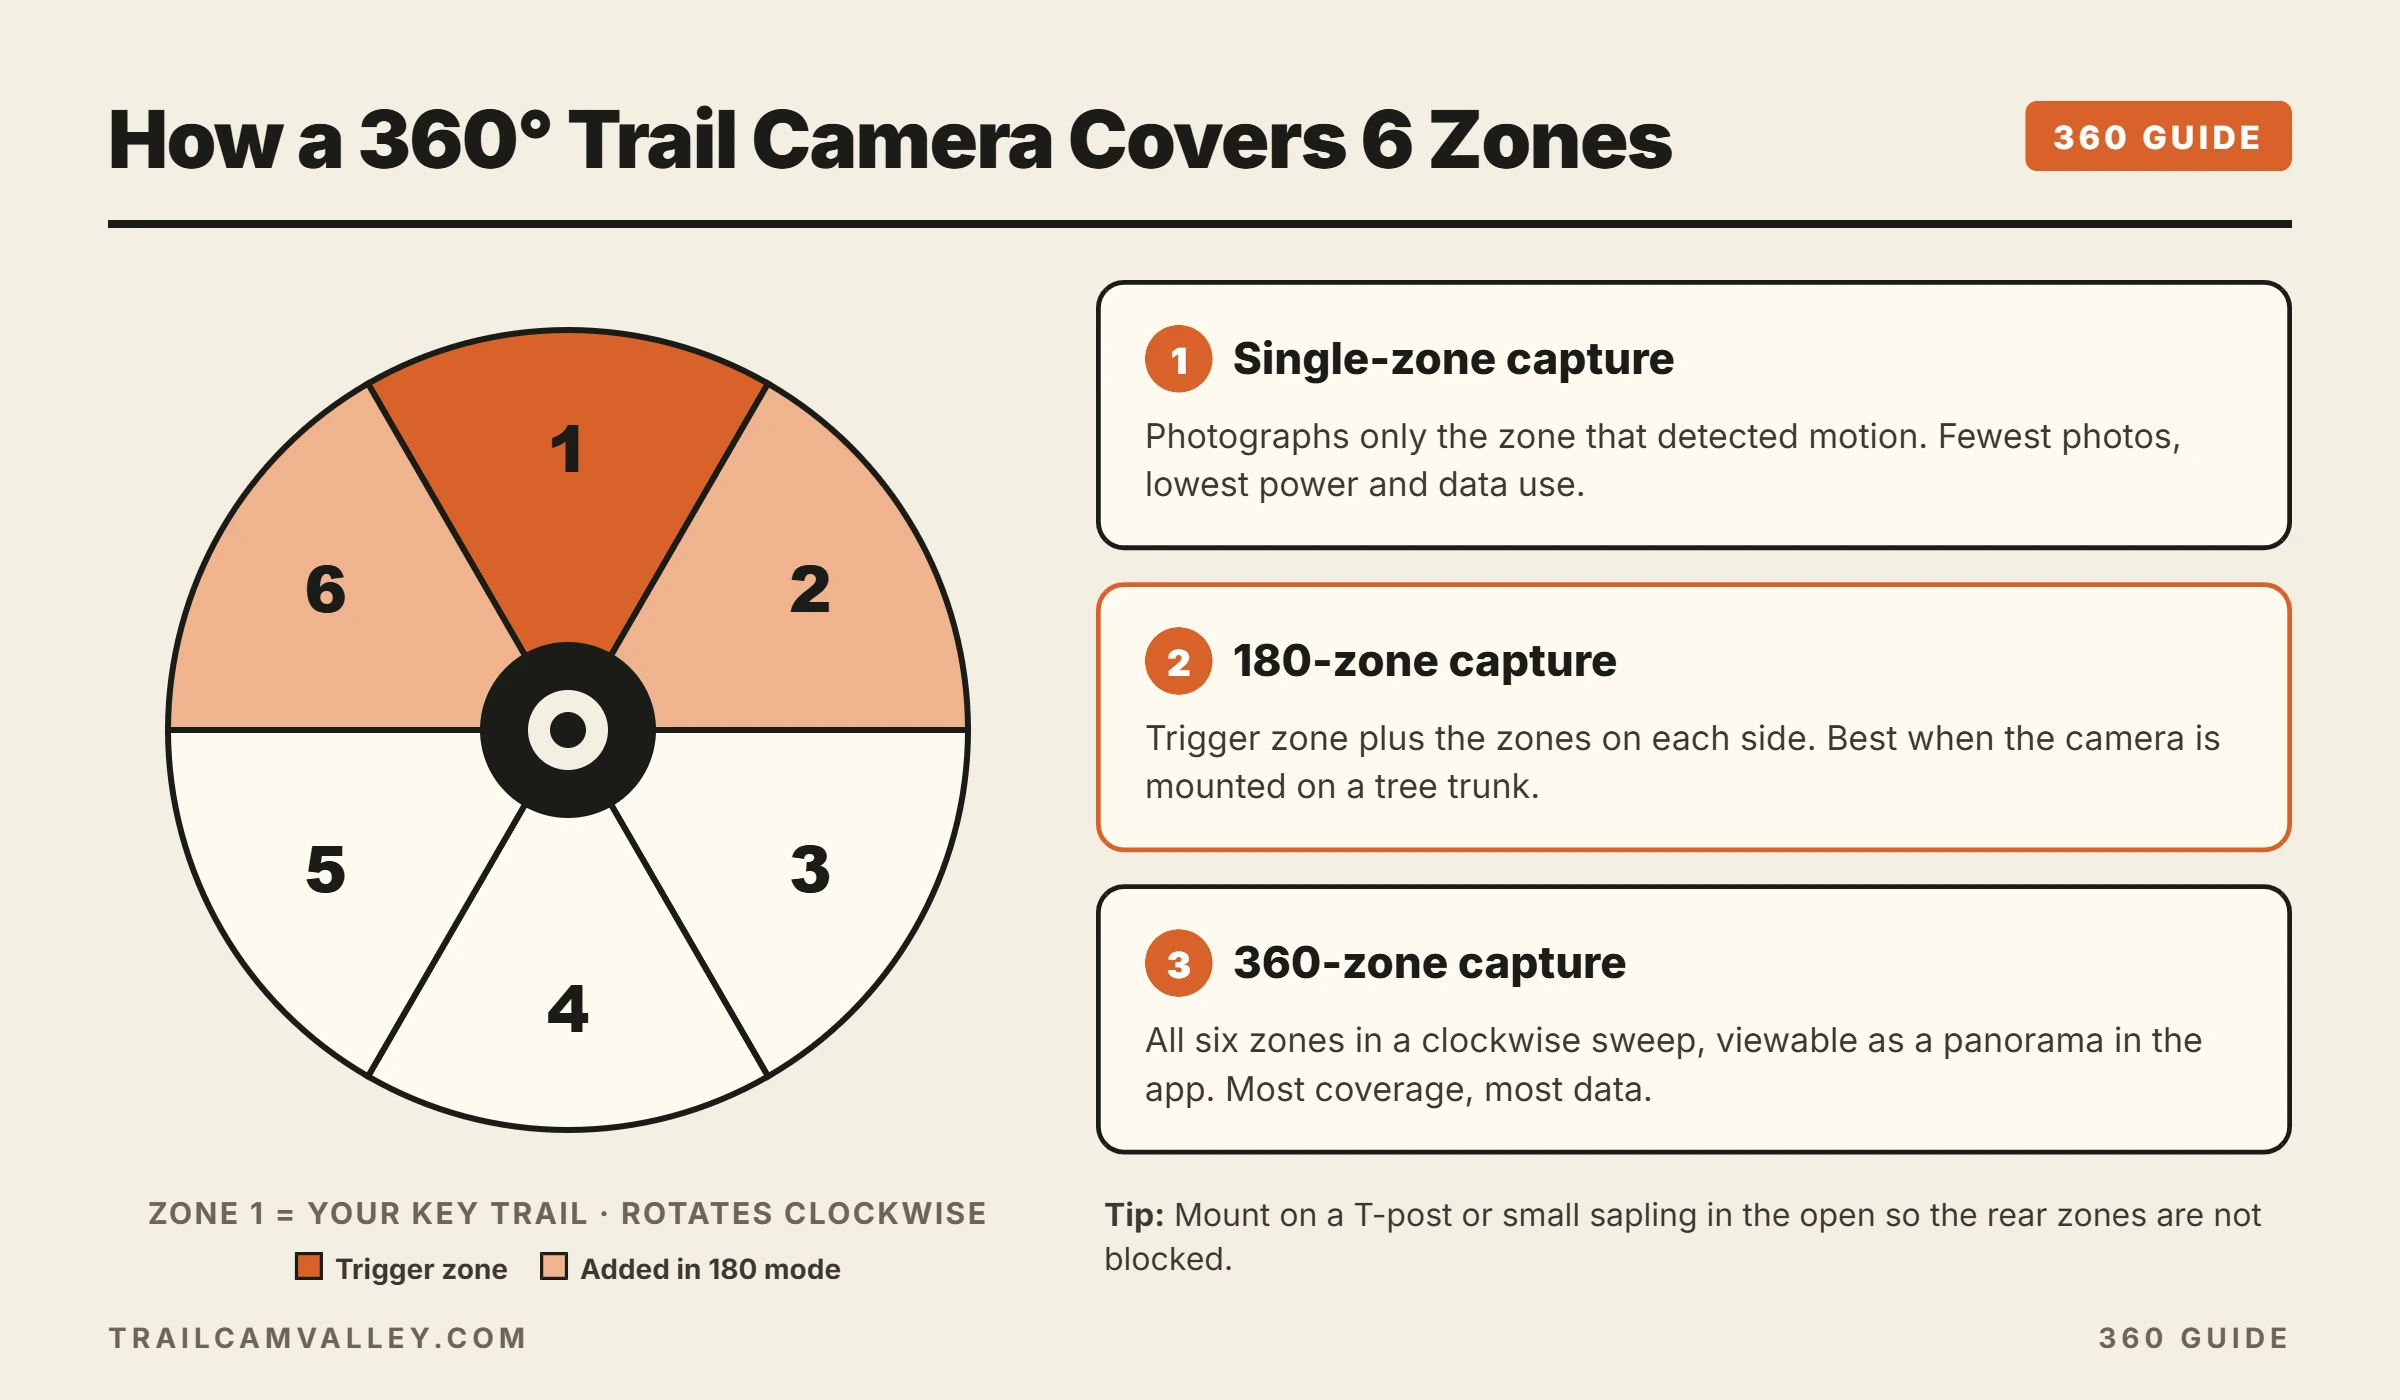
The idea is simple: one camera, one motor, several positions. The lens sits on a rotating head. When the motion sensors detect something, the camera turns toward that zone and takes a photo, then can rotate through other zones depending on your settings.
Bowhunting.com’s launch coverage explains the three capture options on the Revolver:
- Single-zone capture: the camera photographs only the zone where motion was detected, like a regular camera that happens to be able to face any direction.
- 180-zone capture: it photographs the trigger zone plus the zones on either side, which helps catch animals to the left or right of the one that tripped the sensor. It also works when the camera is mounted against a tree and cannot see behind itself.
- 360-zone capture: it takes a photo of all six zones in a clockwise rotation, starting from your designated zone one.
In the Stealth Cam app, those images can be viewed one by one or stitched into a panorama. OutdoorHub’s review notes the app lets you drag and scroll through the panoramic photo, and even tilt your phone to pan around the scene.
Key Specs to Know
Specs vary by model and generation, but the original Revolver gives a useful baseline. Bowhunting.com’s hands-on review lists 36MP photos, a 0.4-second trigger speed, and an 80-foot detection range, powered by 16 AA batteries with a 12V auxiliary jack and an included T-post bracket. The Pro version stepped up to 1440p video and a 100-foot detection range, according to the same site’s launch article.
| Feature | Revolver 360 (original) | Why it matters |
|---|---|---|
| Zones | 6 zones, full 360 degrees | Fewer blind spots from one mount |
| Photo resolution | Up to 36MP | Bigger files, more cellular data |
| Trigger speed | 0.4 seconds | Slower than top fixed cameras |
| Detection range | 80 feet (100 ft on Pro) | Covers open ground well |
| Power | 16 AA, plus 12V jack | Motor and cellular use more power |
Newer generations, including the Revolver 2.0 and 3.0, have since been released, so check current specs before you compare. If you use the Stealth Cam app, our guide to the Stealth Cam Command app covers setup and live view.
Pros and Cons
What a 360 camera does well
- Coverage from one spot. Ideal for crossroads, field centers, and food plots where deer can come from any side.
- Fewer cameras to buy and maintain. One camera and one data plan instead of three or four.
- Great for security. A camera in the middle of a gate area or equipment yard sees approach from every direction.
- Behind-the-camera action. Animals that circle around the camera are no longer invisible.
Trade-offs to accept
- More moving parts. A motor is one more thing that can wear out or freeze in harsh weather.
- Higher power use. Rotating and taking multiple photos per trigger drains batteries faster. External power helps.
- More data. Six photos per event on a cellular plan add up quickly. See our guide to trail camera plans before you choose.
- Bulkier and pricier. These cameras are larger than a typical compact trail camera.
Where to Mount a 360-Degree Trail Camera
The whole point is all-around coverage, so mounting matters more than with a regular camera. A camera strapped tight against a big tree trunk loses most of its rear view. A few placement tips:
- Use a post or small tree. A steel T-post in the open gives the clearest 360-degree view. Our guide on the T-post trail camera mount walks through the setup.
- Pick the center of activity. Field corners, trail intersections, water holes, and food plots are better than a single narrow trail.
- Clear brush in every direction. Grass and branches swaying in any zone can trigger the camera and waste photos.
- Mind the sun. With six directions, at least one zone may face the sun at certain times. That is normal, but do not center your key zone into the sunrise.
- Set zone one deliberately. Point your designated first zone at the most important trail.
Height still matters. Around waist height is a common starting point for deer. Our trail camera height guide has more detail.
Is a 360-Degree Trail Camera Worth It?
It depends on the spot. If you are watching a single trail through the timber, a standard camera aimed down the trail will usually do the job for less money and less power. If you are watching an open area where animals come from every direction, or you want security coverage of a yard or gate, a 360-degree camera can replace several fixed cameras.
Think of it as a specialist tool. Pair one 360 camera at a key hub with regular cameras on the trails feeding into it. If you are still deciding on gear, start with how to pick a trail camera and our look at whether Stealth Cam is a good brand.
Tips to Get Better Results
- Start with 180-zone mode if the camera is on a tree, to avoid photographing bark.
- Use lithium or external power for long sets. See how many batteries a trail camera takes.
- Use a large enough SD card. Multi-zone capture fills cards faster. Our guide to SD cards for trail cameras explains sizes.
- Lock it down. A camera in the open is easier to spot. See how to lock a trail camera.
- Walk-test every zone before you leave the site.
Quick Facts
- The Stealth Cam Revolver 360 uses a rotating lens covering six zones for full panoramic coverage (Farm & Fleet).
- Capture modes include single-zone, 180-zone, and 360-zone (Bowhunting.com).
- The original Revolver lists 36MP photos, 0.4-second trigger speed, and 80-foot detection range (Bowhunting.com).
- The app can display the six photos as a scrollable panorama (OutdoorHub).
- Rotating cameras use more power and data per trigger than fixed cameras.
Frequently Asked Questions
Does a 360-degree trail camera have six lenses?
The Stealth Cam Revolver uses a single rotating camera that moves from zone to zone, not six separate lenses.
Do 360 cameras spook deer?
Reviewers report the motor is quiet. As with any camera, flash type and placement matter more. See can deer see trail camera flash.
Can I use a 360 camera for home security?
Yes. A 360 view is useful around gates, sheds, and driveways, especially in places without Wi-Fi. Cellular models need a data plan.
Is the trigger speed slower than a normal trail camera?
The original Revolver lists 0.4 seconds, which is slower than the fastest fixed cameras. It is fine for feeders and open areas, less ideal for fast-moving deer on a narrow trail.
Does a 360 camera need a cellular plan?
Cellular versions do, to send photos to your phone. Learn more in how cellular trail cameras work.
How do I avoid photographing the tree I mounted it on?
Use 180-zone mode or mount it on a post or small sapling so the rear zones have a clear view.
Final Thoughts
A 360-degree trail camera solves a real problem: the animals and people that pass where your camera is not looking. It costs more, uses more power, and burns more data, but in the right spot it does the work of several cameras. Put it at the hub of activity, clear the brush around it, and choose the capture mode that fits the site.