Nowadays, trail cameras are no mystery devices anymore. Hunters or wildlife photographers tend to install them around locations for tracking game movements. And, people of localities often tend to know where these cameras are. It can also be a thing of interest for many.
However, if the area is too broad, it is not uncommon to not immediately find game cameras. And if you own the camera and want to retrieve data, such an experience can be pretty irritating.
That’s why today, I’m here to give you ideas on how to find trail cameras in the woods. Before I begin, let’s hope you are here for a positive reason. That’s because not every person who spots and passes by the cameras has a good purpose.
How To Find Trail Cameras In The Woods?
You will be surprised to know how many people look for tips to find their trail cameras in the woods. If you also tend to forget where your trail camera is, you can try the following things to find it.
Know Your Camera Well
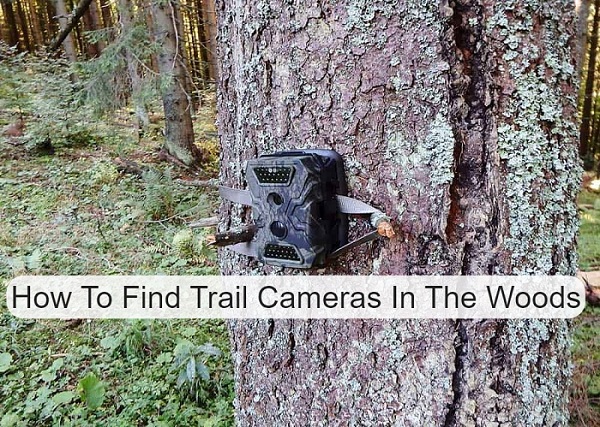
Not knowing your camera is one of the first mistakes we make. Come on, people! If we are going to leave it in the woods, where other hunters or photographers may also set up their cameras, we better know it inside out.
Know the color and pattern of your camera. As most of the trail cameras have a pattern that matches tree color for camouflaging, knowing the color and pattern is essential. If you know what the camera looks like, you will recognize the shade of the tree you have placed it on.
Night Flash
What type of flash does your trail camera have? I ask because the flash type can become helpful to find the camera at night. You will find three types of flashes in trail cameras.
- White Flash: White flashes produce bright light as they snap photos. Though they are not ideal for nighttime shots, they can certainly be helpful in case you need to find them. So, if your camera has white flash, then you are likely to find it at night.
- IR Flash: Red Glow Infrared or low-glow flash trail cameras are the most suitable choice for capturing photos at night. The low-glow flashlights do not scare away the animals. And even if the light will be slightly less bright, there is still a good chance that you might find it at night.
- Black Flash: What should you do if your trail camera has black flash? Well, you should give up. Black flashes are as good as being in complete darkness. So it isn’t going to do any good wasting your time looking for the camera.
Look Up
No, don’t roll your eyes just because it sounds silly. Of course, you will be looking up to find your camera, or perhaps you had tried that before you even came here. But I’m telling you to look again.
If the camera is camouflaged or disguised among the trees, you won’t easily spot it. That’s why I suggest you look up and look hard. The camera could be 10-12 feet above. Follow the branches and see if you notice anything out of the ordinary.
Spotting camouflaged trail cameras in residential areas is not that difficult. But it can cost you a lot of your energy to find it in the wood.
Look For Lens And Straps
You can camouflage the camera’s body, but you will have to leave the lens free from any coverings. Even the sensors need to be uncovered. So when you are watching out for your camera, try to find anything dark and circular.
And then, there are camera straps. The straps go around the tree to hold the camera in place. Even if you are standing at the back of the tree where you placed your camera, you will still notice the straps.
Food Beds
Hunters or photographers tend to set up their trail cameras closer to areas where animals come for food. Some of these beds are set by the hunters to catch animals.
The cameras are always placed several feet away from the beds. So, if you notice food in the woods and around trees, know that there is a trail camera somewhere. Scan the areas and the surroundings, and you may end up finding a trail camera there.
GPS Tracking Device
If you have gone tired just by reading all these ways to find trail cameras in the woods, here is the quickest and most effective solution: use a GPS tracking device. But remember, it is a prudent step, and you have to add this before installing the camera anywhere.
Installing a GPS chip or device in your trail camera will prevent you from going through any unnecessary hassle. Besides, in case the camera gets stolen, you will be able to track it down.
Note: Buy a GPS tracker that is small and distinguishable. It should be competent with harsh weather and must have a system to connect to your mobile.
How To Prevent Trail Camera Theft?
It is not uncommon for people to vandalize or steal trail cameras. If the wrong person knows how to find trail cameras in the woods, it is only a matter of time until they try stealing it.
So, what can you do about it? Naturally, the best thing to do is to take precautions so that the cameras don’t get stolen. You can do that in the following ways:
Place Them Higher
This is one of the most effective tricks that prevent theft. People don’t usually look up when they walk by the woods. Some people do that, but when you are on the move, the chances of scanning trees are pretty low.
That’s why placing the camera at least ten feet off the ground helps to hide the camera. You can angle the camera downwards so that it can still detect motion and take pictures. Even a thief might not notice a camera that high.
Another advantage of doing this is that the animals will not notice any flashes. It will allow them to move around freely while your trail camera keeps snapping pictures.
Note: Take a climbing stick with you whenever you go to check on the camera. Having a trail camera setup that high, it can be troublesome for you to retrieve the camera.
Lock The Camera
I will give you a few more preventive ideas. But no matter which one you use, you might still want to lock your trail camera. So, even if someone notices the camera, they can’t just take it away.
You can use two types of locks:
- Cable lock
- Lockbox
Cable locks can be as long as six feet long, enough to secure the trail camera around the tree. Try to get yourself a camouflage-ends cable lock. A thief will have a hard time trying to find the end.
And if you want something more secure, getting a lockbox is a better option. You can bolt the box into the tree and put the camera inside it. And then you get to lock the box for the camera’s safety.
However, there is one problem with using a lockbox: the weight. It weighs down the trail camera, and setting things up becomes more time-consuming. But the fact that it keeps your camera safe beats the other issues.
Using No-Glow Flashes
Trail cameras don’t require flashes to take clear pictures in broad daylight. However, during the night, the camera will fail to take photos if there’s no flash. And as you know already, flashes at night give away the presence of cameras.
But if you spend some extra bucks on your trail camera, you will be able to purchase a no-glow flash camera. They are also known as black flash trail cameras. These cameras create less flashing glow which is hardly detectable.
Use Small Cameras
Bigger cameras come with the risk of visibility. One can hardly not see something like a trail camera set up perfectly around a tree. I don’t want to creep you out, but staring at a large camera feels like it’s also staring back at you.
Jokes apart, you can actually theft-proof your trail camera if you use a smaller model. And keeping security in mind, many trail camera manufacturers are now manufacturing small cameras. Some of them even come with infrared flashes.
Camouflage The Camera
Your trail camera can be camouflaged with the help of its surroundings. If you are installing the trail camera in the woods, you will find plenty of branches and leaves to cover the camera. The camouflaging works best if the color of branches and leaves matches the color of the camera.
The drawback of using natural foliage to camouflage something is that it will die and shrink after some time. That’s why experts often recommend using artificial foliage.
On top of that, there are plenty of trail cameras in the market that comes with patterns that look like tree bark. These types of cameras are easier to hide.
Note: Keep the lens and sensor areas clear of any camouflaging objects. Otherwise, it will fail to take photos.
Choose Low-Traffic Areas
Human beings have a common trait. We tend to choose the easier path. That’s why it is unlikely for you to come across many people in low-traffic areas. In that case, you can install the camera a little off the trails.
Areas with a few populations are not prone to trail camera theft. Still, you can hide the camera from plain sight by placing it behind bushes or cactuses. It will make reacting to the camera difficult for anyone.
But make sure it is not difficult for you. Otherwise, you won’t be able to retrieve your own camera.
How To Set Up A Trail Camera?
With all those hide-n-seek with trail cameras, let’s not forget that you need to set up the camera correctly, whether for hiding or for taking decent pictures. So, let’s check out the trail camera setup guideline.
Purchase The Right Camera
The first thing you need to do is to get yourself the right camera. Though the camera has to meet your requirements, any good trail camera will have some standard features:
- It has to have a high-resolution camera
- A no-glow or dark flash mode
- Night vision to take clear pictures at night
- An outlook or size that will be easy to distinguish it
- A long durability
- Flexible and quick data transmission features
- An extended motion detection range
- The trigger speed needs to be quite fast
These are the features you must have in your trail cameras. Without them, you won’t get good-quality pictures.
Location And Sites
The location might not be the biggest concern. But it is one of the necessary parts to keep in mind. You can place it anywhere for home security or for tracking game movements. Nevertheless, there are some specific areas where you can capture games.
Open areas such as fields, meadows, or streams are best for game sighting. Animals come to these places for food and water. You can choose these areas for setting up your trail camera.
Preparing The Camera
Now, it’s time for you to prepare the camera by going through a few things. Double-check the following before you install the trail camera.
- Turn on your camera and adjust the settings. You can either choose the photo mode or video, adjust the sensitivity range, trigger, and delay speed. You can make these adjustments at home before setting out with your camera.
- Even if your camera has an automatic data transmission system, you would still need an SD card to store all the photos and videos. Without it, you will lose all data.
- Test it inside your home. Strap it somewhere in your house and walk in front of it a few times. If everything is set correctly, the camera will capture photos as soon as it detects your motion.
Install The Camera
Follow the instructions and install the camera. The camera should be installed at least three feet off the ground. And if you are trying to hide it from onlookers, installing it 10-12 feet off the ground works well.
Most of these cameras come with straps to place the camera around trees. Make sure to tighten the camera with the strap so that thieves or bad weather won’t ruin the angle.
Final Test
Now that camera is ready, run the test one more time before returning, leaving your camera. Make sure everything is functioning well. Check on the detection range and trigger speed as these are the essential parts.
Uses Of Trail Cameras
A common misconception regarding trail cameras is that they are not multipurpose cameras. That is not entirely true. Yes, trail cameras or game cameras are commonly used for tracking game movements.
One can use it for more things. So why not find out the uses of trail cameras?
Hunting
Hours of walking and sweating while searching for games are a thing of the past. Many hunters now set up trail cameras to keep an eye on animals’ movements throughout the season. And finally, when the hunting season arrives, they know where to look for their prey.
Wildlife Photography
A perfect shot of animals in the wild is not easy to get. One needs to wait for hours and days. But then, wildlife photographers started to use trail cameras. As these cameras capture pictures with the detection of movements, photographers no longer need to go through much trouble.
Security
Yes, we know that CCTV cameras are popularly used for security. But trail cameras can serve the same purpose. You can install the camera outside your home to prevent unwanted trespassing. And the best part is that it will immediately capture trespassers’ photos.
Frequently Asked Questions
Q. How Long Does A Trail Camera Last?
Trail cameras come with various durability. While some of them last depending on brands, others last depending on how well they are maintained. Manufacturers provide a one or two years guarantee for these cameras. But if well maintained, a trail camera can last more than two-three years.
Q. What Is The Best Trail Camera?
The best trail camera comes with all the excellent features and will be qualified to do its job well. It will have durable and waterproof materials, a high-quality camera, and must be able to detect movements faster from a distance. You will find plenty of such cameras at a budget price.
Q. How Much Do Trail Cameras Cost?
Trail camera prices vary depending on the brand, quality, and features. Nevertheless, you will find a good-quality trail camera between $40-$200. But if you can invest some extra, you will find some excellent trail cameras.
Final Words
Knowing how to find trail cameras in the woods is helpful to anyone who uses trail cameras. If you know how to do it, it is a matter of minutes to spot your camera. But it isn’t surprising if you cannot find them immediately sometimes.
That’s what happens when you set up your camera in unfamiliar locations. That is also why I urge everyone to set up their trail cameras in tight areas. If it is an unknown locality, try to get to know the trails or paths. Hopefully, nothing will go wrong after that.
As an Amazon Associate, I earn from Qualifying Purchases.