To stop your camera from inverting, adjust the mirror image setting within your video conferencing or recording software.
Having dealt with countless video calls and streaming setups over the years, I know exactly how frustrating it feels to see your text appear backward or your movements seem mirrored. Learning how to stop camera from inverting is a common hurdle for content creators and remote workers alike. Whether you are using Zoom, OBS, or a built-in laptop webcam, this issue usually stems from a simple software toggle rather than a hardware malfunction. I have spent years troubleshooting these exact settings for clients, and I am here to help you fix your orientation once and for all. Let us dive into the solutions that will restore your natural perspective.
Source: macrumors.com
Identifying the Source of Camera Inversion
Inversion issues typically occur because software developers want to give users a mirror-like experience. When you look into a mirror, you are used to seeing your left side on the left, so software often replicates this. However, when you want to show a document or present to an audience, this default setting makes everything look reversed to the viewer. Understanding that this is a feature rather than a bug is the first step in learning how to stop camera from inverting.
Most modern applications provide a simple checkbox to disable this behavior. You might find this under Video Settings, Camera Properties, or Advanced Output options. My experience suggests that you should always check the application settings before blaming your driver or your operating system. If you change the setting in one app, remember that it often does not carry over to others, so you may need to repeat the process.

Source: youtube.com
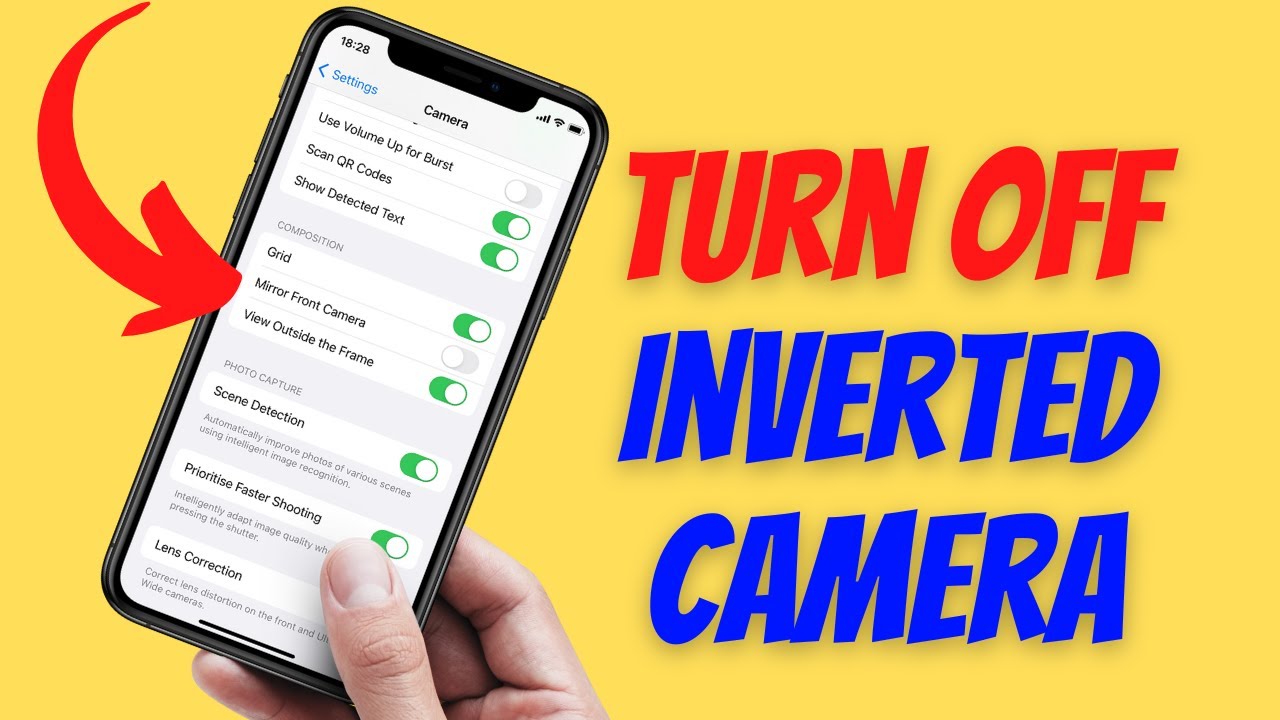
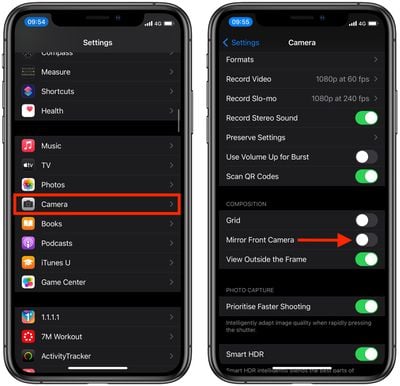
How to Stop Camera from Inverting in Popular Software
Fixing a mirrored feed is usually a matter of finding the right menu. If you are using Zoom, navigate to your settings by clicking the gear icon. Within the Video tab, look for an option labeled Mirror my video. Simply uncheck this box to stop camera from inverting during your meetings.
For those using OBS Studio, the process involves a right-click on your camera source in the sources panel. Select Transform from the menu and then choose Flip Horizontal. This manually overrides the mirror effect and ensures your video looks correct to your audience. If you are using Microsoft Teams, the software often handles this automatically for participants, but you can check your device settings if you notice persistent issues. Always remember that learning how to stop camera from inverting is a vital skill for maintaining professional visual quality in every digital space.

Source: wikihow.com
Troubleshooting Hardware and Driver Issues
Sometimes, the camera driver itself might be the culprit. If you find that every application you open shows a reversed image, your device driver could be misconfigured. In these cases, you should visit the device manager on your computer and look for your camera hardware. Updating the driver or rolling it back to a previous version can often solve the problem when software toggles fail.
I once worked with a client whose webcam was physically mounted upside down, which is a different kind of inversion. If your image is vertically flipped, check for a rotation setting in your camera control panel. Adjusting these settings is a great way to learn how to stop camera from inverting in more complex hardware setups. When in doubt, perform a quick search for your specific camera model to see if other users have faced similar inversion bugs.

Source: youtube.com
Best Practices for Consistent Video Quality
Consistency is key when you are presenting or recording. Once you learn how to stop camera from inverting, make sure to save your settings as a profile or a preset if your software allows it. This prevents you from having to manually flip your feed every time you launch your application.
Another tip I swear by is performing a test recording before your actual event. Taking two minutes to check your framing and orientation saves you from the embarrassment of a mirrored presentation. If you work in a team, share these tips with your colleagues so everyone can look their best. Mastering how to stop camera from inverting is just one of many small tweaks that professionalize your online presence.
Source: online-tech-tips.com
Frequently Asked Questions of How to Stop Camera from Inverting
Why does my text look backward on video calls?
Your software is likely set to mirror your video to mimic a real-world mirror effect. Unchecking the mirror setting in your video app preferences will fix this.
Will changing these settings affect the viewer?
Yes, most video conferencing platforms will broadcast the corrected image to the other participants. They will see you exactly as you appear in real life.
Should I update my drivers if the setting does not work?
If software toggles fail, updating your camera drivers is a recommended step to rule out hardware communication errors. You can usually find these updates on the manufacturer’s official support website.
Can I flip my camera in OBS Studio?
Absolutely, you can right-click your source, select Transform, and choose Flip Horizontal. This is a standard method used by streamers to correct their video orientation.
Is it common for webcams to invert by default?
Yes, many applications enable this feature by default because it feels more intuitive for the user to see a mirror image of themselves. It is a common setting that is easily disabled once you know where to look.
Conclusion
Correcting a mirrored video feed is a simple process once you understand where the settings are hidden. By navigating through your software options or adjusting device transforms, you can easily ensure your audience sees you exactly as you intend. Taking control of your camera settings provides a more professional experience for everyone involved. Implement these changes today to improve the clarity of your presentations and meetings. If you found this guide helpful, consider sharing it with your team or leaving a comment about which camera settings worked best for you.
As an Amazon Associate, I earn from Qualifying Purchases.