
If your camera shows inverted images, it can be frustrating. Fixing this issue is quite simple.
In this guide, we will show you how to make your camera not inverted. Many people face this problem during video calls or while taking selfies. An inverted camera can cause confusion, especially if you need to show text or other precise details.
Whether you use a webcam, smartphone, or a digital camera, there are easy steps to correct this. By the end of this guide, you will know how to adjust your camera settings and ensure your images or videos display correctly. This simple fix will make your video calls and photos look much better. Let’s dive in and solve the inversion issue together!
Credit: indiadiversityforum.org
Check Camera Settings
To make your camera not inverted, start by checking the camera settings. This step is crucial. Often, the default settings may cause the camera to display an inverted image. By adjusting the camera settings, you can fix this issue quickly. Let’s explore how to do this.
Default Settings
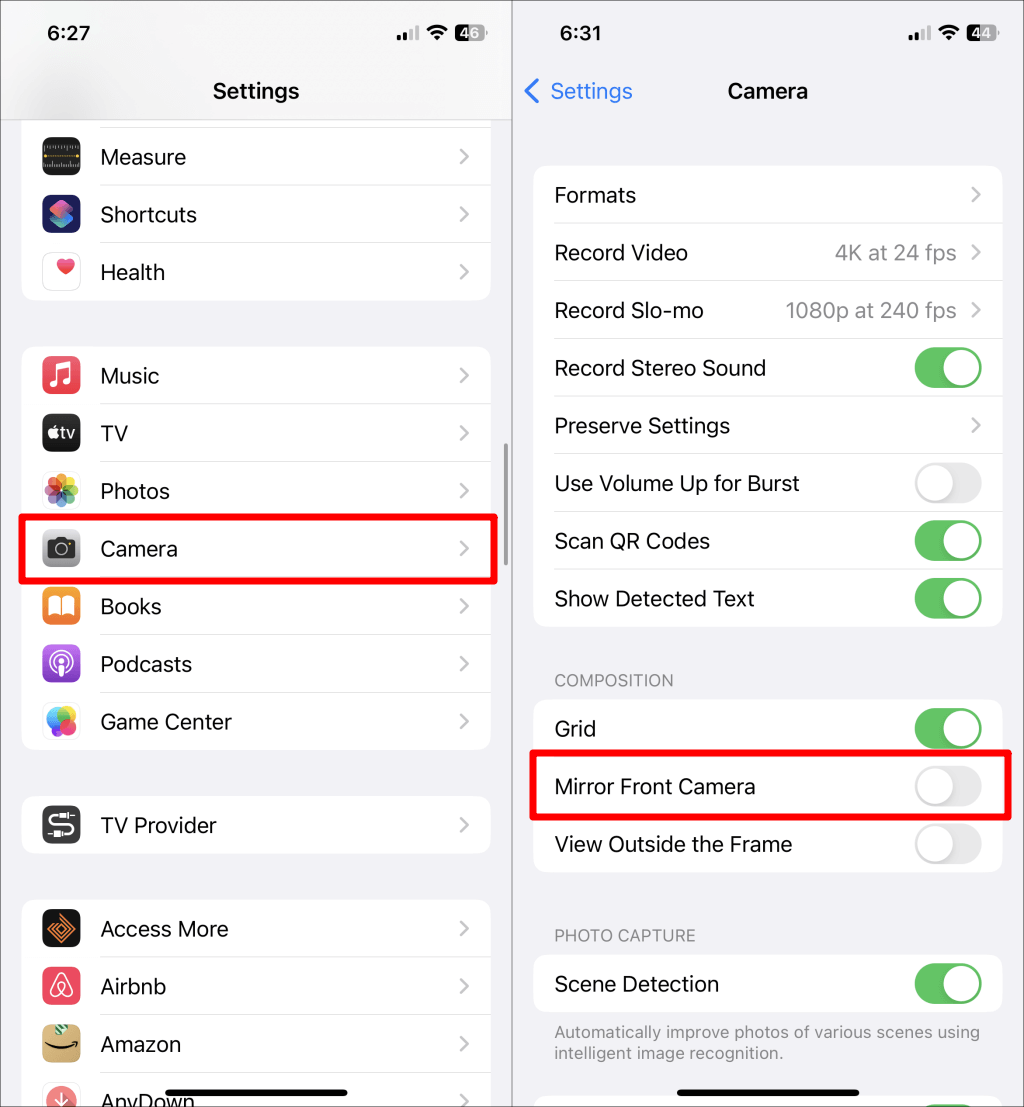
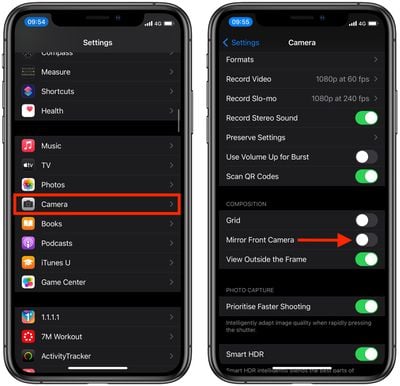
First, access your camera’s default settings. Open the camera application on your device. Look for a settings icon or a gear symbol. Click on it to open the settings menu. In this menu, find the option labeled “default settings” or similar.
Check if there is an option for “flip” or “mirror.” Sometimes, the camera might have a default setting that inverts the image. If this option is enabled, disable it. Save the changes and check if your camera is now displaying the correct image.
Adjust Preferences
If changing the default settings does not help, adjust the camera preferences. Look for an option like “camera preferences” or “advanced settings.” This section might have more specific options for image orientation.
Check for options such as “rotate,” “flip,” or “mirror image.” Adjust these settings until the image appears correctly. Sometimes, there may be a preview option. Use it to see real-time changes while adjusting the settings.
Remember to save your changes. Close the settings menu and test the camera again. If the image is still inverted, consider restarting the device. This can help apply the new settings properly.

Credit: www.youtube.com
Update Camera Drivers
Updating camera drivers can help fix the inverted camera issue. Drivers are essential for hardware to work well with your computer. Old drivers can cause problems, including an inverted camera display. Keeping your camera drivers up-to-date can solve many issues and improve performance.
Importance Of Updates
Updating drivers ensures your camera works properly. It helps fix bugs and improves compatibility with software. Updates can also enhance the overall performance of the camera. Ignoring updates can lead to persistent issues, including an inverted camera view. Regular updates are essential for the smooth functioning of your device.
How To Update
Updating your camera drivers is simple. First, open the Device Manager on your computer. You can find it by searching in the start menu. Next, locate your camera under the “Imaging Devices” section. Right-click on your camera and select “Update Driver.” Choose “Search automatically for updated driver software” and follow the prompts. Your computer will find and install the latest driver.
If the automatic search does not work, you can visit the camera manufacturer’s website. Download the latest driver for your specific camera model. Follow the instructions on the site to install the driver manually. Restart your computer to ensure the new driver takes effect. This should resolve the inverted camera issue.
Use Camera Software
Using camera software is a simple way to fix an inverted camera. Different software options can help you correct this issue. You can use built-in software or third-party tools. Let’s explore both.
Built-in Software
Most cameras come with built-in software. This software often includes options to adjust camera settings. You can flip the image to make it look correct. Check your camera settings for an option to flip or mirror the image. This adjustment is usually found in the settings or preferences menu.
Using built-in software is easy and doesn’t require extra downloads. It is a quick fix for an inverted camera. This method works well for most users. You only need to find the right setting and make the change.
Third-party Tools
Third-party tools offer more advanced features. These tools can provide additional options to fix an inverted camera. Software like OBS Studio or ManyCam can help. They allow you to flip the camera view with a few clicks.
Many third-party tools are free to use. Some may offer extra features for a fee. These tools can be downloaded online and installed on your computer. Once installed, you can adjust your camera settings as needed.
Using third-party tools can be very effective. They offer more control over your camera settings. This makes them a good choice if built-in software does not solve the problem.
Adjust Video Call Settings
Adjusting video call settings can help you fix the inverted camera issue. Many video conferencing platforms have built-in options to correct this. This section will guide you through the process on different platforms and offer common fixes.
Platform-specific Settings
Each video call platform has its own settings. These settings can help you adjust your camera view. Here are steps for some popular platforms:
Zoom: Open Zoom and go to Settings. Click on Video. Look for the option “Mirror my video” and uncheck it. This will fix the inverted view.
Microsoft Teams: Start a call on Teams. Click on the three dots at the top-right corner. Choose Device settings. You will see a preview of your camera feed. Uncheck the “Mirror my video” option.
Google Meet: Google Meet does not have a direct setting to fix inverted video. But your peers see the correct view. The mirrored view is just for you.
Common Fixes
If platform-specific settings do not help, try these common fixes:
Check your camera app: Many laptops have a built-in camera app. Open it and look for settings. You may find an option to flip or mirror the camera.
Update drivers: Outdated drivers can cause camera issues. Go to your device manager. Find your camera under “Imaging devices.” Right-click and select “Update driver.”
Use third-party software: Some software can help you adjust your camera. Tools like OBS Studio allow more control. Install and configure to fix the inverted view.
By following these steps, you can ensure your video calls look right. Adjusting settings can make a big difference. Happy video calling!
Check Hardware Connections
Experiencing an inverted camera can be frustrating. One primary solution is to check hardware connections. Ensuring that cables and ports are functioning correctly can solve the issue. This section will guide you through these checks.
Cable Issues
Damaged or loose cables can cause camera problems. Inspect the cable for any visible damage. If you find any, replace it. Ensure the cable is firmly connected at both ends. Sometimes, a loose connection can invert the camera image.
Port Problems
Faulty ports can also invert your camera. Check the port where the camera connects. Look for debris or damage inside the port. Clean it carefully with a soft brush. If the port appears damaged, try another port. Using a different port can resolve the issue.
Credit: www.macrumors.com
Test With Different Applications
Sometimes, your camera might appear inverted on certain applications. This can be frustrating, especially during important calls or recordings. Testing your camera with different applications can help you identify where the problem lies. Below, we discuss two types of applications: video conferencing apps and recording software.
Video Conferencing Apps
Many people use video conferencing apps for work meetings, classes, or catching up with friends. Popular apps include Zoom, Skype, and Microsoft Teams. Follow these steps to test and adjust your camera settings:
- Open the app and start a new meeting or join an ongoing one.
- Locate the video settings menu. This is usually found in the toolbar.
- Check the preview of your video feed. Is it inverted?
- Look for a ‘mirror’ or ‘flip’ option in the settings. Toggle it to see if it corrects the issue.
If the problem persists, it could be an issue with the app itself or your camera’s drivers. You might need to update the app or your system drivers.
Recording Software
Recording software is used for creating videos, tutorials, and more. Examples include OBS Studio, Camtasia, and Windows Camera. Here’s how to test your camera using these programs:
- Open the software and create a new project or recording.
- Go to the video input settings. This is where you select your camera.
- Check the live preview of your camera feed. Is the image inverted?
- Look for a ‘flip’ or ‘rotate’ option in the settings. Adjust it to correct the image.
Some software may not have a built-in option to flip the video. In such cases, you might need to use third-party software or adjust the settings within your operating system.
Frequently Asked Questions
How Do I Stop My Camera From Inverting?
To stop your camera from inverting, access your camera settings. Look for an option labeled “mirror” or “flip. ” Disable it.
Why Is My Camera Image Inverted?
Your camera image might be inverted due to default settings. Many devices flip the image for a mirror effect.
Can I Fix Inverted Camera On Zoom?
Yes, you can. Go to Zoom settings, navigate to the “Video” section, and uncheck “Mirror my video. “
How To Fix Inverted Camera On Windows 10?
Open the Camera app, go to settings, and disable the “Flip” or “Mirror” option.
Conclusion
Fixing your inverted camera is simple and quick. Follow the steps outlined. Your videos and photos will look right side up. It improves your visual content quality. No more frustrating mirrored images. Enjoy a better camera experience. Keep exploring your camera settings.
You’ll find more useful features. Happy capturing!
As an Amazon Associate, I earn from Qualifying Purchases.