
Trail cameras are great tools for wildlife observation. They capture animals in their natural habitats.
Placing a trail camera in the right spot can make a big difference. You want clear, exciting pictures of wildlife. This guide will help you find the best locations. We will discuss key spots where animals frequent. You will learn how to get the most out of your trail camera.
By the end, you will know where to place your camera for the best results. Get ready to capture amazing wildlife moments.
Choosing The Right Locations
Placing trail cameras in the right locations is essential for capturing wildlife. The correct placement can help you get clear, engaging photos. It can also help you understand animal behavior. Below, we will discuss some key spots to place your trail cameras. This will help you make the most of your equipment.
Animal Habitats
Animal habitats are great locations for trail cameras. Look for areas where animals eat, sleep, or hide. These places are often near water sources, thick bushes, or nesting areas. Setting up your camera here can give you insight into their daily lives.
Natural Pathways
Natural pathways are another excellent spot for trail cameras. Animals often use the same trails to move around. These paths can be near streams, ridges, or clearings. Placing cameras on these routes can capture animals on the move. Aim your camera at a slight angle to catch more activity. This will increase your chances of getting great shots.
Understanding Animal Behavior
Understanding animal behavior is crucial for placing trail cameras. Animals follow patterns. They eat, drink, and move in predictable ways. By studying these habits, you can capture better footage.
Feeding Areas
Animals frequently visit feeding areas. These spots provide food sources like berries, nuts, or fallen fruit. Setting up trail cameras here can yield high activity. Look for signs like:
- Trampled grass
- Scattered seeds
- Animal tracks
These signs indicate a popular feeding spot. Place your camera at a height of 2-3 feet. Ensure it faces the area with the most activity. This placement maximizes your chances of capturing animals.
Water Sources
Water sources are hotspots for animal activity. Animals need water daily. They visit streams, ponds, and rivers often. Positioning your trail camera near water increases sightings.
Ideal locations include:
- Shallow banks
- Watering holes
- Small creeks
Place the camera 10-15 feet from the water. Angle it to capture the entire scene. This setup ensures clear, wide shots of animals as they drink or bathe.
Optimal Camera Height
Finding the optimal camera height is crucial for capturing the best wildlife photos. Depending on your target species, camera placement can vary. Here’s how to decide where to place your trail camera for the best results.
Ground Level
Setting your camera at ground level has its benefits. It is ideal for capturing small animals like rabbits or foxes. Placing the camera low gives a natural perspective of these creatures.
When setting up at ground level, ensure the camera is stable. Use a tripod or secure it to a solid object. This prevents the camera from tipping over. Keep in mind, ground-level cameras are more likely to catch motion. This can result in more images but may also capture false triggers.
Elevated Positions
Using elevated positions can offer a broader view. This is especially useful for larger animals like deer or elk. Mounting the camera higher reduces the chance of false triggers from small animals or wind. It also keeps the camera safe from curious animals.
When positioning your camera above ground, try to angle it slightly downward. This improves the field of view and captures more activity. Secure the camera to a tree or pole at least 4 to 6 feet high. This height is optimal for detecting movement from larger wildlife.
Here’s a quick comparison:
| Position | Best For | Tips |
|---|---|---|
| Ground Level | Small Animals | Use a tripod, check stability |
| Elevated Positions | Large Animals | Angle downward, secure properly |
Choosing the right height for your trail camera can enhance your wildlife photography. Adjust as needed based on your observations and the type of wildlife you aim to capture.

Credit: deerlab.com
Ideal Distance From Target
Choosing the ideal distance for placing your trail camera is crucial. It ensures you capture the best footage of wildlife. Whether you want close-up shots or wide-angle views, distance matters. Let’s explore the best distances for different scenarios.
Close Range
Placing your trail camera at close range has its benefits. It provides detailed images of animals. Set the camera 10 to 20 feet from the target. This distance captures clear, high-resolution photos. Perfect for identifying specific features. Close range also works well for monitoring feeders and trails.
Wide Angle Views
For a broader view, place your camera farther away. Set it 30 to 50 feet from the target. This distance captures more of the landscape. Ideal for observing animal behavior over a larger area. Wide-angle views help in spotting multiple animals at once. Great for monitoring open fields and large clearings.
Considering Camera Angle
Placing trail cameras correctly is vital for getting the best wildlife shots. The angle at which you position the camera can significantly impact the images you capture. Proper camera angle ensures clear and detailed photos or videos, capturing the essence of wildlife behavior. Let’s dive into the specifics of horizontal and vertical placement to maximize your trail camera’s potential.
Horizontal Placement
Horizontal placement involves setting the camera at a level parallel to the ground. This angle works best for capturing animals at eye level. It provides a natural and realistic perspective of wildlife.
Ensure the camera is stable and not tilted. A level camera avoids distorted images. Place it on a tree or a stable surface. Use a mounting bracket if necessary. Aim the camera slightly downward. This helps in capturing smaller animals that might pass by.
Vertical Placement
Vertical placement means angling the camera to face downward. This setup is useful for monitoring ground activity. It works well for capturing images of smaller animals. It also helps in areas with dense vegetation.
Mount the camera higher on a tree. Angle it downwards to cover the ground. This placement can also help avoid detection by animals. It reduces the chance of your camera being tampered with.
Both horizontal and vertical placements have their benefits. The choice depends on the wildlife you wish to capture. Adjust the angle to suit your specific needs.
Credit: exodusoutdoorgear.com
Minimizing Human Scent
Minimizing human scent is crucial when placing trail cameras. Wildlife can detect and avoid human odors. This results in fewer captures. Here are some essential tips to reduce your scent.
Wearing Gloves
Always wear gloves while handling trail cameras. This prevents your scent from transferring to the camera. Opt for latex or rubber gloves. They block scent better than fabric gloves.
Scent-free Products
Use scent-free products before heading into the wild. Scent-free soaps, shampoos, and deodorants help reduce your odor. Spray your clothes with scent eliminator. This adds an extra layer of protection. Also, store your gear in a scent-free container. This keeps unwanted smells at bay.
Monitoring And Maintenance
Placing trail cameras is only the first step in wildlife monitoring. To get the best results, you need to keep an eye on your cameras. Regular checks and proper battery management are essential. This ensures your cameras work effectively throughout the season.
Regular Checks
Regularly checking your trail cameras is crucial. It helps you identify any issues early. Check the camera for:
- Physical damage
- Lens obstructions
- Memory card space
Visit your cameras at least once every two weeks. This ensures they’re functioning properly and capturing clear images. If your area has bad weather, check more often. This helps prevent damage from rain or snow.
Battery Life Management
Batteries are the lifeline of your trail cameras. Managing battery life is important to avoid missing crucial footage. Here are some tips:
- Use high-quality batteries. Lithium batteries last longer than alkaline.
- Check battery levels during each visit.
- Replace batteries if they fall below 50%. This prevents sudden shutdowns.
Consider using a solar panel if your camera supports it. This can extend battery life significantly. Always carry spare batteries during your checks. This ensures you can replace them on the spot.
Credit: www.bowsite.com
Seasonal Adjustments
Trail camera placement varies with the seasons. Animals change their habits based on weather and food sources. Adjusting camera locations ensures better wildlife photos and videos. Here is a guide for placing your trail cameras during winter and summer.
Winter Placement
In winter, animals seek warmth and shelter. Place trail cameras near bedding areas. Deer and other wildlife often stay in dense forests. These areas provide protection from the cold. Focus on southern-facing slopes. They receive more sunlight, making them warmer.
Another good spot is near food sources. Animals look for food that is still available. Set up cameras near berry bushes and evergreen plants. You might also find animals near water sources. Streams and rivers do not freeze completely. Wildlife visits these areas to drink.
Summer Placement
Summer brings different challenges and opportunities. Animals move to stay cool and find food. Place trail cameras near water sources. Lakes, ponds, and rivers attract wildlife. They come to drink and cool off. Capture great photos and videos in these spots.
Look for shady areas under large trees. Animals rest here to escape the heat. Trails and paths through the forest are also good locations. Wildlife uses them to travel between feeding and resting spots. Setting up cameras along these trails can yield excellent results.
Frequently Asked Questions
Where Should I Place Trail Cameras?
Place trail cameras near water sources, trails, and feeding areas. Ensure they are at animal height and camouflaged.
How High Should Trail Cameras Be?
Mount trail cameras at chest height, around 3 to 4 feet. This height captures clear images of passing wildlife.
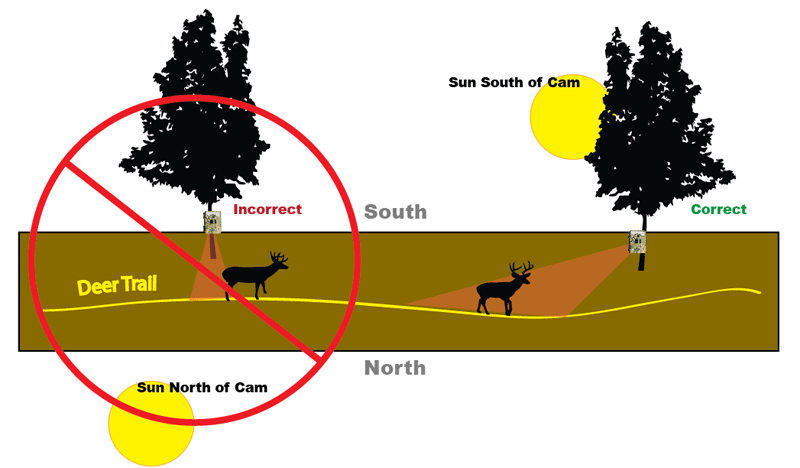
What Direction Should Trail Cameras Face?
Face trail cameras north or south. This avoids direct sunlight, which can cause overexposure and unclear photos.
How To Hide Trail Cameras From Animals?
Camouflage trail cameras using natural materials like leaves and branches. Avoid placing them directly in animal paths.
Conclusion
Placing trail cameras correctly boosts your wildlife tracking success. Find spots with animal activity. Look for signs like tracks and droppings. Position cameras at the right height. Avoid direct sunlight for clear images. Check and adjust placements regularly. Simple steps lead to better results.
Enjoy capturing nature’s beauty. Happy wildlife watching!
As an Amazon Associate, I earn from Qualifying Purchases.