
Setting up a trail camera can seem tricky at first. But with the right steps, it becomes easy and fun.
Trail cameras are great tools for observing wildlife or keeping an eye on your property. These devices capture photos or videos whenever movement is detected. Whether you are a hunter, nature enthusiast, or just curious about the animals in your area, a trail camera can offer valuable insights.
In this guide, you will learn the basics of setting up a trail camera. We will cover everything from choosing the right location to adjusting settings for the best results. By the end, you will feel confident in setting up your own trail camera. Let’s get started!
Credit: www.bowsite.com
Choosing The Right Trail Camera
Choosing the right trail camera can enhance your outdoor adventures. The right camera helps you capture the best wildlife moments. This section will help you choose the right trail camera.
Types Of Trail Cameras
There are different types of trail cameras to consider. Each type serves a different purpose. Understanding these types can help you make an informed choice.
The first type is the standard infrared camera. It captures photos using infrared light. This makes it great for nighttime use. Another type is the no-glow infrared camera. It uses a no-glow LED flash. This camera is ideal for not disturbing wildlife.
Next, there are cellular trail cameras. They can send images directly to your phone. This type is useful for remote monitoring. Lastly, there are wireless trail cameras. They connect to Wi-Fi. You can access them through an app on your smartphone.
Key Features To Consider
When choosing a trail camera, consider its features. The first feature to look at is the resolution. Higher resolution means clearer images. Look for cameras with at least 10 megapixels.
Another important feature is trigger speed. This is the time it takes for the camera to snap a photo. Faster trigger speed means you won’t miss any action. Choose a camera with a trigger speed of less than one second.
Battery life is also crucial. Longer battery life means less frequent changes. Some cameras use AA batteries, while others use rechargeable ones.
Storage capacity is another key feature. Cameras with more storage can hold more photos and videos. Look for cameras that support SD cards with at least 32 GB capacity.
Lastly, consider the camera’s durability. It should withstand harsh weather conditions. Look for cameras with waterproof and dustproof ratings.

Credit: www.northamericanwhitetail.com
Selecting The Ideal Location
Setting up a trail camera involves many steps. Selecting the ideal location is crucial. This ensures you capture the best wildlife images. Let’s dive into how to pick the perfect spot.
Scouting The Area
Begin by exploring the area. Look for signs of wildlife. Search for tracks, droppings, or trails. These signs indicate animal activity. Choose a location where these signs are frequent. This increases the chances of capturing great photos.
Consider the landscape. Open fields, dense forests, and water sources attract different animals. Think about which animals you want to capture. Match the environment to your target species. This helps you get the best shots.
Evaluating Animal Activity
Observe animal behavior. Are they active in the morning or evening? Knowing this helps you place your camera at the right time. Pay attention to feeding and drinking spots. Animals often return to these places.
Use a field notebook. Record your observations. Note the time and type of activity. This helps in planning your camera setup. The more data you gather, the better your chances.
Check for natural funnels. Animals use these to move between areas. Trails, streams, and ridge lines are good places. Placing your camera here increases the likelihood of capturing images.
Mounting The Camera
Mounting the camera is a crucial step in setting up your trail camera. Proper mounting ensures you capture clear and useful images. It also helps protect the camera from weather and wildlife. Follow these steps for the best results.
Choosing The Right Height
Choose the right height for optimal coverage. Mount your camera around 3 to 4 feet off the ground. This height works well for capturing images of deer and other wildlife. It provides a good view of the area without being too noticeable.
If you aim to capture smaller animals, consider mounting it lower. For larger animals, a slightly higher position might be better. Always test the height before finalizing the position. Check the camera’s field of view to ensure it covers the desired area.
Securing The Camera
Secure the camera firmly to avoid movement. Use a sturdy strap or bungee cords to attach it to a tree or post. Make sure the camera is stable and won’t shift with wind or animal contact. A loose camera can result in blurry images.
Consider using a security box for added protection. This prevents theft and damage from animals. Ensure the box doesn’t obstruct the camera’s lens or sensors. Finally, double-check the camera’s angle and make any necessary adjustments.
Setting Up The Camera Settings
Properly setting up your trail camera settings can make a big difference. It ensures you capture the best quality photos and videos. This section will guide you through essential settings adjustments.
Adjusting Resolution And Image Quality
First, adjust the resolution and image quality. High resolution means clearer images. But it also uses more storage. Choose a balance between clarity and storage space. For most users, a medium resolution works well. It provides good quality images without filling the memory card too quickly.
Configuring Detection Settings
Next, configure the detection settings. These settings control how and when your camera takes photos. Adjust the sensitivity based on the location. High sensitivity is good for areas with less movement. Lower sensitivity helps in busy spots. This prevents too many false triggers. Set the detection delay to manage how often the camera takes pictures. A short delay captures more images but uses more battery.
Powering The Camera
Powering your trail camera is crucial for its performance and longevity. The right power source ensures your camera runs smoothly and captures the best shots. Let’s explore the different ways to power your trail camera.
Battery Types And Options
Trail cameras often use different types of batteries. Knowing your options helps in making an informed choice.
- Alkaline Batteries: These are common and cheap. They work well in moderate temperatures.
- Lithium Batteries: These last longer and perform better in extreme temperatures. They are more expensive than alkaline batteries.
- Rechargeable Batteries: These are eco-friendly and cost-effective in the long run. They need a charger and regular maintenance.
Using Solar Panels
Solar panels are an excellent option for powering your trail camera. They provide a renewable energy source and reduce the need for frequent battery changes.
- Choose a Compatible Solar Panel: Ensure the solar panel is compatible with your trail camera.
- Positioning: Place the solar panel in an area with direct sunlight. This ensures maximum energy absorption.
- Connect the Solar Panel: Use the provided cables to connect the solar panel to your camera. Check the connections to avoid any power issues.
- Monitor the Battery Level: Regularly check the battery level. Ensure the solar panel is charging the camera effectively.
Using solar panels can save you money and effort in the long run. It is an eco-friendly way to keep your trail camera powered.

Credit: life.hawkeoptics.com
Testing And Troubleshooting
Setting up a trail camera doesn’t end with mounting it. Testing and troubleshooting are key steps. These steps ensure your camera captures the best footage. Let’s explore how to perform test runs and fix common issues.
Performing Test Runs
After mounting the camera, turn it on. Walk in front of it to trigger the sensor. Check the captured images or videos. This helps you see if the camera angle is correct. Adjust the camera if the footage is not clear. Repeat the process until satisfied.
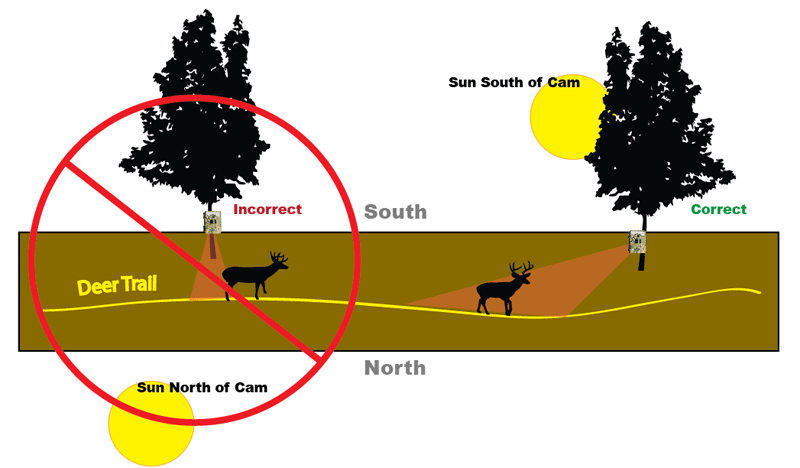
Test during different times of the day. Morning, noon, and evening light can affect footage. Ensure the camera works well in all conditions. This helps capture clear images day and night.
Common Issues And Fixes
Sometimes, trail cameras face issues. Blurry images are common. Clean the lens with a soft cloth. Make sure the camera is stable. Movement can cause blurriness.
Another issue is the camera not triggering. Check the batteries. Low batteries can affect performance. Replace them if needed. Ensure the motion sensor is not blocked. Clear any debris in front of it.
If the camera captures too many empty shots, it may be too sensitive. Adjust the sensitivity settings. Lowering sensitivity can reduce empty shots.
Lastly, check the memory card. Sometimes, it can be full. Replace or clear the card to make space for new footage. Ensure the card is correctly inserted. A loose card can cause errors.
Maintaining Your Trail Camera
Maintaining your trail camera ensures it works efficiently and lasts longer. Regular checks and proper cleaning keep it in top condition. Here’s how you can take care of your trail camera.
Regular Inspections
Inspect your trail camera every few weeks. Check for any damage or wear. Look for cracks, loose parts, or rust. Ensure the battery compartment is dry and free of corrosion. Test the camera to make sure it powers on and captures clear images.
Cleaning Tips
Clean your trail camera to keep it functioning well. Use a soft cloth to wipe the exterior. Avoid harsh chemicals; they can damage the camera. Clean the lens with a lens-safe cleaner. Keep the sensor and battery compartment dry. Remove any dirt or debris from these areas.
Analyzing Captured Data
Once your trail camera has captured images and videos, the next step is to analyze the data. This process helps you understand animal behavior, track patterns, and make informed decisions. By carefully reviewing and recording the data, you can gain valuable insights into wildlife activity in your area.
Reviewing Images And Videos
Start by downloading the images and videos from your trail camera. Use a computer or a compatible device for better visibility. Look for clear and well-lit images. These provide the most information. Pay attention to the timestamp on each file. This helps identify the time of day animals are most active.
Sort the images and videos into folders based on the type of wildlife captured. Create folders for different animal species. For example, have separate folders for deer, birds, and other wildlife. This organization makes it easier to analyze the data later.
Use photo editing software if needed. Enhance the images for better clarity. Zoom in to observe details like animal markings or behavior. Take notes on any interesting observations. This detailed review process helps in gathering accurate data.
Recording Observations
After reviewing the images and videos, record your observations. Use a spreadsheet or a wildlife journal. This helps keep track of important details. Include information like the date, time, and location of each sighting. Note the type of animal and any specific behavior observed.
| Date | Time | Location | Animal Type | Behavior |
|---|---|---|---|---|
| 2023-10-01 | 06:30 AM | North Trail | Deer | Grazing |
| 2023-10-02 | 08:00 PM | South Trail | Fox | Hunting |
Use bullet points for quick observations. For example:
- Deer spotted grazing at dawn
- Fox hunting at dusk
This systematic recording aids in identifying patterns over time. It helps in understanding animal habits and preferences. Consistent observation and recording lead to better wildlife management and conservation efforts.
Frequently Asked Questions
How Do You Set Up A Trail Camera?
To set up a trail camera, choose a strategic location. Mount it securely on a tree or post. Adjust the camera height and angle. Ensure the camera is aimed at your desired target area.
What Is The Best Height For A Trail Camera?
The best height for a trail camera is about 3 to 4 feet. This height helps capture clear images of wildlife. Adjust based on the specific animal activity in the area.
How To Position A Trail Camera For Deer?
Position your trail camera facing trails, feeding areas, or water sources. Set it at a 45-degree angle to the trail. This positioning increases the chances of capturing clear, full-body shots of deer.
How Often Should I Check My Trail Camera?
Check your trail camera every 1 to 2 weeks. This frequency prevents disturbing wildlife too much. Regular checks ensure the camera is functioning correctly and has sufficient battery life and storage.
Conclusion
Setting up a trail camera can be easy. Follow the steps mentioned. Choose a good location. Check the camera settings. Secure it properly. Regularly monitor the camera. This ensures better results. Enjoy capturing stunning wildlife moments. Happy trail camera setup!
As an Amazon Associate, I earn from Qualifying Purchases.