
Finding the camera settings on a Mac can be confusing. Many users search for this information.
Whether you need to adjust your camera for a video call or tweak settings for a project, knowing where to find these options is crucial. Mac computers have built-in tools to manage camera settings, but they are not always easy to locate.
This guide will help you navigate through your Mac to find and adjust your camera settings. By the end, you will know exactly where to go and what to do. Stay with us as we explore the steps to access and change camera settings on your Mac.
Accessing Camera Settings
Finding the camera settings on your Mac can be easy. This guide will show you the steps to access these settings. We’ll cover the necessary steps under different sections. Let’s start with System Preferences and Privacy Settings.
System Preferences
To access your camera settings, first, go to System Preferences. Follow these steps:
- Click on the Apple logo at the top left corner of your screen.
- Select “System Preferences” from the drop-down menu.
- In the System Preferences window, locate the “Security & Privacy” option.
Now, we will check the privacy settings for the camera.
Privacy Settings
In the Security & Privacy section, follow these steps:
- Click on the “Privacy” tab at the top.
- On the left-hand side, find and click on “Camera”.
- You will see a list of apps that have access to your camera.
To allow or deny access, check or uncheck the boxes next to each app. Make sure to lock the padlock icon at the bottom to save changes.
Understanding these settings helps you control which apps can use your Mac’s camera. It keeps your privacy safe.
Enabling Camera
Enabling the camera on your Mac is essential for various tasks. This includes video calls, capturing photos, and recording videos. Knowing where to find and how to activate these settings is crucial. Follow these steps to ensure your camera functions properly.
App Permissions
First, open the System Preferences on your Mac. Then, click on “Security & Privacy.” In this window, select the “Privacy” tab. Scroll down and click on “Camera.” You will see a list of apps that have requested access to your camera. Check the box next to the apps you want to grant access to. Ensure the apps you frequently use have camera permissions enabled.
Security Preferences
Next, make sure your Mac’s security settings allow camera access. Go back to the “Security & Privacy” settings. Click on the “General” tab. Here, you may need to unlock the settings by clicking the lock icon in the bottom left corner. Enter your administrator password to make changes. Adjust the settings to ensure your camera is enabled and secure. This step helps protect your privacy while allowing necessary access.
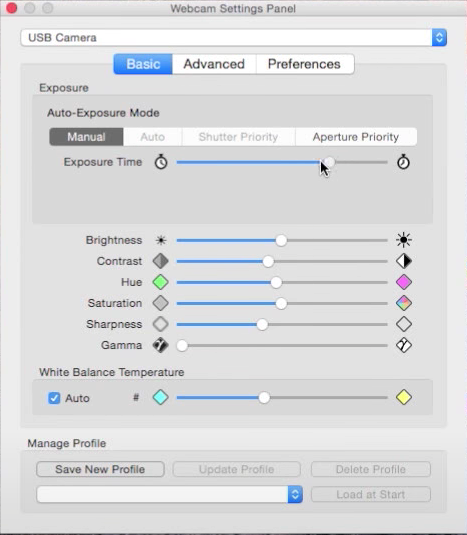
Adjusting Camera Quality
Adjusting camera quality on a Mac can make your video calls sharper. Better video quality enhances your professional presence. Here’s how to adjust various settings to improve camera quality.
Resolution Settings
Resolution affects the clarity of your video. A higher resolution provides a clearer image. To adjust the resolution, open the application you use. Navigate to the settings or preferences. Look for camera or video settings. Choose the highest resolution available. This setting might be listed as 720p, 1080p, or even higher.
Brightness And Contrast
Brightness and contrast settings control the light and dark areas of your video. Proper brightness makes you visible. Proper contrast adds depth to the image. Open the camera app or the settings in your video call app. Find the brightness and contrast settings. Adjust the sliders until the image looks balanced. Do not make it too bright or too dark.

Credit: support.pitchvantage.com
Using Camera With Apps
Using the camera on your Mac can enhance many activities. Whether it’s video calls or snapping quick photos, knowing how to access and use the camera settings with various apps is essential. Let’s explore how to use your camera effectively with some popular Mac apps.
Video Conferencing
Video conferencing apps like Zoom, Skype, and FaceTime rely on your Mac’s camera. First, open your preferred video conferencing app. Then, navigate to the settings or preferences menu. Look for the video or camera settings. Here, you can adjust your video quality. Ensure your camera is selected as the video source. This step ensures your video feed is clear during calls.
Photo Booth
Photo Booth is a fun app for taking photos and recording videos. Open the Photo Booth app from your Applications folder. The app will automatically access your camera. You can choose between photo or video mode at the bottom of the screen. To adjust settings, click on the camera icon. Here, you can select different effects and filters. Experiment with these to create unique photos and videos. Remember, good lighting improves image quality.
Troubleshooting Camera Issues
Experiencing camera issues on your Mac can be frustrating, especially when you need it for important meetings or personal use. This section will guide you through troubleshooting camera issues on your Mac, making it easier to identify and resolve common problems.
Common Problems
Mac users often encounter several common problems with their camera, including:
- Camera not working or not detected
- Image quality issues
- Camera being used by another application
- Software conflicts
- Outdated camera drivers
Solutions And Tips
Here are some effective solutions and tips to resolve these issues:
- Restart your Mac: A simple restart can often fix minor glitches.
- Update macOS: Ensure your system is up-to-date by checking for software updates.
- Check Privacy Settings: Go to
System Preferences > Security & Privacy > Camerato ensure the app has camera access. - Close Other Applications: Ensure no other applications are using the camera.
- Reset the SMC: Resetting the System Management Controller (SMC) can resolve hardware-related issues.
Follow these steps to reset the SMC:
- Shut down your Mac.
- Disconnect the power adapter.
- Hold the Shift + Control + Option keys and the power button for 10 seconds.
- Release all keys and reconnect the power adapter.
- Turn on your Mac.
If the camera issues persist, consider visiting an Apple Store or contacting Apple Support for further assistance.
Credit: www.fineshare.com
Enhancing Camera Performance
Enhancing the performance of your Mac’s camera can make a big difference in video calls, recordings, and photography. Understanding how to optimize the settings and make use of additional tools can lead to a more professional and polished output. Let’s dive into some key aspects of enhancing your Mac’s camera performance.
Software Updates
Regular software updates are crucial for maintaining optimal camera performance on your Mac. Apple frequently releases updates that include performance enhancements and bug fixes.
To check for updates, follow these steps:
- Click on the Apple menu in the top-left corner of the screen.
- Select System Preferences.
- Click on Software Update.
- If updates are available, click Update Now.
Updating your macOS ensures that your camera is running on the latest firmware, which can improve its performance and stability.
Third-party Apps
Third-party apps can significantly enhance your Mac’s camera capabilities. These apps offer advanced features that are not available in the default camera app.
Here are some popular third-party camera apps:
| App Name | Key Features |
|---|---|
| EpocCam | Turns your phone into a webcam |
| iGlasses | Advanced camera adjustments |
| ManyCam | Custom backgrounds and effects |
Using these apps, you can adjust brightness, contrast, and saturation to enhance your video quality. They also offer features like virtual backgrounds and special effects, making your video calls and recordings more engaging.
Camera Shortcuts And Tips
Accessing camera settings on a Mac is easy with the right shortcuts and tips. You can quickly adjust settings, capture snapshots, and enhance your video calls. Let’s explore some useful shortcuts and tips.
Keyboard Shortcuts
Keyboard shortcuts help you save time. Here are some essential shortcuts:
- Command (⌘) + Shift + 5: Open the screenshot toolbar.
- Command (⌘) + Option + 8: Invert screen colors.
- Command (⌘) + Option + F: Open the Find window to search for files or text.
These shortcuts let you access features quickly. Practice these commands to become more efficient.
Quick Access Tips
For quick access to camera settings, follow these tips:
- System Preferences: Click on the Apple menu, select System Preferences, then choose Security & Privacy. Go to the Camera tab to adjust permissions.
- Camera Apps: Use apps like Photo Booth or FaceTime. Open the app and click on the Video menu to adjust settings.
- Control Center: Click on the Control Center icon in the menu bar. You can quickly turn the camera on or off from here.
These tips ensure you can adjust your camera settings swiftly. Familiarize yourself with these options to improve your workflow.
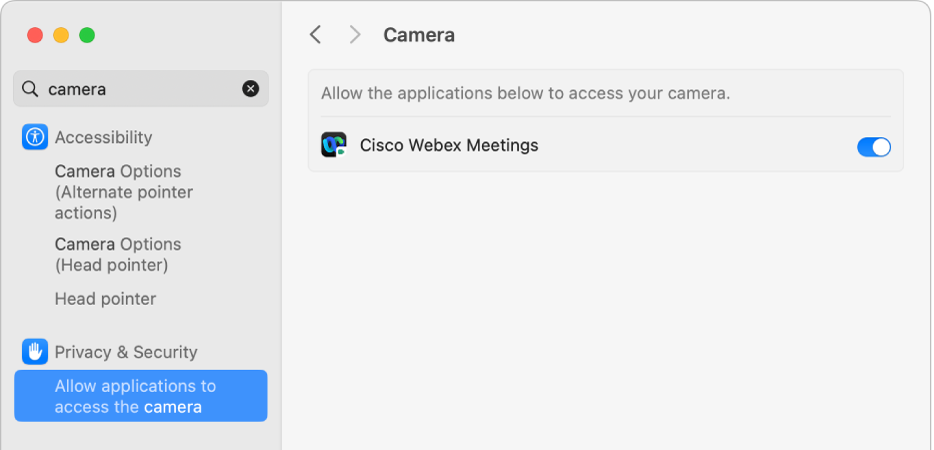
Privacy And Security
Privacy and security are essential when using any device. This includes managing your camera settings on a Mac. Ensuring your camera is secure protects your personal space. It also prevents unauthorized access and potential misuse. Let’s explore the key aspects of camera privacy and security on a Mac.
Camera Indicator Light
The camera indicator light is a built-in security feature. It lights up when the camera is active. This ensures you know when the camera is on. No one can secretly use your camera without you noticing. The light is a visual cue for your safety.
App Monitoring
Mac allows you to control which apps can access your camera. Go to System Preferences. Click on Security & Privacy. Then, choose the Camera option. Here, you can see the list of apps with camera access. You can enable or disable access for each app. This keeps your camera secure from unwanted apps.
Credit: support.apple.com
Frequently Asked Questions
How To Access Camera Settings On Mac?
To access Camera settings on a Mac, open System Preferences. Then, go to Security & Privacy, and select the Camera tab. Here, you can manage which apps have access to your camera.
Where To Find Camera Permissions On Mac?
Find Camera permissions on your Mac by opening System Preferences. Next, select Security & Privacy, and click on the Camera tab. You’ll see a list of apps with camera access.
Can I Change Camera Settings On Mac?
Yes, you can change Camera settings on your Mac. Open System Preferences, go to Security & Privacy, then select the Camera tab. Adjust permissions as needed.
How Do I Allow Camera Access On Mac?
To allow Camera access on your Mac, open System Preferences. Go to Security & Privacy, select the Camera tab, and check the box next to the desired app.
Conclusion
Finding camera settings on your Mac is easy with this guide. Access System Preferences, then Security & Privacy. Ensure apps have camera permission. Check FaceTime, Photo Booth, and other apps. Adjust settings as needed. Now, you’re ready to capture moments with your Mac.
Enjoy seamless video calls and photos. Keep exploring your Mac’s features for more possibilities. Happy snapping!
As an Amazon Associate, I earn from Qualifying Purchases.