
Using off-camera flash can take your photography to the next level. It provides control over lighting, creating stunning images.
Understanding when to use off-camera flash is crucial for photographers. It helps in achieving the perfect balance of light and shadows. Whether shooting portraits, events, or creative projects, knowing the right moments to employ this technique makes a difference. Off-camera flash adds depth, dimension, and drama to your shots.
It allows you to manipulate light in ways an on-camera flash cannot. This blog will guide you through the scenarios where off-camera flash shines. You’ll learn how to use it to enhance your photography skills, creating more professional and captivating images. Let’s dive into the world of off-camera flash and explore its benefits.
Introduction To Off-camera Flash
Lighting plays a vital role in photography. Using an off-camera flash can transform your images. It’s an essential technique for photographers. Let’s dive into the basics of off-camera flash.
Benefits Of Off-camera Flash
An off-camera flash offers many advantages. It allows control over light direction. This flexibility helps create dramatic effects. Shadows and highlights can be managed better. It also improves image depth. Natural light limitations are no longer a problem. You can shoot in low light easily.
Common Misconceptions
Many believe off-camera flash is complex. This is not true. With practice, it becomes simple. Another misconception is the cost. Affordable options are available. Some think it’s only for professionals. Amateur photographers can benefit too. Some fear harsh lighting results. Proper techniques ensure soft, flattering light.
Essential Gear
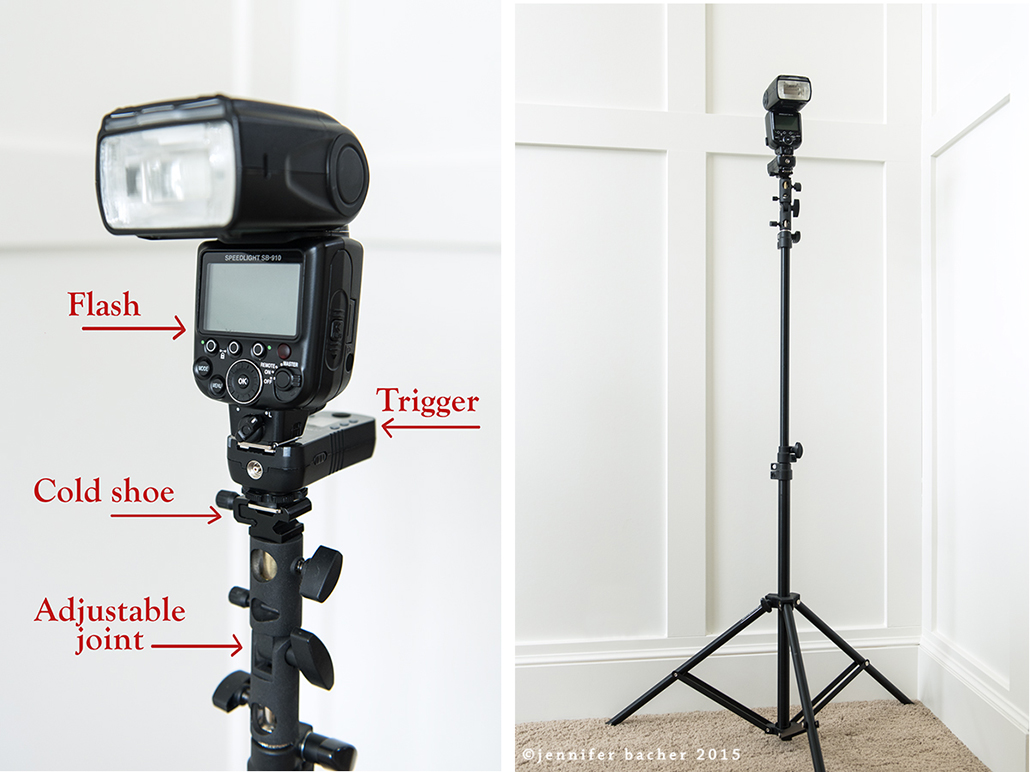
Using off-camera flash can transform your photography. It adds depth, dimension, and drama to your images. To start using off-camera flash, you need essential gear. This includes flash units, triggers, and receivers.
Flash Units
Flash units are the most important part of off-camera lighting. They provide the light source. There are two main types: speedlights and studio strobes.
- Speedlights: These are small, portable, and battery-operated. They are great for on-the-go photography. They attach to your camera’s hot shoe or stand-alone.
- Studio Strobes: These are larger and more powerful. They need an external power source. They are ideal for studio work and controlled environments.
Consider the type of photography you do. Choose flash units that suit your needs and style.
Triggers And Receivers
Triggers and receivers let you control your flash units remotely. They communicate between your camera and the flash.
- Triggers: These attach to your camera’s hot shoe. They send a signal to the receiver to fire the flash.
- Receivers: These attach to your flash units. They receive the signal from the trigger and activate the flash.
You can find triggers and receivers in different types. Some use radio frequency, others use infrared. Radio frequency triggers are more reliable and have a longer range.
Here is a table for quick comparison:
| Type | Range | Reliability |
|---|---|---|
| Radio Frequency | Long | High |
| Infrared | Short | Medium |
Choosing the right triggers and receivers ensures consistent and reliable flash performance.
Setting Up Your Flash
Setting up your flash can transform your photography. Proper setup ensures you achieve the desired lighting effect. Whether you are taking portraits or product shots, correctly positioning and adjusting your flash is crucial. Let’s break it down into essential steps.
Positioning The Flash
Positioning your flash correctly can make a significant difference. Here are some tips:
- Start with the Flash to the Side: Place the flash at a 45-degree angle to your subject. This creates depth and reduces harsh shadows.
- Elevate the Flash: Positioning the flash above your subject can help mimic natural sunlight.
- Use a Light Stand: Utilize a light stand to hold the flash in place. This provides stability and consistency.
Adjusting Flash Power
Adjusting the flash power is key to achieving the right exposure. Follow these steps:
- Start with Low Power: Begin with the flash set to a low power setting, such as 1/16.
- Take Test Shots: Capture a few test shots to see how the light falls on your subject.
- Increase Power Gradually: Adjust the flash power in small increments until you reach the desired lighting.
Proper flash setup can elevate your photography. Experiment with different positions and power settings to find what works best for your style.
Credit: clickitupanotch.com
Creative Lighting Techniques
Creative lighting techniques can transform ordinary photos into stunning works of art. Off-camera flash provides flexibility and control over light. It allows photographers to experiment with different effects and styles. Understanding how to use this tool effectively can elevate your photography skills.
Using Softboxes And Umbrellas
Softboxes and umbrellas diffuse light, creating a softer and more even look. Softboxes are great for portraits, as they minimize harsh shadows. They help in achieving a natural and flattering light. Umbrellas are versatile and easy to set up. They can be used for both indoor and outdoor shoots. Both tools help to control the direction and intensity of the light. Experiment with different sizes and angles to find the perfect setup.
Creating Dramatic Shadows
Dramatic shadows add depth and interest to photos. Position the flash at an angle to create strong, defined shadows. This technique works well for black-and-white photography. It emphasizes textures and shapes. Adjust the distance between the flash and the subject for more or less shadow. Play with different angles to achieve a unique look. Practice makes perfect when creating dramatic effects.
Balancing Ambient And Flash Light
Balancing ambient and flash light is vital for stunning photos. It helps create depth and drama. Using both light sources effectively can transform an image. The key is to blend them seamlessly. This guide will help you achieve balance.
Using Manual Settings
Manual settings give you control over your camera. Adjusting the shutter speed, aperture, and ISO is necessary. Start by setting the camera to manual mode. This ensures consistent exposure.
Set the shutter speed to control ambient light. Use a slower speed for more ambient light. A faster speed reduces ambient light. Adjust the aperture to control depth of field. A wider aperture lets in more light.
Controlling Exposure
Balancing exposure is crucial. Adjust the flash output to match ambient light. Start with a low flash power. Increase it gradually while checking results.
Use a light meter to measure light. This helps ensure correct exposure. Adjust flash settings based on the meter reading. Take test shots and review the histogram.
The histogram shows the light distribution. Aim for a balanced histogram. Avoid overexposure and underexposure.
Experiment with different settings. Practice makes perfect. Keep adjusting until you achieve the desired balance.
Portrait Photography Tips
Portrait photography can be a challenge, but using an off-camera flash can enhance your photos. Proper lighting will make your portraits stand out. Here are some tips for using off-camera flash to create stunning portraits.
Creating Soft Light
Soft light is essential for flattering portraits. It reduces harsh shadows and highlights the subject’s features. Use a diffuser or softbox with your off-camera flash to create soft light. This will spread the light evenly, making the portrait look natural.
Position the flash at a 45-degree angle to your subject. This angle helps in creating soft, even light. Experiment with different distances from your subject to achieve the perfect softness.
Adding Depth With Shadows
Shadows add depth and dimension to portraits. They can make your subject look more three-dimensional. Use the off-camera flash to control shadow placement.
Place the flash to the side or above your subject. This will create shadows that add depth. Adjust the flash’s power to control the intensity of the shadows. A lower power setting will create softer shadows.
Try using a reflector to bounce light back onto your subject. This will help in controlling the shadows and adding a natural look to your portrait.
Here is a quick summary:
| Tip | Action |
|---|---|
| Create Soft Light | Use a diffuser or softbox, position flash at 45-degree angle |
| Add Depth with Shadows | Place flash to the side or above, use a reflector |
Outdoor Lighting Challenges
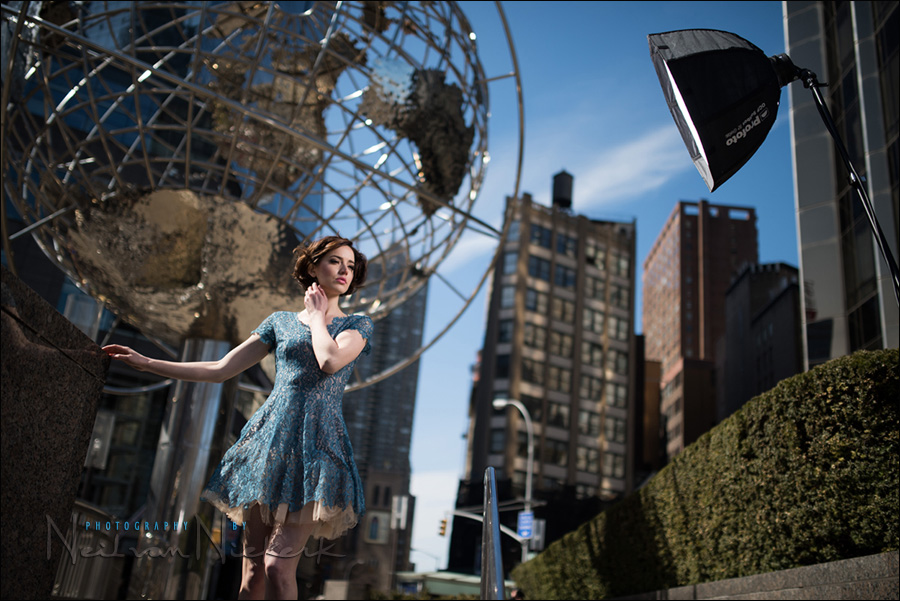
Outdoor lighting challenges can make photography tricky. The sun’s position changes throughout the day. This can create harsh shadows or overexposed areas. Understanding how to manage these issues is key for great outdoor shots. One effective solution is using off-camera flash. This can help balance the light and improve your photos. Below, we explore dealing with sunlight and using reflectors.
Dealing With Sunlight
The sun can be both a friend and a foe. Direct sunlight can create harsh shadows and bright spots. These can ruin an otherwise perfect shot. To deal with this, use off-camera flash. Position the flash to fill in shadows. This balances the light and makes your subject look better.
Another tip is to shoot during the golden hour. This is the time shortly after sunrise or before sunset. The light is softer and more flattering then. Off-camera flash can enhance this natural light. It adds depth and detail to your photos.
Using Reflectors
Reflectors are simple tools that can make a big difference. They bounce light onto your subject, reducing shadows. Use them with off-camera flash for the best results. Place the reflector opposite the flash. This fills in shadows and creates even lighting.
Reflectors come in various colors. Silver reflectors create a bright, neutral light. Gold reflectors add a warm tone. White reflectors produce soft, natural light. Choose the one that fits your scene best. Combining reflectors with off-camera flash gives you more control over the light.

Credit: m.youtube.com
Post-processing Tips
Post-processing can significantly enhance your off-camera flash photos. It helps bring out the best in your shots. This section will provide valuable tips for enhancing flash effects and correcting exposure during post-processing.
Enhancing Flash Effects
Use software like Adobe Lightroom to enhance flash effects. Begin by adjusting the highlights and shadows. This will balance the light in your images. Increase the clarity to make details stand out. Experiment with the contrast slider. It can help make the flash effect more pronounced.
Consider using the brush tool. This helps to selectively enhance areas lit by the flash. Adjust the exposure and highlights within the brush settings. This can make the flash-lit areas pop. Finally, add a slight vignette. This focuses attention on the subject.
Correcting Exposure
Correcting exposure is crucial for a balanced image. Start with the basic panel in Lightroom. Adjust the exposure slider to achieve the right brightness. Use the histogram as a guide. It helps in ensuring no part of the image is overexposed or underexposed.
Check the whites and blacks in the image. Adjust these sliders to ensure a good range of tones. Fine-tune the highlights and shadows. This helps in bringing out more details. Finally, use the adjustment brush. Correct any local exposure issues this way. This ensures a well-balanced image.
Common Mistakes To Avoid
Using off-camera flash can elevate your photography. But, making mistakes can ruin your shots. Let’s dive into some common errors photographers make and how you can avoid them.
Overpowering The Subject
One frequent mistake is overpowering the subject with too much light. This can wash out details and make your photos look harsh.
To avoid this, adjust the flash power to a lower setting. Use a light meter to measure the correct exposure. This ensures your subject is well-lit but not overexposed.
Another tip is to use a diffuser. This softens the light and creates a more natural look. You can use items like softboxes or umbrellas for this purpose.
Ignoring Background Lighting
Many photographers focus only on the subject and ignore background lighting. This can result in a well-lit subject but a dark, unappealing background.
To fix this, pay attention to the ambient light. Use your camera settings to balance the background exposure with the flash. This creates a more cohesive and attractive image.
You can also add extra lights to the background. This adds depth and makes your photos more interesting. Remember, the background is just as important as the subject.
Credit: neilvn.com
Frequently Asked Questions
What Is Off Camera Flash Used For?
Off camera flash is used to create dynamic lighting. It helps in adding depth and dimension to photos. It also allows for more creative control over lighting.
When Should You Use Off Camera Flash?
Use off camera flash in low light situations. It’s also beneficial for portrait photography. It enhances the quality of lighting and reduces harsh shadows.
How Does Off Camera Flash Improve Photos?
Off camera flash improves photos by providing better lighting control. It reduces harsh shadows and highlights details. It also adds depth and dimension to the subject.
Is Off Camera Flash Necessary For Beginners?
Off camera flash is not necessary for beginners, but it’s beneficial. It helps in learning advanced lighting techniques. It also enhances the quality of photos significantly.
Conclusion
Off camera flash can transform your photography. It adds depth and creativity. Use it to control light direction. Experiment with shadows and highlights. Capture stunning portraits and dynamic scenes. Practice makes perfect. Start with simple setups. Improve gradually. Explore various techniques.
Your photos will stand out. Off camera flash offers endless possibilities. Embrace the learning process. Have fun with your camera. Happy shooting!
As an Amazon Associate, I earn from Qualifying Purchases.