The iPhone camera is a powerful tool. Many users don’t maximize its potential.
Your iPhone camera can do much more than just snap quick photos. With the right tips and tricks, you can capture stunning images. Whether you are a beginner or have some experience, there are ways to enhance your photography skills.
This guide will help you explore the features and settings of your iPhone camera. Learn how to take beautiful pictures, improve your techniques, and make the most out of every shot. From adjusting the focus to using advanced modes, discover how to use your iPhone camera like a pro. Get ready to impress with your photography!
Credit: womenlovetech.com
Choosing The Right Settings
Your iPhone camera is a powerful tool. Yet, to get the best results, you need to choose the right settings. This can make a big difference in your photos and videos. Let’s explore two key settings: resolution options and frame rates.
Resolution Options
Resolution affects the detail of your photos. Higher resolution means more detail. You can change this in your camera settings. For most uses, 12MP is enough. If you need prints or detailed shots, go higher. Remember, higher resolution uses more storage space.
Frame Rates
Frame rates are key for videos. They determine how smooth your video looks. Common frame rates are 24, 30, and 60 frames per second (fps). For a cinematic look, use 24 fps. For everyday videos, 30 fps works well. For slow-motion effects, choose 60 fps or higher.
Mastering Focus And Exposure
The iPhone camera is powerful. But to get the best shots, you need to understand how to use focus and exposure. These two settings can make a huge difference. Learning to adjust them can elevate your photos from good to great. Let’s dive into mastering focus and exposure on your iPhone camera.
Manual Focus
Manual focus gives you control over what is sharp in your photo. Tap the screen where you want to focus. A yellow box will appear. This shows the focus point. Hold your finger on the focus point. The AE/AF Lock will appear at the top. This locks the focus. Now you can move your camera without losing focus.
Adjusting Exposure
Exposure controls the brightness of your photo. After setting the focus, a sun icon appears. This is next to the yellow box. Slide your finger up or down on the screen. Up to make the photo brighter. Down to make it darker. Adjust until the photo looks good.
Use exposure to highlight details. Too bright and you lose detail. Too dark and the photo looks gloomy. Find the right balance for a clear, detailed photo.
Utilizing Camera Modes
The iPhone camera is more than just a point-and-shoot device. By utilizing its various modes, you can capture stunning photos in any situation. Each mode is designed to enhance your pictures in specific ways. Let’s explore two of the most popular modes: Portrait Mode and Night Mode.
Portrait Mode
Portrait Mode is perfect for taking professional-looking photos of people. It adds a depth-of-field effect to your shots. This mode keeps the subject sharp and the background blurry. This creates a beautiful, focused image. To use Portrait Mode, open the camera app and swipe to Portrait. Make sure your subject is within eight feet. You will see the depth effect in action. Adjust the lighting effects for different looks. Try Natural Light, Studio Light, or Contour Light. Take your time and experiment with these options. Your photos will look amazing.
Night Mode
Night Mode helps you take clear photos in low light. It activates automatically when it gets dark. You will see a moon icon at the top of the screen. Hold your phone steady or use a tripod. The camera will adjust the exposure time based on the light. A longer exposure time means brighter pictures. You can also adjust the exposure time manually. Tap the moon icon and drag the slider. This helps you get the right amount of light. With Night Mode, you can capture stunning photos even in the dark.
Composing The Perfect Shot
Composing the perfect shot with your iPhone camera can be a game changer. Great composition transforms an ordinary photo into a stunning one. With a few easy tips, you can elevate your iPhone photography skills.
Rule Of Thirds
The Rule of Thirds helps create balanced and interesting photos. Imagine your screen divided into nine equal parts. Place your subject along these lines or at their intersections. This draws the viewer’s eyes naturally to the important parts of your photo.
Most iPhone cameras have a grid option. Activate it in your settings. This grid helps you apply the Rule of Thirds easily. Try positioning your subject off-center. This often results in a more engaging photo.
Leading Lines
Leading lines guide the viewer’s eyes through your photo. They can be roads, fences, or even shadows. These lines lead to the main subject, making your photo more compelling.
Use leading lines to add depth and dimension. Experiment with different angles and perspectives. This technique can turn a flat photo into a dynamic one.
Look for natural lines in your environment. Position them to draw attention to your subject. This simple tip can significantly improve your composition.
Enhancing Photos With Editing
Editing can turn a good photo into a great one. With your iPhone, you have many tools to edit your photos. This guide will help you use these tools to improve your pictures. Let’s explore how to enhance your photos using both built-in tools and third-party apps.
Built-in Tools
Your iPhone comes with many built-in tools for photo editing. These tools are easy to use and powerful. Here are some of the main features:
- Auto-Enhance: This tool automatically adjusts your photo’s lighting and color. Tap the wand icon to use it.
- Exposure: Adjust the brightness of your photo. Slide to increase or decrease light.
- Brilliance: Enhance details and make your photo pop. Adjust the slider for more or less brilliance.
- Highlights: Control the brightest parts of your photo. Lowering highlights can bring back details.
- Shadows: Adjust the darkest parts of your photo. Increase shadows to reveal hidden details.
- Contrast: Change the difference between light and dark areas. More contrast can make your photo look bolder.
- Filters: Apply different filters to change the look and feel of your photo. Swipe to see different options.
Third-party Apps
Third-party apps offer advanced editing features. They can help you achieve professional results. Here are some popular choices:
| App Name | Features |
|---|---|
| Snapseed | Advanced tools, selective adjustments, and healing brush. |
| VSCO | Many filters, fine-tune adjustments, and editing presets. |
| Adobe Lightroom | Professional tools, RAW editing, and cloud storage. |
These apps provide more control over your edits. They can handle complex adjustments and offer unique filters.

Credit: www.instagram.com
Maximizing Lighting
Lighting can make or break a photo. Knowing how to use light effectively can take your iPhone photography to the next level. This guide will help you understand how to maximize lighting, whether you are using natural light or artificial light.
Natural Light
Natural light is your best friend for great photos. It is soft, warm, and free. Here are some tips to make the most of it:
- Golden Hour: The hour after sunrise and the hour before sunset is known as the “golden hour”. The light during these times is soft and warm, making your photos look stunning.
- Avoid Direct Sunlight: Direct sunlight can cause harsh shadows and overexposure. Find a shaded area for even lighting.
- Use Reflective Surfaces: Reflective surfaces like mirrors, water, or bright walls can bounce light onto your subject, brightening them up.
Artificial Light
Sometimes natural light is not available. Artificial light can help, but it needs careful handling:
- Soft Light: Soft light is more flattering. Use lamps with lampshades or softboxes to diffuse the light.
- Avoid Mixed Lighting: Different light sources have different color temperatures. Mixing them can make your photos look odd. Stick to one type of light source.
- Adjust White Balance: Use your iPhone’s camera settings to adjust the white balance. This helps in getting the right color temperature in your photos.
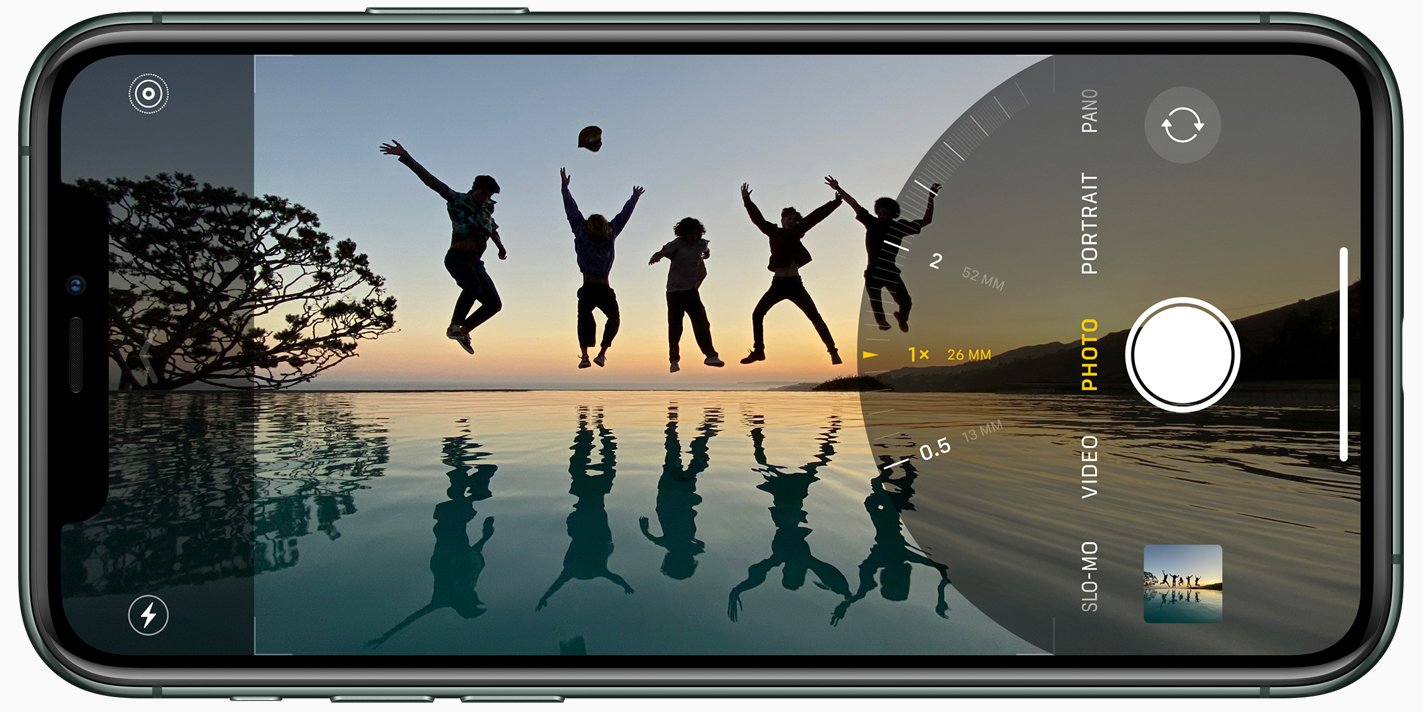
Capturing Motion And Action
Capturing motion and action with your iPhone camera can be exciting. Whether it’s a sporting event, a lively street scene, or kids playing, your iPhone has features to help you. Understanding these features can enhance your photography skills significantly.
Burst Mode
Burst Mode is ideal for capturing fast-moving subjects. It takes multiple photos quickly. To use Burst Mode, press and hold the shutter button. Your iPhone captures a series of images. You can later select the best ones.
This feature is perfect for action shots. It ensures you do not miss any moment. For example, capturing a friend’s jump or a dancer’s spin becomes easier. Experiment with different angles and distances. This can help you get the perfect shot.
Slow Motion
Slow Motion mode is another excellent feature. It allows you to record videos at a high frame rate. Then, the video plays back in slow motion. This adds a dramatic effect to your videos.
To use Slow Motion, open the camera app. Swipe to the Slo-Mo option. Press the record button to start. This mode is great for capturing water splashes or a bird in flight. It reveals details that are usually missed.
Adjust the speed to suit your scene. Experiment with different subjects. This can help you create captivating and detailed videos.
Maintaining Your Camera
To get the best photos, keep your iPhone camera well-maintained. Proper care ensures clear, sharp images every time. This section covers essential tips for maintaining your camera.
Cleaning Lenses
Dirty lenses can ruin your photos. Regularly clean the camera lens with a soft cloth. Microfiber cloths work best for this. Avoid using your shirt or paper towels. These can scratch the lens. For stubborn dirt, use a lens cleaning solution. Spray the solution on the cloth, not directly on the lens. Gently wipe in a circular motion until clean.
Protective Accessories
Protective accessories help maintain your camera. Use a lens cover to shield the lens from dust and scratches. It is a small investment but offers significant protection. Another accessory to consider is a phone case with a raised edge around the camera. This prevents the lens from touching surfaces when you place your phone down. Finally, a screen protector for your phone can also help. It keeps the camera area free from scratches and smudges.

Credit: www.youtube.com
Frequently Asked Questions
How Can I Improve My Iphone Camera Quality?
To improve your iPhone camera quality, clean the lens regularly, use HDR mode, and adjust exposure settings. Ensure good lighting and avoid digital zoom. Use a tripod for stability.
What Are The Best Settings For Iphone Camera?
The best settings for your iPhone camera include using HDR, enabling grid lines, and adjusting focus and exposure. Use portrait mode for depth effect and experiment with live photos.
How Do I Take Better Iphone Photos At Night?
To take better iPhone photos at night, use Night mode, stabilize your phone, and increase exposure. Experiment with different angles and avoid using flash directly.
What Is The Use Of Portrait Mode On Iphone?
Portrait mode on iPhone creates a depth effect by blurring the background. It highlights the subject, making it stand out. Use it for professional-looking photos.
Conclusion
Making the most out of your iPhone camera is easy. Practice these tips regularly. Explore different settings and modes. Capture moments creatively. Use natural light for better photos. Keep your lens clean. Experiment with angles and perspectives. Adjust exposure and focus manually.
Try third-party apps for more features. Share your best shots with friends. Enjoy your photography journey with your iPhone.
As an Amazon Associate, I earn from Qualifying Purchases.