
Connecting your Wyze camera to Wi-Fi is essential for accessing its features. This simple task allows you to view live feeds, receive alerts, and manage settings remotely.
In today’s world, smart home devices like Wyze cameras are becoming increasingly popular. They offer convenience and peace of mind for homeowners. However, many users struggle with the initial setup, especially when it comes to connecting the camera to Wi-Fi.
Understanding the process can help you avoid frustration and make the most of your device. Whether you are a tech novice or a seasoned user, this guide will walk you through each step. Soon, you’ll be able to monitor your home effortlessly, ensuring that you stay connected wherever you are.
How to Connect Wyze Camera to Wifi: Introduction
Wyze cameras are popular for their affordability and impressive features. They offer high-definition video, night vision, and motion detection. Many people choose Wyze cameras for home security, monitoring pets, or keeping an eye on kids.
Benefits Of Wireless Connectivity
Wireless connectivity transforms how you interact with your Wyze camera. First, it eliminates the clutter of wires, allowing for easy placement anywhere in your home.
You can access your camera feed remotely through the Wyze app. This feature lets you monitor your space in real-time, no matter where you are.
Additionally, wireless connectivity simplifies the setup process. You can quickly connect your camera to your Wi-Fi network without dealing with complicated wiring.
- Convenience: Easily move your camera to different locations.
- Accessibility: View live streams and recorded footage from anywhere.
- Flexibility: Integrate with other smart home devices seamlessly.
Prerequisites For Setup
Before connecting your Wyze camera to Wi-Fi, gather some essentials. Ensure you have your Wi-Fi network name and password handy. This information is vital for the setup process.
Next, download the Wyze app from the App Store or Google Play. You’ll need to create a Wyze account if you don’t already have one.
Finally, ensure your camera is plugged into a power source. Wait for the status light to flash yellow, indicating it’s ready for setup. This preparation makes the connection process straightforward and efficient.
Credit: www.cnet.com
Preparing For Installation
Setting up your Wyze camera for Wi-Fi connection is straightforward. Begin by downloading the Wyze app and creating an account. Ensure you have your Wi-Fi name and password handy to complete the installation smoothly.
Preparing for the installation of your Wyze Camera is an essential first step to ensure a smooth setup process. With a little organization and the right tools, you can have your camera up and running in no time. Let’s break down what you need to do before diving into the installation.
Downloading The Wyze App
First, grab your smartphone or tablet and head to your device’s app store.
– For iOS users, visit the Apple App Store.
– For Android users, go to the Google Play Store.
Search for “Wyze” and download the app. This app is your gateway to controlling your Wyze Camera and accessing its features.
Once you have it installed, open the app and prepare for the next step.
Creating A Wyze Account
Before you can connect your camera, you need a Wyze account.
– Open the Wyze app and select “Sign Up.”
– Enter your email address and create a strong password.
Make sure to use an email you frequently check. You’ll receive important notifications about your camera and updates directly to your inbox.
After you fill out the necessary details, you’ll receive a confirmation email. Click the link in that email to verify your account.
Now, you’re ready to connect your camera to Wi-Fi!
Have you ever faced challenges while setting up smart devices? It’s common, but with these preliminary steps, you’re already ahead of the game.
Starting The Wyze Camera Setup
Setting up your Wyze camera is simple. Start by downloading the Wyze app on your phone. Make sure your Wi-Fi name and password are handy. Once the camera is plugged in, follow the app instructions to connect it to your Wi-Fi network.
Starting the Wyze Camera Setup involves a few straightforward steps that ensure your camera is ready to connect to Wi-Fi. If you’ve just unboxed your Wyze camera, you might feel a mix of excitement and confusion. Let’s simplify the process so you can start monitoring your home in no time.
Powering The Camera
First, plug your Wyze camera into a power outlet using the provided adapter.
You’ll see a small light on the front that indicates its status.
Wait for the light to flash yellow; this means the camera is powered on and ready for setup.
Initiating The Setup Mode
Now, it’s time to put your camera into setup mode.
Press and hold the SETUP button on the camera until you hear a voice prompt. This usually takes about 3 seconds.
Once you hear the prompt, the status light should start flashing yellow again, signaling that the camera is in setup mode.
Are you ready to connect to Wi-Fi?
Grab your smartphone and open the Wyze app, which you should have downloaded beforehand.
With just a few taps, you can complete the connection and start monitoring your space.
The process is designed to be user-friendly, so you won’t need to be a tech expert to get it done.
What will you do first once your camera is connected?

Credit: www.reddit.com
Connecting To Your Wifi Network
Connecting your Wyze camera to your Wi-Fi network is easy. Follow these steps to ensure a smooth connection. Start by preparing your Wi-Fi details. You will need your network name and password. Let’s dive into the process.
Finding Your Network
Open the Wyze app on your smartphone. Make sure your phone is connected to the same Wi-Fi network. Tap on the “+” icon to add a new device. Select your Wyze camera from the list. The app will prompt you to choose your Wi-Fi network.
Look for your network name in the list. If you do not see it, check your router. Ensure it is turned on and functioning. You can also refresh the list by pulling it down.
Entering Wifi Credentials
Once you find your network, tap on it. Enter your Wi-Fi password carefully. Make sure there are no typos. This step is crucial for a successful connection.
After entering the password, double-check it. Tap “Connect” to proceed. Wait for the app to confirm the connection. This may take a few moments. You will see a message once the camera connects to your Wi-Fi.
Finalizing The Camera Setup
After connecting your Wyze camera to Wi-Fi, it’s time to finalize the setup. This step ensures your camera is ready for use. Follow the instructions below to complete the process smoothly.
Scanning The Qr Code
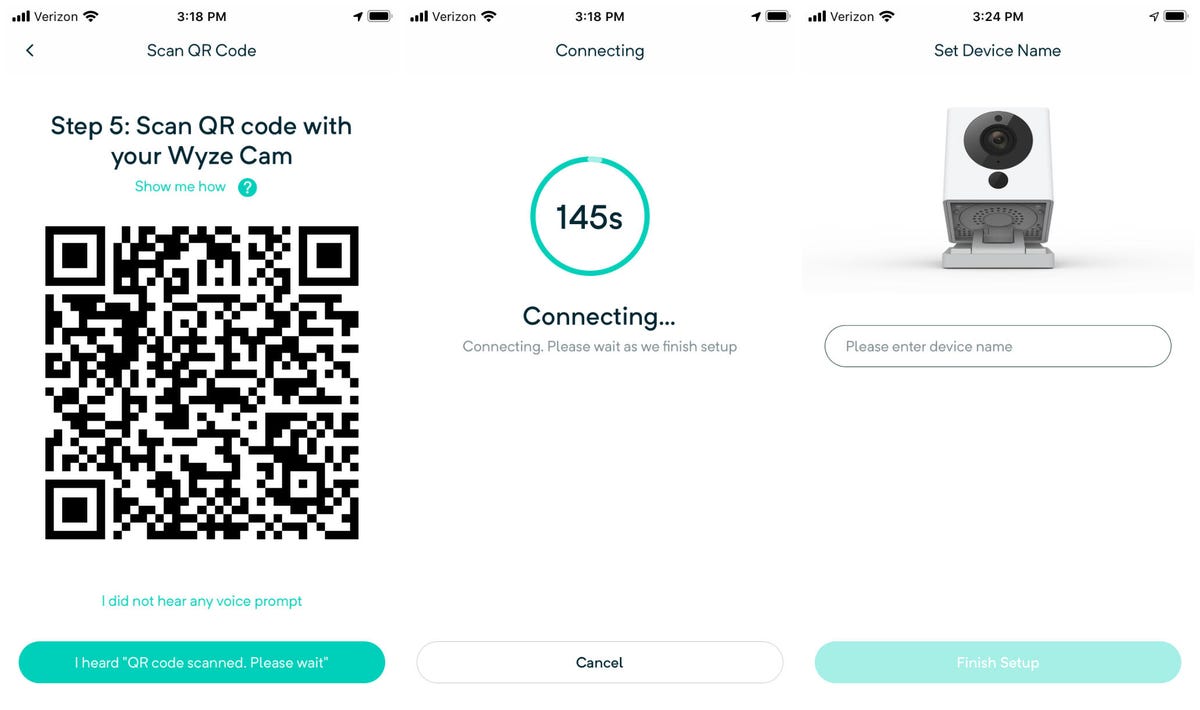
Open the Wyze app on your smartphone. Make sure your camera is powered on. The status light should flash yellow. Tap the “+” icon in the app to add your camera. Select “Wyze Cam” from the list. The app will prompt you to scan a QR code.
Hold your phone in front of the camera. The camera will recognize the QR code. Wait for the voice prompt that confirms a successful scan. This indicates your camera is connecting to Wi-Fi.
Completing The In-app Instructions
Once the QR code scan is successful, follow the in-app instructions. The app will guide you through the final setup steps. This includes naming your camera and selecting its location.
Make sure to check the camera’s live feed. This ensures the camera is connected properly. If everything looks good, you have successfully completed the setup.
Troubleshooting Connection Issues
Connecting your Wyze camera to Wi-Fi can sometimes be tricky. Various issues may arise during the setup process. Here are some common problems and their solutions. Follow these steps to troubleshoot effectively.
Updating The Wyze App
Ensure you have the latest version of the Wyze app. An outdated app may cause connection problems. Check your app store for any available updates.
Open the app store on your device. Search for “Wyze.” If an update is available, tap “Update.” After updating, restart the app and try connecting again.
Checking Network Credentials
Incorrect Wi-Fi credentials can stop your camera from connecting. Verify your network name and password before trying again. Make sure you enter them exactly as they are.
Check for typos. Ensure the password is case-sensitive. Sometimes, using a different device to confirm your Wi-Fi details can help.
Also, ensure your Wi-Fi network is 2.4GHz. Wyze cameras do not support 5GHz networks. If needed, switch your device to the correct network and retry.
Maintaining Your Wyze Camera Connection
Keeping your Wyze camera connected is crucial for effective monitoring. A stable connection ensures you receive real-time updates and alerts. Regular maintenance can help prevent connection issues. Follow these tips to maintain your camera’s connection.
Regular App Updates
Updating the Wyze app is important. New updates fix bugs and improve performance. Check for updates regularly in your app store. Enable automatic updates to save time. Always use the latest version for the best experience.
Network Stability Tips
A stable Wi-Fi network is essential for your camera. Place your router in a central location. Avoid placing it near thick walls or metal objects. Keep your network secure with a strong password. Regularly restart your router to refresh the connection.
Consider using a Wi-Fi extender if your signal is weak. This can help reach areas where the camera is installed. Monitor your network speed using online tools. A stable connection ensures your camera runs smoothly.

Credit: www.youtube.com
Advanced Settings And Features
The Wyze Camera offers a range of advanced settings and features that can help you maximize its functionality. Once you’ve successfully connected your camera to Wi-Fi, it’s time to dive deeper into customizing your experience. Whether you’re looking to adjust video quality or set up motion detection alerts, these advanced options will enhance how you use your camera.
Customizing Camera Settings
Start by accessing the camera settings in the Wyze app. Here, you can adjust video quality to either standard or high definition, depending on your needs and internet speed.
- Resolution: Choose from 1080p or 720p based on your preference for clarity versus bandwidth usage.
- Motion Detection: Enable or adjust the sensitivity of motion detection. This feature can save you from unnecessary notifications.
- Night Vision: Turn on night vision to ensure your space is monitored even in low light conditions.
Have you ever missed an important moment because your camera settings weren’t optimized? Adjusting these settings can help you capture what matters most.
Exploring Additional Features
Your Wyze Camera isn’t just a simple monitoring device; it’s packed with features that can enhance your security experience. One standout feature is the ability to create custom activity zones.
- Activity Zones: Define specific areas within the camera’s view to monitor. You’ll receive alerts only for movements in those zones.
- Two-Way Audio: Communicate directly through the camera. This is perfect for checking in on pets or speaking to visitors without being home.
- Cloud Storage: Consider opting for cloud storage for your recordings. It ensures that you can access footage anytime, even if your camera is damaged.
Have you tried using two-way audio yet? It adds an interactive element to your monitoring setup that many users find incredibly useful.
Taking the time to customize your Wyze Camera can greatly improve your home security experience. Every feature is designed to give you more control and peace of mind.
Frequently Asked Questions
How Do I Reconnect My Wyze Camera To A New Wi-fi?
To reconnect your Wyze camera to a new Wi-Fi, open the Wyze app. Tap the settings gear, then select Device Info and Wi-Fi Network. Follow the prompts to enter your new Wi-Fi details and complete the setup process. Ensure your camera is plugged in and ready for configuration.
How Do I Get My Wyze Camera Back Online?
To get your Wyze camera back online, unplug it from power and plug it back in. Restart your Wi-Fi router and modem. Ensure the Wyze app is updated. Check the camera settings for a restart option. If issues persist, consider a factory reset following Wyze instructions.
How Do I Manually Connect My Wyze Camera?
To manually connect your Wyze camera, download the Wyze app and create an account. Plug in the camera and wait for the yellow light to flash. Press the SETUP button until you hear a voice prompt. Follow the instructions in the app to complete the setup.
Why Can’t My Wyze Cam Find My Network?
Your Wyze Cam may not find your network due to several reasons. Check if your Wi-Fi is 2. 4GHz, as Wyze Cams do not support 5GHz. Ensure your password is correct without extra spaces. Update the Wyze app and perform a factory reset if necessary.
Conclusion
Connecting your Wyze camera to Wi-Fi is a straightforward process. Following the steps carefully ensures a smooth setup. With your camera connected, you gain peace of mind. Monitor your home easily from your smartphone. Don’t hesitate to revisit the setup steps if you encounter issues.
Troubleshooting can often resolve common problems. Enjoy the convenience and security that comes with your Wyze camera. Happy monitoring!
As an Amazon Associate, I earn from Qualifying Purchases.