
Wondering where to find the camera on your MacBook? The camera, known as the FaceTime HD camera, is located at the top center of your screen.
MacBooks come equipped with a built-in camera designed for video calls and taking photos. Knowing where to find this camera can be crucial for making the most of your MacBook’s features. Whether you need it for a meeting on Zoom, a FaceTime chat with friends, or snapping a quick photo, the camera’s location is essential.
This guide will help you understand exactly where to find the camera on your MacBook, ensuring you’re ready for any video call or photo opportunity that comes your way. Stay tuned to learn more about accessing and using your MacBook’s camera.

Credit: support.pitchvantage.com
Locating The Camera
Locating the camera on a MacBook is straightforward. Apple designs MacBooks with user-friendly features. Finding the camera is easy, whether it’s built-in or external. Here’s a guide to help you locate it.
Built-in Camera Placement
Most MacBooks come with a built-in camera. It’s at the top of the screen. The camera is centered above the display. This placement allows for easy video calls and photos. The built-in camera is small but effective. It blends well with the sleek design of the MacBook.
External Camera Setup
You might prefer using an external camera. Some users need better video quality. Others use it for professional purposes. Connecting an external camera is simple. Use one of the available USB ports on your MacBook. Ensure your external camera is compatible with Mac. Most modern cameras work well with macOS.
After connecting, your MacBook should recognize the external camera. You can select it as your primary camera in settings. The external camera might offer better resolution. It can improve your video calls and recordings. Position the external camera on top of the MacBook screen. This setup mimics the built-in camera position.
Accessing The Camera
Accessing the camera on your MacBook can be easy and straightforward. Whether you need it for video calls, taking pictures, or recording videos, your MacBook has built-in applications that make this possible. Below, we explore two main ways to access your camera: Using FaceTime and Using Photo Booth.
Using Facetime
FaceTime is a popular application for video calls. It is pre-installed on MacBooks and offers a simple way to use your camera.
- Open the FaceTime application from your Applications folder or Dock.
- Sign in with your Apple ID if prompted.
- Click on the “New FaceTime” button.
- Enter the contact details of the person you want to call.
- Click the green “Video” button to start the call.
Once the call starts, your camera will activate, and you will see yourself in a small window.
Using Photo Booth
Photo Booth is another pre-installed application on MacBooks. It allows you to take photos and record videos using your built-in camera.
- Open the Photo Booth application from your Applications folder or Dock.
- Wait for the camera to activate. You should see yourself on the screen.
- To take a photo, click the red “Camera” button.
- To record a video, click on the “Video” tab, then click the red “Record” button.
- To stop recording, click the red “Stop” button.
Photo Booth also offers fun effects and filters to enhance your pictures and videos.
Camera Settings
The camera settings on a MacBook can help you get the best experience for video calls and recordings. Whether you need to adjust the camera preferences or manage permissions, knowing where to find these settings is crucial. This section guides you through the essential camera settings on a MacBook.
Adjusting Camera Preferences
To adjust camera preferences, start by opening the “System Preferences” from the Apple menu. Click on “Displays” to access camera settings. You can fine-tune your camera’s brightness, contrast, and other display settings. These adjustments help improve the quality of your video feed.
For further customization, you may use third-party apps. These apps offer more advanced controls. They let you tweak exposure, focus, and more. Make sure to download apps from trusted sources.
Managing Camera Permissions
Ensuring your camera permissions are set correctly is vital for privacy and security. Open “System Preferences” and click on “Security & Privacy.” Select the “Privacy” tab and click on “Camera” in the sidebar. Here, you will see a list of apps that have requested access to your camera.
To grant or deny access, check or uncheck the boxes next to each app. This control ensures only trusted apps can use your camera. Regularly review these permissions to maintain your privacy.
Troubleshooting Camera Issues
Encountering camera issues on your MacBook can be frustrating. Sometimes, the camera may not work during a video call or when using a specific app. Understanding common problems and their solutions can help you quickly get back to your tasks.
Common Problems
The camera may not turn on or show a black screen. You might see an error message saying the camera is not connected. Sometimes, apps may not detect the camera at all. These issues can arise due to software glitches, outdated drivers, or incorrect settings.
Quick Fixes
First, restart your MacBook. This simple step can resolve many minor issues. Check if the app has permission to use the camera. Go to System Preferences, then Security & Privacy, and select Camera. Ensure the box next to the app is checked.
If the problem persists, update your macOS. Often, updates contain fixes for known issues. Also, close any other apps that might be using the camera. Multiple apps using the camera simultaneously can cause conflicts.
Lastly, reset the SMC (System Management Controller). Shut down your MacBook, then hold Shift + Control + Option and press the power button for 10 seconds. Release all keys, then turn on your MacBook.
Camera Tips And Tricks
The camera on your MacBook is a powerful tool. It can be used for video calls, taking photos, and even creating content. To get the best out of it, you need to know a few camera tips and tricks. Here are some ways to enhance your experience.
Enhancing Video Quality
Good video quality makes a big difference. It helps you look professional and clear. Here are some tips:
- Lighting: Use natural light if possible. Face the light source. Avoid backlighting.
- Camera Position: Place your MacBook at eye level. This provides a flattering angle.
- Clean the Lens: Wipe the camera lens before use. A clean lens gives a clearer image.
- Adjust Settings: Go to System Preferences > Camera. Adjust the settings for better quality.
Using Filters
Filters can add a fun touch to your videos and photos. They can also enhance the overall look. Here’s how to use filters:
- Open Photo Booth: This app is pre-installed on your MacBook.
- Select Effects: Click on the Effects button to browse filters.
- Choose a Filter: Pick a filter that suits your style. Try different ones to see which looks best.
Filters can make your video calls more engaging. They can also add a creative flair to your photos.
Credit: support.apple.com
Privacy And Security
Protecting your privacy is essential. Your MacBook’s camera can be a potential concern. Understanding how to manage it can help keep your privacy intact.
Disabling The Camera
Disabling the camera on your MacBook can prevent unauthorized access. You can do this through system settings. Simply go to the Security & Privacy section. Then, navigate to Camera and uncheck apps you don’t want to use the camera.
For more control, use terminal commands. This method is more advanced. It requires some comfort with command-line interfaces. Type specific commands to disable or enable the camera as needed.
Using Camera Covers
Camera covers provide a physical barrier. They are easy to use. Simply attach the cover over your camera. Slide it open when you need the camera. Slide it closed when you don’t.
These covers are affordable and widely available. Many laptop users prefer this method. It offers a visible assurance of privacy. Even if software settings fail, the physical cover remains effective.
Camera Apps And Software
Exploring camera apps and software on your MacBook can enhance your photo and video experience. With the right tools, you can take stunning photos and videos. You can also edit them with ease. Let’s dive into some popular camera apps and editing software for your MacBook.
Popular Camera Apps
There are several camera apps available for MacBook users. Photo Booth is a built-in app that lets you take photos and record videos. It also offers fun effects and filters. FaceTime is another built-in app. It is mainly used for video calls but can also capture photos.
For more advanced features, consider third-party apps. iGlasses is a popular choice. It provides enhanced camera controls and effects. ManyCam is another versatile app. It allows you to use your camera with multiple applications at once.
Editing Software
After capturing your photos and videos, you may want to edit them. iMovie is a built-in app for MacBook users. It offers basic and advanced editing tools. You can trim, cut, and add effects to your videos. Photos is another built-in app. It helps you organize and edit your photos easily.
For more advanced editing, consider third-party software. Adobe Photoshop is a powerful tool for photo editing. It offers a wide range of features. Final Cut Pro is excellent for video editing. It provides professional-grade tools and effects.
Advanced Camera Features
MacBook cameras have come a long way, offering several advanced features to enhance your experience. These features not only improve video quality but also integrate seamlessly with other devices and software. Let’s dive into some of these advanced capabilities.
Using Virtual Backgrounds
One of the standout features of the MacBook camera is the ability to use virtual backgrounds. This feature allows you to replace your real background with any image or video of your choice. It’s perfect for maintaining privacy or adding a professional touch during video calls.
- Open your video conferencing app.
- Go to the settings or preferences menu.
- Find the option for virtual backgrounds.
- Select a pre-loaded background or upload your own image.
Virtual backgrounds work best in well-lit environments. Ensure your background is plain for optimal results. This feature is compatible with most popular video conferencing apps like Zoom and Microsoft Teams.
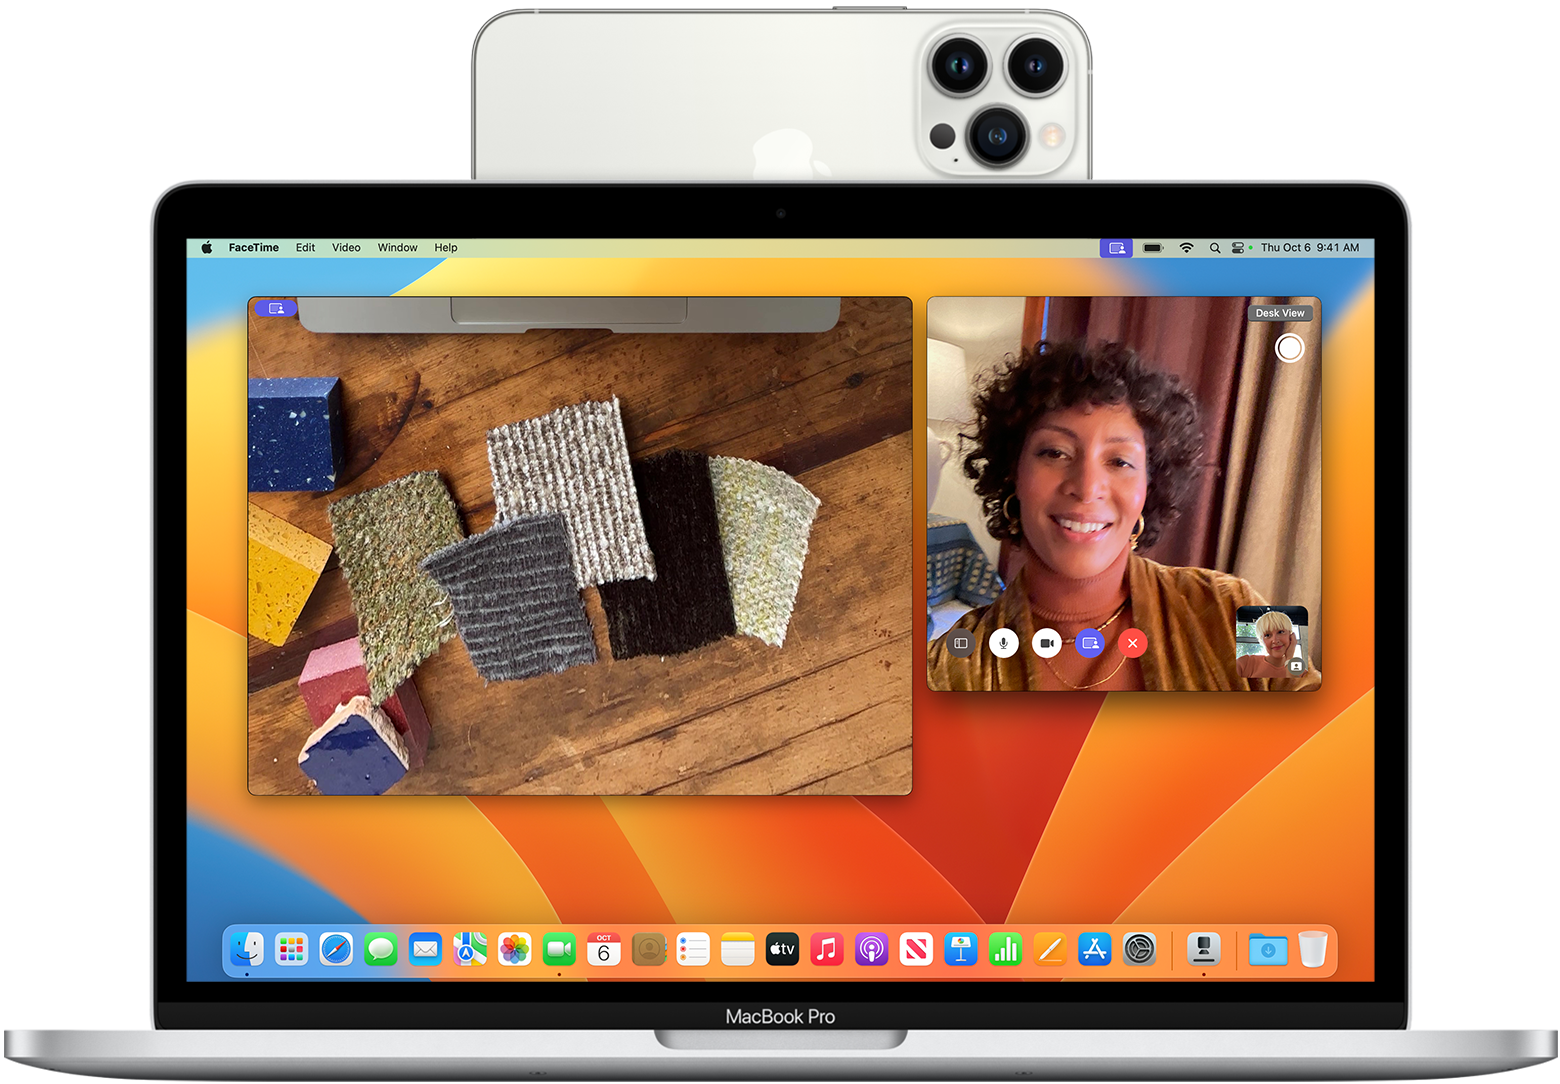
Integrating With Other Devices
The MacBook camera can integrate with other devices for a seamless experience. This is especially useful for professionals who use multiple devices.
For example, you can use your iPhone as a secondary camera during video calls. This can be done through apps that support multi-device integration.
| Device | Integration Method |
|---|---|
| iPhone | Using Continuity Camera |
| iPad | Sidecar feature |
Integrating your MacBook camera with other devices can make your workflow more efficient. For example, you can use your iPhone as a document scanner, which directly feeds into your MacBook during a call.
These advanced camera features make the MacBook a versatile tool for both personal and professional use. Whether you’re using virtual backgrounds or integrating with other devices, these features enhance your overall experience.
:max_bytes(150000):strip_icc()/002-how-to-turn-on-camera-on-mac-4175436-35d5f72c3bbb4843ae92f52832f40a7e.jpg)
Credit: www.lifewire.com
Frequently Asked Questions
Where Is The Camera Located On A Macbook?
The camera on a MacBook is located at the top center of the screen. It is integrated within the bezel.
How Do I Access The Camera On My Macbook?
To access the camera, open applications like FaceTime, Photo Booth, or any other app that uses the camera.
Why Is My Macbook Camera Not Working?
Your MacBook camera may not work due to software issues. Restarting the MacBook or updating software may help.
How Can I Test My Macbook Camera?
You can test your MacBook camera by opening Photo Booth or FaceTime. If the camera activates, it works fine.
Conclusion
Finding the camera on your MacBook is simple. Just follow the steps mentioned. Ensure your apps have camera access. This helps avoid any issues. If problems persist, check your MacBook settings. This guide aims to help you locate the camera quickly.
Now you can use the camera for video calls or photos easily. Enjoy your MacBook’s features with confidence. Happy capturing!
As an Amazon Associate, I earn from Qualifying Purchases.