
Is your laptop camera not working? It’s a common issue.
Let’s fix it together. A malfunctioning laptop camera can be frustrating, especially during important meetings or video calls. Often, the problem is simple and can be solved without expert help. Before you worry about replacing your laptop or camera, there are a few easy steps you can try.
From checking the camera settings to updating drivers, we’ll guide you through practical solutions. By the end of this post, you’ll likely have your camera working again. Let’s dive in and troubleshoot this issue so you can get back to your tasks smoothly.
Check Hardware Connections
Experiencing issues with your laptop camera can be frustrating. Before diving into complex solutions, it’s essential to check hardware connections. Often, the problem may be as simple as a loose connection or a disabled camera. Let’s explore some steps to ensure your camera is properly connected and enabled.
Inspect Physical Connections
First, ensure the camera is properly connected to your laptop. If you use an external webcam, check the USB port and cable.
- Make sure the USB cable is firmly plugged into the laptop.
- Try different USB ports to rule out port issues.
- Inspect the cable for any visible damage.
If the camera is built into your laptop, inspect the bezel around the screen. Ensure there are no obstructions or damage.
Ensure Camera Is Enabled
Sometimes, the camera may be disabled in your laptop’s settings. Follow these steps to ensure it’s enabled:
- Press Windows + I to open the Settings menu.
- Select Privacy and then Camera.
- Make sure the toggle under Allow apps to access your camera is turned on.
- Scroll down and ensure the toggle for specific apps is also turned on.
Another method is to check the Device Manager:
- Press Windows + X and select Device Manager.
- Expand the Imaging devices section.
- Right-click your camera device and select Enable device if it’s disabled.
Update Camera Drivers
If your laptop camera is not working, updating the camera drivers could fix the problem. Drivers help your computer communicate with hardware. Outdated or missing drivers can cause devices to malfunction. There are two main ways to update your camera drivers: automatic driver updates and manual driver installation.
Automatic Driver Updates
Automatic driver updates are the easiest way to keep your drivers up to date. Here’s how you can do it:
- Press Windows Key + X and select Device Manager.
- Find and expand the Cameras or Imaging devices section.
- Right-click your camera and select Update driver.
- Choose Search automatically for updated driver software.
- Follow the on-screen instructions to complete the update.
This method lets your system find the latest driver automatically. It is fast and user-friendly.
Manual Driver Installation
Manual driver installation gives you more control. Follow these steps to install drivers manually:
- Identify the make and model of your camera.
- Visit the manufacturer’s website and go to the Support or Downloads section.
- Search for your camera model and download the latest driver.
- Open Device Manager by pressing Windows Key + X and selecting Device Manager.
- Right-click your camera and select Update driver.
- Choose Browse my computer for driver software.
- Navigate to the location where you saved the driver file and select it.
- Follow the on-screen instructions to complete the installation.
Manual installation can be more time-consuming but ensures you have the most suitable driver.
Adjust Privacy Settings
If your laptop camera isn’t working, it might be due to privacy settings. Adjusting these settings can help. Many times, the camera is blocked by default. This ensures your privacy. Let’s explore how to adjust these settings.
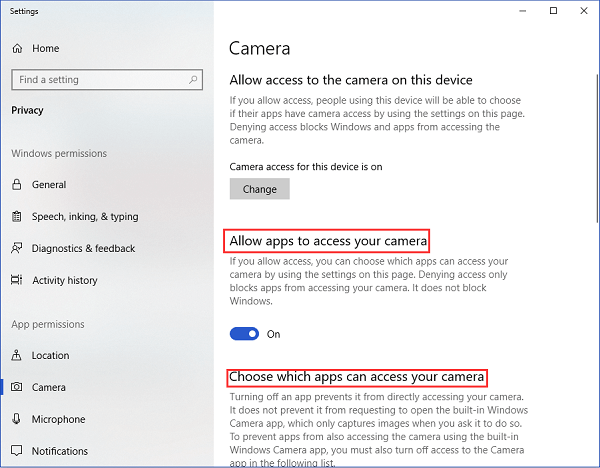
Camera Access For Apps
For your camera to work, apps need permission. Follow these steps to check and adjust camera access:
- Open Settings.
- Go to Privacy.
- Select Camera from the left-hand menu.
- Ensure the option Allow apps to access your camera is turned on.
You can also choose which specific apps can access your camera. Scroll down to see a list of apps. Toggle the switch next to the app you want to allow access.
Windows Privacy Settings
Windows has system-level privacy settings. These settings control camera access for the entire system. Follow these steps:
- Go to Settings.
- Click on Privacy.
- Under App permissions, click on Camera.
- Make sure Camera access for this device is on.
This setting ensures that Windows itself allows camera access. If it’s off, no app can use the camera. Turn it on if it’s off.
By adjusting these privacy settings, you ensure the camera can work. This simple step often resolves camera issues.
Credit: www.asurion.com
Run Troubleshooter
Is your laptop camera not working? It can be frustrating. But don’t worry! Running a troubleshooter can help you fix this issue. Let’s explore how to use the troubleshooter effectively.
Using Windows Troubleshooter
First, try the Windows Troubleshooter. It’s a built-in tool that scans for problems. To start, click on the Start menu. Then, go to Settings. Choose Update & Security. Now, find Troubleshoot in the left menu. Click on it.
Next, you will see a list of troubleshooters. Find the one for your camera. Click on it and follow the instructions. The troubleshooter will scan for issues. It will then suggest fixes. Apply the suggested fixes. Check if your camera works now.
Third-party Tools
Sometimes, the Windows Troubleshooter may not fix the issue. In that case, third-party tools can help. There are many available online. These tools can diagnose and fix camera problems.
Download and install a trusted third-party tool. Follow the instructions provided by the tool. It will scan your laptop for issues. Then, it will suggest fixes. Apply those fixes. Check if your camera works after that.
Using these steps, you can fix your laptop camera. Try the Windows Troubleshooter first. If it doesn’t work, use third-party tools. Your camera should be working soon.
Check Software Conflicts
Check for software conflicts causing camera issues on your laptop. Disable conflicting applications to restore camera functionality. This often resolves the problem.
Your laptop camera may not work due to software conflicts. These conflicts can arise when different applications or programs interfere with the camera’s function. Identifying and resolving these conflicts can restore your camera’s performance. Here are some steps to tackle software conflicts:Close Background Applications
Open Task Manager by pressing Ctrl + Shift + Esc. Check the list of running applications. Close any unnecessary applications, especially those that might use the camera. This includes video conferencing tools and photo editing software. Restart your camera application to see if it works.Update Conflicting Software
Outdated software can also cause conflicts. Ensure all your applications are up to date. Open each application and check for updates. Focus on video conferencing tools, photo apps, and security software. Sometimes, updating these can resolve the issue. If the problem persists, consider reinstalling the problematic software. Reinstallation can clear any corrupt files causing the conflict. “`
Credit: www.youtube.com
Test With Different Applications
Sometimes, your laptop’s camera may not work properly. Testing it with different applications can help identify the problem. This method ensures that the issue is not specific to one app. Let’s explore different ways to test your camera.
Use Default Camera App
Start with the default camera app. Most laptops have a built-in camera app. Open it and see if the camera works. If the image appears, your hardware is fine. The problem might be with a specific application.
If the default app does not show an image, check for updates. Sometimes, an outdated app can cause problems. Updating it can solve the issue. You can also restart your laptop. This simple step can fix many technical issues.
Test With Video Conferencing Apps
Video conferencing apps can also be used to test your camera. Open apps like Zoom, Skype, or Google Meet. Start a video call and check if the camera works. If the camera works in these apps, your default camera app may be at fault.
If the camera does not work in video calls, check the app settings. Make sure the camera is enabled. Sometimes, apps may not have permission to use the camera. Adjust the settings to grant access. Restart the app and try again.
Testing with different applications helps you pinpoint the problem. It can save you time and effort in troubleshooting. Always start with simple steps and move to more complex solutions if needed.
Scan For Malware
Is your laptop camera not working? Your device could be infected with malware. Malware can disrupt hardware and software functions. This includes your camera. Scanning for malware can help identify and remove threats.
Run Antivirus Software
First, make sure your antivirus software is up to date. Open the program and run a full scan of your system. This will check all files and applications for harmful malware. If the antivirus finds any threats, follow the steps to remove them. This might solve your camera problem.
Check For Suspicious Activity
Look for unusual behavior on your laptop. Are there programs running you don’t recognize? Check your task manager to see what’s active. If you find any suspicious programs, research them online. They could be malware affecting your camera.
Some malware can disguise itself. If you’re unsure, it’s best to consult a tech professional. They can help identify and remove any malicious software. Keeping your system clean ensures your camera and other hardware work properly.
Reset Camera Settings
Resetting camera settings on your laptop can help fix many issues. If your camera is not working, this should be one of the first steps. This process can restore the camera to its original state. Follow these simple steps to reset your camera settings effectively.
Reset Camera App
First, try resetting the camera app itself. This can often fix minor glitches.
- Open the Settings menu on your laptop.
- Go to Apps and then click on Apps & Features.
- Scroll down to find the Camera app.
- Click on the Camera app and select Advanced options.
- In the new window, click on the Reset button.
- Confirm the action by clicking Reset again.
This process will reset the camera app, clearing any settings or cache that may be causing issues.
Restore Default Settings
If resetting the camera app doesn’t work, try restoring the default settings of your camera.
- Open the Camera app on your laptop.
- Click on the Settings icon, usually represented by a gear symbol.
- Scroll down to find the option to Restore Default Settings.
- Click on Restore Default Settings and confirm your choice.
This will revert the camera settings to their original state. This step can resolve more complex issues that a simple reset cannot fix.
Credit: www.easeus.com
Frequently Asked Questions
Why Is My Laptop Camera Not Working?
Your laptop camera might not work due to outdated drivers, software conflicts, or hardware issues. Ensure your drivers are updated. Check if any software is blocking the camera. If problems persist, the issue might be hardware-related.
How Do I Update My Camera Drivers?
To update camera drivers, go to Device Manager. Find your camera under Imaging devices. Right-click and select “Update driver. ” Follow the prompts to complete the update.
How Can I Check If My Camera Is Blocked By Software?
Open your laptop’s settings. Navigate to Privacy or Camera settings. Ensure apps have permission to access the camera. Disable any software that might be blocking the camera.
What Should I Do If My Camera Is Still Not Working?
If your camera still doesn’t work, try reinstalling the camera driver. Go to Device Manager, right-click the camera, and select “Uninstall. ” Restart your laptop and let Windows reinstall the driver.
Conclusion
Having a non-working laptop camera can be frustrating. Follow these steps to fix it. Check the camera settings first. Update the drivers if needed. Restart your laptop and see if it helps. Sometimes, simple solutions work best. If problems persist, consider seeking professional help.
Remember, keeping your software updated is crucial. Regular maintenance can prevent many issues. Don’t let a faulty camera disrupt your work. Stay proactive and keep your laptop in good shape.
As an Amazon Associate, I earn from Qualifying Purchases.