Time-lapse on a trail camera captures images at set intervals. This creates a video showing changes over time.
Trail cameras are popular among wildlife enthusiasts and researchers. These cameras help monitor animal activity without disturbing their habitat. Time-lapse mode takes this a step further by recording regular snapshots. This feature is useful for studying patterns and behaviors. Imagine watching a plant grow or snow cover a forest floor.
Time-lapse helps reveal these slow changes. Whether you’re a scientist or a curious nature lover, understanding time-lapse can enhance your outdoor observations. Let’s explore how this feature works and its benefits for your wildlife adventures.
Introduction To Time Lapse
Time lapse is a photography technique that captures a series of images over a period. These images are then combined to create a video showing the event in a faster speed. Trail cameras with time lapse features are popular in wildlife observation.
Basics Of Time Lapse
Time lapse on a trail camera involves setting the camera to take pictures at specific intervals. For example, the camera can take a picture every minute. These intervals can be adjusted based on the user’s needs.
Many trail cameras offer various settings for time lapse. Users can set the start and stop times. They can also choose the interval between each picture. This allows for capturing different types of events. From fast-moving animals to slow-growing plants.
Importance In Wildlife Observation
Time lapse is crucial in studying animal behavior. It allows researchers to observe animals without disturbing them. They can track movements, feeding habits, and interactions.
Here’s a table showing the benefits of using time lapse in wildlife observation:
| Benefit | Description |
|---|---|
| Non-Intrusive | Does not disturb the animals |
| Long-Term Monitoring | Allows observation over extended periods |
| Detailed Analysis | Provides a clear view of animal behavior |
Time lapse also helps in understanding environmental changes. For example, researchers can observe how animals respond to changes in weather. Or how they interact with other species.
Trail Camera Essentials
Time-lapse on a trail camera is a fascinating feature. It captures images or videos at set intervals. This allows you to observe wildlife activities over extended periods. Whether you are a nature enthusiast or a researcher, understanding this feature is crucial. Let’s dive into the essentials of trail cameras to help you make the right choice.
Choosing The Right Camera
Selecting the right trail camera is important. First, consider your budget. There are many options available, from affordable to high-end models. Next, think about the environment where you will place the camera. Different models perform better in various conditions. Some cameras are better for low-light environments, while others excel in open fields.
Key Features To Look For
When choosing a trail camera, several key features are essential. Look for high resolution. This ensures clear images and videos. Next, check the battery life. Longer battery life means less frequent changes. Also, consider the trigger speed. Faster speeds capture more precise moments. Finally, look at the storage capacity. Larger storage allows for more footage before needing to download or change the memory card.
Setting Up For Time Lapse
Setting up your trail camera for time-lapse photography can be an exciting task. By following a few key steps, you can capture stunning sequences of wildlife or natural scenery. Let’s explore how to find the best locations and mount your camera correctly.
Optimal Locations
Choose a location with a clear view. Avoid thick brush or obstacles. Look for places where wildlife frequents. Water sources and feeding areas are ideal. Open fields and trails also work well. Ensure good lighting throughout the day. This enhances the quality of your time-lapse photos.
Proper Mounting Techniques
Secure your camera on a sturdy tree or post. Use strong straps or mounts. Ensure the camera is stable. Angle the camera correctly. Point it slightly downward. This minimizes sky and maximizes ground view. Check the camera height. Position it at 3 to 5 feet off the ground. Ensure no branches or leaves obstruct the lens. Regularly check and adjust the setup.
Configuring Time Lapse Settings
Trail cameras are great for monitoring wildlife. Time lapse settings can help capture amazing sequences. Knowing how to configure these settings is crucial.
Interval Selection
Interval selection determines how often the camera takes photos. Shorter intervals capture more detail. Longer intervals save battery and storage.
| Interval | Best Use |
|---|---|
| 5 seconds | Fast-moving subjects |
| 30 seconds | Slow-moving subjects |
| 1 minute | General use |
| 5 minutes | Long-term monitoring |
Choose the interval based on your goal. Adjust as needed for best results.
Resolution And Quality Settings
Resolution and quality settings affect the image clarity. Higher resolution gives better detail. It also uses more storage.
- High Resolution: Best for detailed images
- Medium Resolution: Good balance of quality and storage
- Low Resolution: Saves storage, less detail
Quality settings control compression. High quality means less compression. This retains image detail but uses more space. Low quality compresses more, saving space.
Consider your storage capacity. Balance resolution and quality for your needs.
Capturing Day And Night
Capturing day and night scenes with a trail camera can provide amazing insights. Whether you’re observing wildlife or monitoring a property, time lapse photography can be useful. Understanding how to use your trail camera during different times can make a big difference.
Daytime Strategies
Daytime offers plenty of natural light. This can help you capture clear and vibrant images. Position the camera to avoid direct sunlight, which can cause glare. Focus on areas with activity, like water sources or feeding spots. Set the interval rate based on movement patterns. Frequent intervals can capture more details.
Nighttime Tips
Nighttime photography can be tricky. Using infrared or low-glow LEDs can help. These features reduce the chance of startling wildlife. Place the camera near paths or trails. Animals often use the same routes. Ensure the camera has a clear view. Avoid placing it behind obstacles like branches. Set the interval rate slower at night. This helps conserve battery life. Use a camera with good night vision capabilities. This ensures sharp images even in low light.

Credit: www.researchgate.net
Post-processing Time Lapse Footage
Post-processing time lapse footage can elevate your trail camera captures. It involves refining the raw images into a smooth, captivating video. This process includes choosing the right editing software and enhancing the visual quality of your footage.
Editing Software Options
Various editing software options are available for processing time lapse footage. Adobe Premiere Pro is a popular choice for its versatility. It allows precise control over the video timeline.
Final Cut Pro is another excellent option. It offers powerful tools for Mac users. For beginners, iMovie provides a user-friendly interface. It is great for basic edits.
DaVinci Resolve is also worth considering. It is known for its color correction capabilities. This software is free and suitable for advanced users.
Enhancing Visual Quality
Enhancing the visual quality of your time lapse footage is crucial. Start with adjusting the brightness and contrast. This makes the footage more vibrant.
Next, focus on color grading. This step involves tweaking the colors to achieve the desired look. Use the software’s built-in tools for this purpose.
Stabilization is also important. Shaky footage can distract viewers. Most editing software has stabilization features. Apply these to smooth out any jitters.
Finally, consider adding music or sound effects. This can make your time lapse more engaging. Select tracks that complement the visuals.
Common Challenges And Solutions
Using a trail camera with a time lapse feature can be highly rewarding. But it comes with its own set of challenges. Below are common issues and their solutions to help you get the most out of your trail camera.
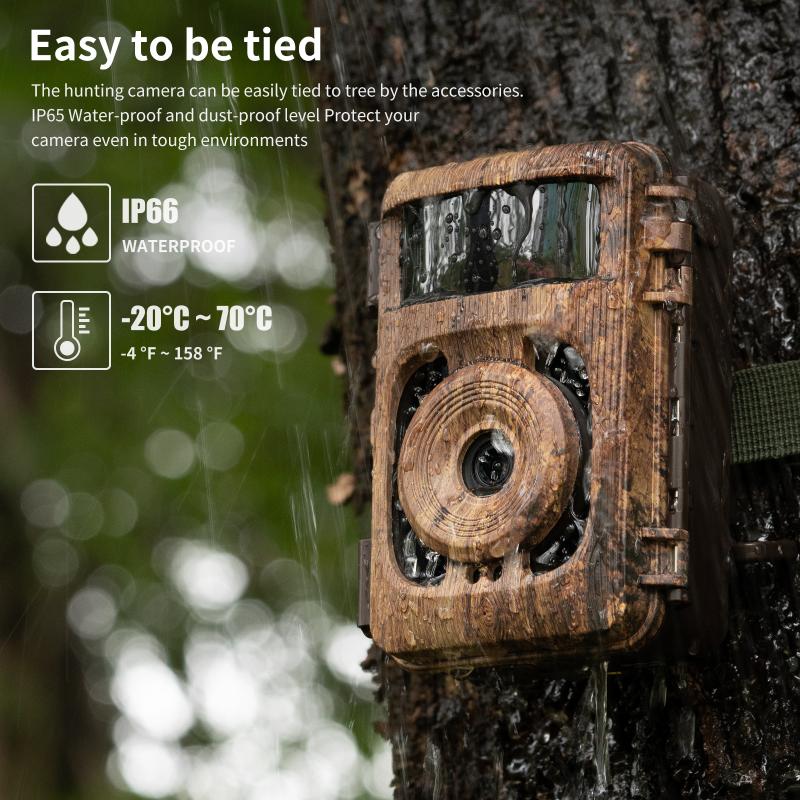
Weather Conditions
Weather can impact the performance of your trail camera. Rain, snow, and extreme temperatures can damage the camera or affect its battery life.
- Rain and Snow: Use a weatherproof housing. This will protect the camera from water damage.
- Extreme Temperatures: Choose a camera designed to withstand extreme conditions. Look for models that function well in both hot and cold weather.
Battery And Storage Management
Managing battery life and storage is crucial. A dead battery or full memory card means missed shots.
- Battery Life: Use high-capacity batteries or a solar panel. This helps keep your camera running longer.
- Storage: Opt for high-capacity memory cards. Regularly check and replace them to avoid missing important footage.
| Challenge | Solution |
|---|---|
| Weather Conditions | Weatherproof housing, extreme weather cameras |
| Battery Life | High-capacity batteries, solar panel |
| Storage | High-capacity memory cards, regular checks |

Credit: gardeproshop.com
Showcasing Your Time Lapse
Showcasing your time lapse from a trail camera can be an exciting experience. It allows you to share the beauty and activity of nature. Whether you want to display wildlife behavior or scenic changes, sharing your time lapse can captivate your audience.
Sharing On Social Media
Social media platforms are great for showcasing your time lapse. Sites like Facebook, Instagram, and Twitter can help you reach a broad audience. Upload your video directly to these platforms. Use short, descriptive captions to grab attention.
Consider the optimal video length for each platform. On Instagram, keep videos under one minute. For Facebook, longer videos can work well. Twitter supports videos up to 2 minutes and 20 seconds. Adapt your content to fit these guidelines.
Creating Engaging Stories
Creating stories with your time lapse can make them more engaging. Break your video into short clips to highlight key moments. Use text overlays to provide context or fun facts about the scene.
Storytelling adds depth to your time lapse. Describe what viewers are seeing. Explain why certain moments are significant. This approach keeps your audience interested and informed.
Ethical Considerations
When using a trail camera for time lapse, ethical considerations are crucial. Ensuring that your actions do not harm wildlife or the environment is important. This section will discuss key ethical aspects to consider.
Respecting Wildlife
Respecting wildlife should be a top priority. Avoid placing cameras near animal nests or dens. Disturbing these areas can cause stress to animals. Use cameras in areas where animals naturally roam. This reduces the chance of interference with their daily activities.
Adjust camera settings to minimize flashes. Bright lights can startle and confuse wildlife. Use infrared or low-glow cameras to avoid causing distress.
Minimizing Environmental Impact
Minimizing environmental impact is also essential. Avoid damaging vegetation when setting up your camera. Clear pathways gently and avoid trampling plants.
Use biodegradable materials if possible. This helps reduce plastic waste and protects the environment. Ensure your camera is securely fastened to prevent it from falling and causing harm.
Regularly check your equipment to remove any litter. Clean up any trash or debris you find in the area. This keeps the environment clean and safe for all wildlife.
Credit: www.kentfaith.com
Frequently Asked Questions
What Is Time Lapse On A Trail Camera?
Time lapse on a trail camera captures images at set intervals. This feature helps monitor wildlife activity over time. It is useful for observing patterns without triggering the camera’s motion sensor.
How Does Time Lapse Work On Trail Cameras?
Time lapse works by taking photos at regular intervals. This allows you to see changes over time. It does not rely on motion detection to trigger the camera.
Why Use Time Lapse On Trail Cameras?
Using time lapse helps monitor areas with low activity. It captures consistent images over time. This feature is ideal for tracking animal movements and environmental changes.
Can Time Lapse Save Battery On Trail Cameras?
Yes, time lapse can save battery by reducing motion-triggered images. It captures fewer images, extending battery life. This is useful for long-term monitoring.
Conclusion
Time lapse on a trail camera is a powerful tool. It captures fascinating moments in nature. You can monitor wildlife activities with ease. This feature helps in studying animal behavior. It also provides valuable data for research. Using time lapse is simple and effective.
It enhances your trail camera experience. Understanding its benefits makes it a smart choice. Start exploring the wonders of nature today. Happy wildlife watching!
As an Amazon Associate, I earn from Qualifying Purchases.