Use Creative inventory, the /give command, or the in-game recipe to obtain a Camera quickly.
I’ve taught and tested Minecraft Education Edition in classrooms for years, and I know how to make Camera in Minecraft Education Edition and use it well. This guide explains clear steps, real classroom tips, and simple troubleshooting. Read on to learn exact ways to get a Camera, take photos, and build lessons that use pictures for student reflection and assessment.
What is the Camera in Minecraft Education Edition?
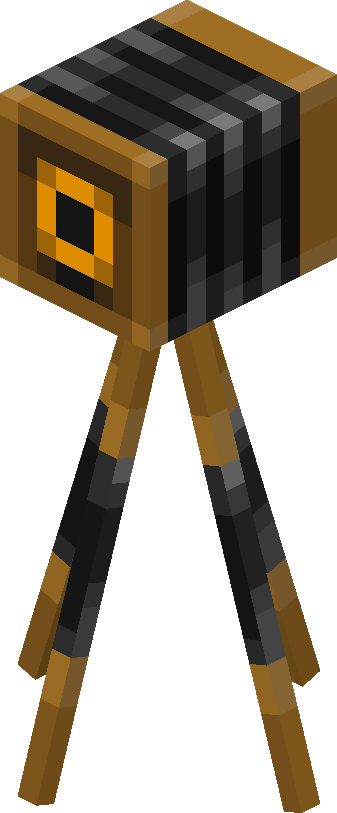
The Camera is a tool that lets players take in-game photos and save them to a Portfolio. It is a simple way to capture builds, experiments, and student work. The Camera works in both Creative and Survival modes in Education Edition when available. It is designed for classroom use and can help students document learning.

How to Make Camera in Minecraft Education Edition — Step-by-Step
Below are the main ways to make a Camera in Minecraft Education Edition. Try each method to see which fits your world settings and lesson plan.
- Get a Camera from Creative inventory.
- Open the Creative inventory.
- Search for “Camera” or browse the Tools tab.
- Drag the Camera to your hotbar and equip it.
- Use the /give command.
- Open chat (press T).
- Type /give @p camera 1 and press Enter.
- The Camera appears in your inventory instantly.
- Craft a Camera in Survival (if crafting is enabled).
- Open a crafting table.
- Check the recipe book in-game for the Camera recipe.
- Place required materials into the grid to craft the Camera.
- Use classroom world settings.
- Ensure Education Edition features are enabled in the world options.
- Turn on the Camera and Portfolio options if present.
Tips:
- The /give method is best for quick setup in a lesson.
- The crafting method requires that the world allows recipe crafting.

Source: youtube.com

How to Use the Camera and Portfolio
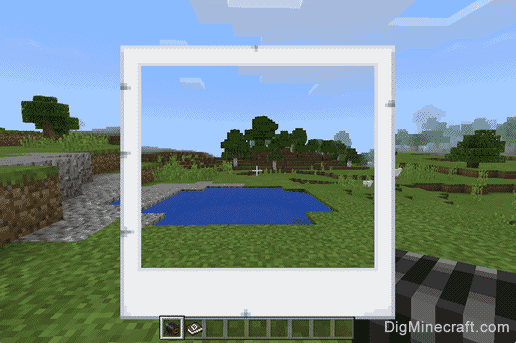
Once you know how to make Camera in Minecraft Education Edition, learn to use it well. The Camera takes screenshots and stores them in the Portfolio item. Students can open their Portfolio to view and export images.
- To take a photo: equip the Camera and use the action key (right-click or secondary action).
- To tag a photo: add text or labels in the Portfolio to explain the image.
- To export photos: use the Portfolio export option to save images to your device.
- To review work: combine images with reflection prompts for class discussion.
From my classroom work, students love making step-by-step photo journals of projects. The Camera makes it easy and safe to capture progress.
Classroom Uses, Lesson Ideas, and Tips
Using the Camera adds a visual layer to learning. After you learn how to make Camera in Minecraft Education Edition, try these activities.
- Science observation logs.
- Students document experiments in short photo steps.
- Storyboarding for creative writing.
- Use images to create panels and write captions.
- Design reviews and feedback.
- Students submit photos of builds for critique.
- Digital portfolios for assessment.
- Collect images over time to show growth.
Practical tips:
- Set clear photo goals for each task.
- Limit image count per student to keep work manageable.
- Teach students privacy rules for sharing images.
Source: youtube.com

Troubleshooting, Limitations, and Best Practices
You may run into issues when you try to make Camera in Minecraft Education Edition. Here are simple fixes and honest limits.
- Camera not in inventory: check world settings and enable Education features.
- /give command fails: ensure cheats are allowed on the world.
- Photos won’t export: check file permissions on the device and the Portfolio options.
- Storage limits: large portfolios can fill device space, so export regularly.
Best practices:
- Test the Camera before a class.
- Provide short how-to steps for students.
- Back up exported images after each lesson.
Source: youtube.com

Frequently Asked Questions of How to Make Camera in Minecraft Education Edition
How do I get a Camera in Minecraft Education Edition?
You can get a Camera from the Creative inventory or use /give @p camera 1. Some worlds also allow crafting via the recipe book.
Can students craft the Camera in Survival mode?
Yes, if the world allows crafting of the Camera. Check the recipe book in-game for exact materials and enable crafting in world settings.
Where do photos taken with the Camera go?
Photos save directly to the Portfolio item. Students can open their Portfolio to view, label, and export images.
Do I need special permissions to use the Camera?
You need Education Edition features enabled and cheats allowed for /give. Teachers should enable settings before students join.
How can I export photos for assessment?
Open the Portfolio and use the export option to save images to your device. Then collect files via your normal classroom workflow.
Can the Camera be used in multiplayer class worlds?
Yes. Photos are saved to the player’s Portfolio and are private unless exported and shared. Teachers can guide sharing rules.
Conclusion
Learning how to make Camera in Minecraft Education Edition is quick and useful for classroom work. Use Creative inventory or the /give command for fast setup. Teach students simple export habits and use photos for reflection and assessment. Try one camera activity next week and collect images to show learning progress. Leave a comment with your favorite Camera lesson or subscribe for more tips and lesson ideas.
As an Amazon Associate, I earn from Qualifying Purchases.