Adjust resolution, enable RAW, tweak ISO/exposure, and set white balance for better camera quality in settings.
I have spent years optimizing photos and video across phones and cameras, so I’ll guide you through how to improve camera quality in settings with clear, tested steps. This article breaks down what each setting does, shows device-specific tips, and gives practical examples so you can get sharper, cleaner images and video quickly.
Source: neat.no
Understanding Camera Settings and Why They Matter
Camera settings are the controls that shape exposure, color, and detail. Learning how to improve camera quality in settings means understanding ISO, aperture, shutter speed, white balance, focus, and file formats. These settings work together; change one and you may need to tweak others.
ISO controls sensor sensitivity. Lower ISO gives cleaner images but needs more light. Aperture changes depth of field and light; wider aperture blurs backgrounds. Shutter speed freezes or blurs motion. White balance ensures colors look natural under different light. File format choices like JPEG, HEIF, and RAW affect editing room and final quality.
Knowing the role of each setting helps you choose the fastest, simplest route to better photos. Focus on the handful of settings that deliver the biggest quality gains first, then refine with advanced options. Practically, this is how to improve camera quality in settings step by step.
People also ask
How does changing ISO affect image quality?
Higher ISO increases brightness but adds noise. Use the lowest ISO you can for clean detail.
When should I use RAW instead of JPEG?
Use RAW when you plan to edit exposure or color later; RAW preserves more data and detail.
Does resolution always mean better photos?
Higher resolution stores more detail but also needs better lenses and steady shooting to show benefits.

Source: joyofandroid.com
Step-by-Step: How to Improve Camera Quality in Settings
Follow these ordered steps to improve camera quality in settings on most devices. Do them in sequence to get the biggest improvement fast.
- Set maximum resolution and quality
- Choose the highest photo resolution and video resolution your device supports.
- For video, pick 1080p or 4K at a stable frame rate for your needs.
- Use the right file format
- Enable RAW or ProRAW for stills when you plan to edit.
- Use high-bitrate or “HQ” video codecs where available.
- Lock focus and exposure
- Tap to lock focus and exposure in the camera app to prevent sudden shifts.
- Adjust ISO and shutter speed (manual or pro mode)
- Lower ISO to reduce noise; increase shutter speed to freeze motion.
- Set white balance for the light source
- Use presets or manual Kelvin settings to avoid color casts.
- Enable stabilization and HDR
- Turn on optical or electronic stabilization. Use HDR for high-contrast scenes.
- Disable digital zoom
- Use the main lens and move closer to avoid quality loss from digital zoom.
- Enable grid lines and level
- Grid helps composition; level avoids tilted horizons and framing errors.
- Optimize frame rate and bitrate for video
- Use 24/30 fps for cinematic look; 60 fps for smooth action; increase bitrate where possible.
- Turn on noise reduction and sharpening sparingly
- Use built-in denoise for low light, but avoid over-sharpening which creates artifacts.
Following these steps will directly show how to improve camera quality in settings by prioritizing clean capture and correct exposure.

Source: pcmag.com
Device-Specific Tips: Phones, DSLRs, and Mirrorless
Different devices label settings differently. Here are quick, practical notes for common platforms.
- iPhone
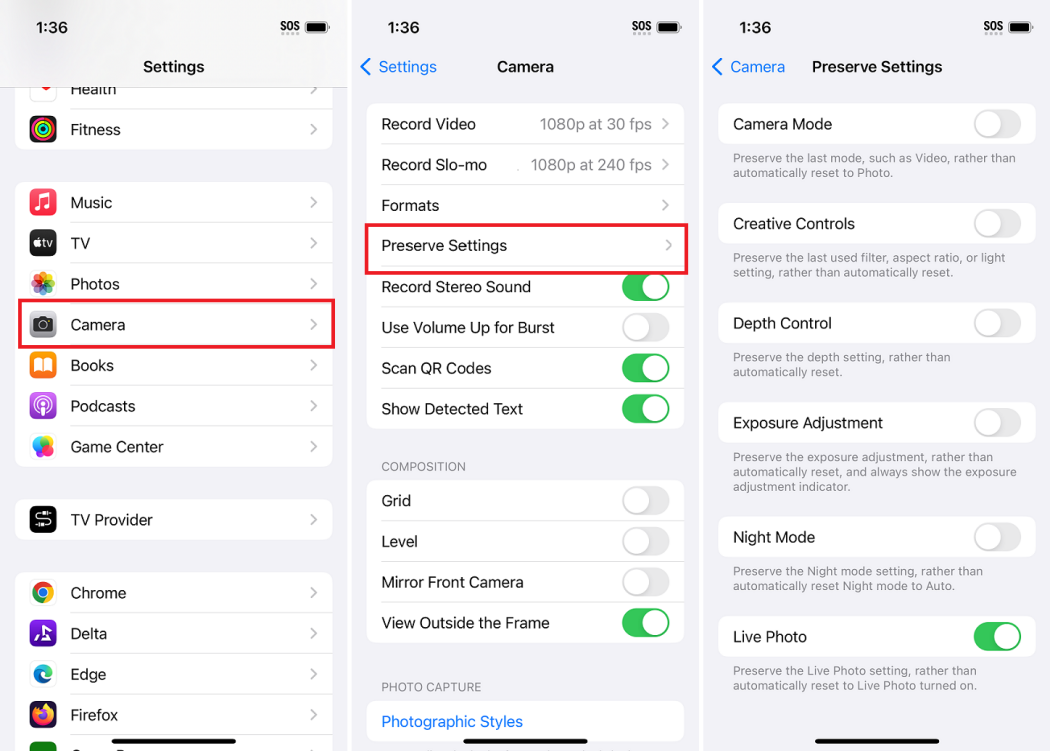
- Enable “ProRAW” for high-quality stills. Turn on “ProRes” for top-tier video if available. Use Exposure Compensation and AE/AF Lock.
- Android (stock and manufacturer UIs)
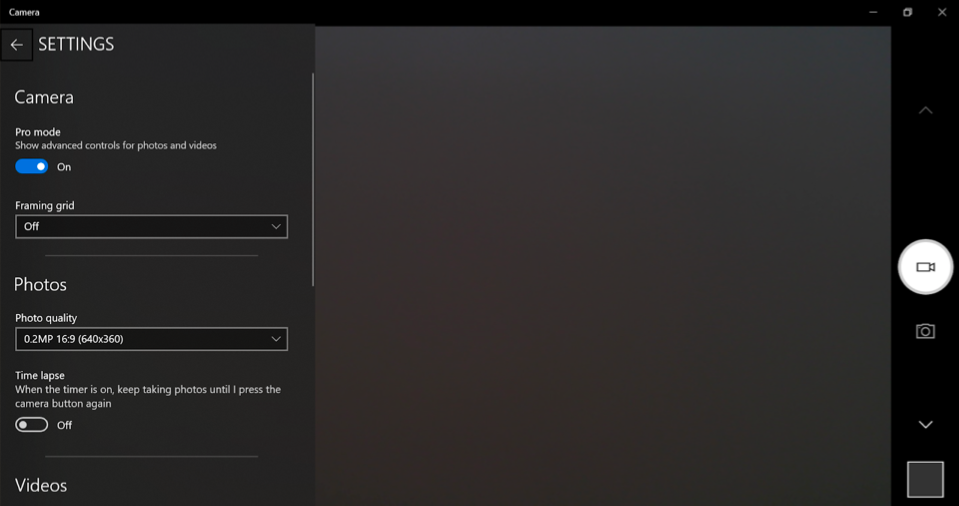
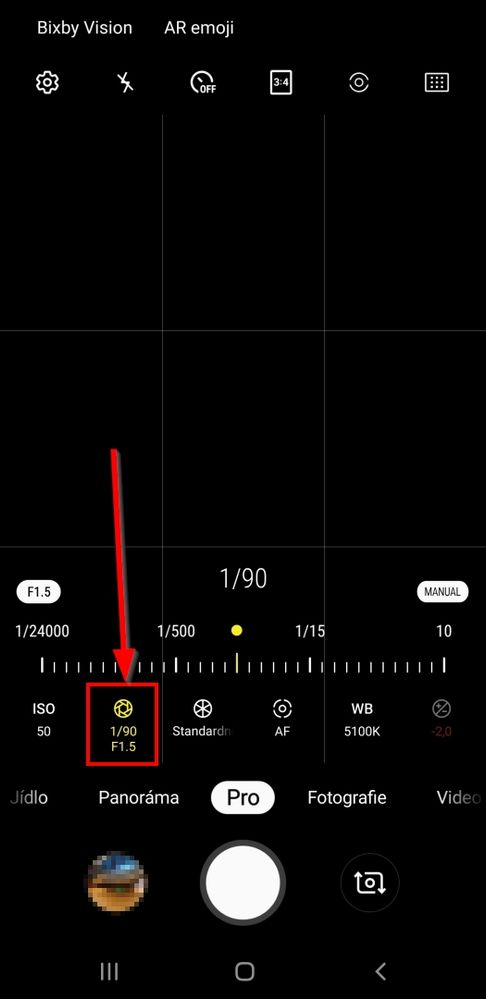
- Use “Pro” mode to set ISO, shutter speed, and white balance. Enable HEIF or RAW formats if supported.
- DSLR and Mirrorless
- Set RAW, choose appropriate aperture for depth of field, and use manual focus or back-button focus for consistent results.
- Action cameras and compact cams
- Lock exposure, use the widest available FOV for quality, and set the highest bitrate and resolution.
These device tips make learning how to improve camera quality in settings faster because you can target the exact toggles that matter.
Source: mefoto.com
Lighting, Composition, and Settings Interaction
Good settings cannot fix poor light. Lighting and composition amplify every setting choice.
- Use natural light when possible
- Soft window light and golden hour reduce harsh shadows and lower needed ISO.
- Control light direction
- Side light creates depth; front light reduces texture and detail.
- Compose with intent
- Use rule of thirds, leading lines, and negative space to make images feel professional.
- Match settings to the scene
- For low light, open aperture, slow shutter speed with stabilization, and raise ISO carefully.
- For bright scenes, lower ISO and use faster shutter speeds to keep highlights intact.
When you combine smart lighting with the right camera settings, you’ll clearly see how to improve camera quality in settings and produce consistently better results.

Source: youtube.com
Advanced Settings: RAW, Color Profiles, Bitrate, and Post-Processing
Move beyond basic toggles once you master them. Advanced settings give you more control and higher-quality output.
- RAW vs compressed files
- RAW stores sensor data for recovery in editing. Compressed files save space but limit tweaks.
- Color profiles and picture styles
- Use neutral or flat profiles to preserve dynamic range. Vivid profiles are fine when you want little editing.
- Bitrate and codecs for video
- Higher bitrate preserves more detail, especially in motion and high-contrast scenes.
- Log and flat profiles
- Use log for grading flexibility; it needs color grading to look right.
- Post-processing
- Basic edits: exposure, white balance, contrast, and sharpening. Advanced: noise reduction, selective color, and lens corrections.
Understanding these options helps you decide when and where to invest time. If your workflow includes editing, these advanced settings are central to how to improve camera quality in settings.

Source: youtube.com
Common Mistakes and How to Fix Them
Avoid these frequent errors that reduce image quality.
- Shooting at auto max ISO
- Fix: Lower ISO and add light. Use a tripod for longer exposures.
- Overusing digital zoom
- Fix: Move closer or crop in post from a high-res file.
- Ignoring white balance
- Fix: Set white balance manually or correct in RAW editing.
- Excessive in-camera sharpening or noise reduction
- Fix: Use subtle settings; do final tweaks in post.
- Not updating firmware or camera app
- Fix: Keep software up to date for stability and better processing.
Addressing these mistakes directly teaches you practical ways to improve camera quality in settings without needing expensive gear.
:max_bytes(150000):strip_icc()/007-improve-the-ipads-camera-1994693-99f6d4650edc4a6cb7de87daae67f6f9.jpg)
Source: lifewire.com
Personal Experience and Practical Tips
From shooting live events to doing product photography, I learned to trust settings over gimmicks. Early on, I shot everything at auto and had noisy, flat photos. Switching to a simple checklist changed my work.
- My checklist
- Set resolution and RAW.
- Lock focus and exposure.
- Check white balance and grids.
- Use a steady support or stabilize.
- A lesson learned
- One event taught me that a small ISO increase beats a missed shot. Prioritize capture over perfect settings in fast situations.
- Quick practical tips
- Before important shoots, test settings for five minutes in the same light. Save presets or modes for repeatable setups.
These real-world practices show not just theory but how to improve camera quality in settings while staying calm on busy shoots.

Source: youtube.com
Frequently Asked Questions of How to Improve Camera Quality in Settings
How do I start improving camera quality in settings on my phone?
Start by setting the highest resolution, enabling RAW if available, and locking focus/exposure. Use Pro or Manual mode to control ISO, shutter speed, and white balance.
Will shooting RAW always give better results?
RAW gives more editing room and can improve final quality, but it requires post-processing. For quick share-ready photos, high-quality JPEG can be fine.
How important is white balance for image quality?
Very important. Correct white balance preserves natural color and reduces time spent fixing color casts in editing.
Can software updates improve camera quality?
Yes. Firmware and app updates can improve processing algorithms, stabilization, and color tuning. Keep your device updated.
Does using HDR make photos better?
HDR helps in high-contrast scenes by preserving shadow and highlight detail, but it can look unnatural if overused. Use judiciously.
How do I reduce noise in low-light photos?
Lower ISO when possible, use a tripod for longer exposures, shoot RAW, and apply noise reduction in post. Avoid heavy in-camera sharpening.
Conclusion
Mastering how to improve camera quality in settings means focusing on core controls: resolution, RAW, ISO, exposure, white balance, and stabilization. Start with the simple steps and add advanced options as you grow. Test settings in the light you’ll shoot in and save presets to speed your workflow. Try one change per session, and you’ll see steady improvement.
Take action now: apply the checklist in your next shoot, save a preset, and leave a comment with your results or questions.
As an Amazon Associate, I earn from Qualifying Purchases.