
Drawing a deer can be a fun and rewarding activity. It allows you to express creativity while connecting with nature.
Whether you’re an experienced artist or a beginner, learning how to draw a deer opens up a world of artistic possibilities. In this guide, you will discover simple steps to create a beautiful deer drawing. Understanding the basic shapes and proportions will help you bring your deer to life on paper.
You’ll learn how to capture its graceful features, from the elegant antlers to the soft fur. This process can boost your confidence and improve your drawing skills. Grab your pencil and paper, and let’s embark on this creative journey together!
Gathering Your Drawing Materials
Gathering your drawing materials is the first step to creating a stunning deer illustration. Having the right tools not only enhances your experience but also affects the outcome of your artwork. Let’s dive into what you’ll need to set yourself up for success.
Choosing The Right Paper
The type of paper you use can significantly impact your drawing. For detailed work, opt for smooth, heavyweight paper that can handle erasing and shading without tearing. Consider using sketch paper for practice, and switch to higher-quality paper for your final piece.
Popular choices include:
- Sketch paper: Affordable and perfect for quick studies.
- Watercolor paper: Great if you plan to add color with water-based mediums.
- Bristol board: Excellent for fine details and clean lines.
Think about how your choice of paper influences your style. Have you ever had a piece that just didn’t feel right because of the paper? Choosing wisely can enhance your artistic voice.
Selecting Pencils And Erasers
Quality pencils are essential for achieving the desired effects in your deer drawing. A range of pencils—from hard (H) to soft (B)—allows you to create both fine lines and rich shadows. Start with an HB pencil for general outlines, then switch to softer pencils for shading.
Don’t overlook the importance of erasers. A kneaded eraser is fantastic for lightening areas without smudging, while a vinyl eraser works well for clean removals. Keep both on hand to adapt as you progress through your drawing.
Have you ever been frustrated by an eraser that just wouldn’t cooperate? Investing in good-quality erasers can save you time and headaches, allowing your creativity to flow smoothly.
Now that you know what materials to gather, you’re ready to start your drawing journey. What will your deer look like? Let your imagination guide you!
Basic Shapes And Proportions
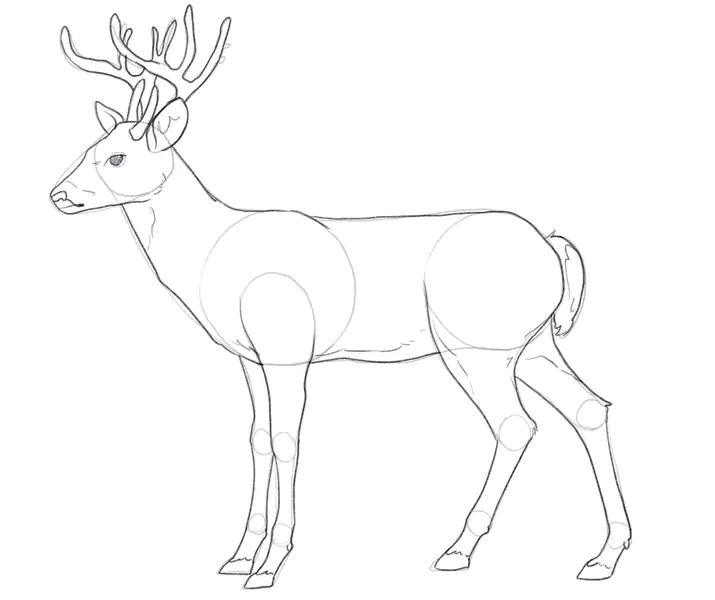
Understanding basic shapes and proportions is essential for drawing a deer. Start with simple forms like circles and ovals to outline the body. Focus on the placement of legs, head, and antlers for a balanced and realistic deer drawing.
Drawing a deer might seem daunting at first, but breaking it down into basic shapes and proportions can make the process enjoyable and manageable. Understanding how to simplify the deer’s complex form into basic geometric shapes will help you capture its essence accurately. By focusing on proportions, you’ll create a more realistic representation that resonates with viewers.Starting With Simple Geometric Forms
Begin your drawing journey by using basic shapes. Start with a large oval for the body and a smaller circle for the head. These forms serve as the foundation for your deer.Next, add rectangles for the legs and triangles for the ears. This simple approach makes it easier to adjust the proportions as you work. Don’t hesitate to sketch lightly at first; you can always refine your lines later.As you create these shapes, think about how they connect. The neck should be a smooth transition between the head and body. This method not only makes your drawing more coherent but also helps you visualize the deer’s posture.Understanding Deer Anatomy
To enhance your drawing, familiarize yourself with deer anatomy. Notice how their bodies are built. A deer has a strong, muscular frame that supports its agile movements.Pay attention to the proportions. The legs are long and slender, while the body is wider at the midpoint. This balance is essential for creating a lifelike representation.Consider the deer’s head next. The eyes are positioned about halfway down the head, and the ears sit high and alert. These details bring your drawing to life. Remember, practice makes perfect. Each time you draw, you’ll improve your understanding of these proportions, making your deer look more realistic.How does breaking down complex forms into basic shapes change your perspective on drawing? Embrace this approach, and you’ll find drawing a deer becomes an exciting challenge rather than an intimidating task.Sketching The Deer’s Body
To draw a deer, start with the body. This part sets the foundation for your artwork. Focus on proportions and shapes to create a realistic look. Begin with simple forms to make it easier.
Drawing The Torso
Start by sketching the torso. Use a large oval shape for the main body. This will give you a good base. The torso should be wider at the back and narrower at the front.
Next, add a smaller oval for the chest. Place it slightly overlapping the larger oval. This helps define the deer’s body shape. Adjust the size as needed to fit your drawing.
Adding The Neck And Head
Now, draw the neck. Create two lines extending from the chest oval. These lines should curve gently upwards. This gives the deer a graceful appearance.
For the head, draw a smaller circle at the top of the neck. This will be the guide for the deer’s head. Connect the head to the neck smoothly. Ensure the proportions look natural.
With the basic shapes in place, you can start adding details later. Focus on making the body and head shapes accurate. This will make your drawing more lifelike.
Credit: www.biowars.com
Refining The Head Details
Refining the head details of a deer involves focusing on key features like the eyes, ears, and nose. Pay attention to proportions for a realistic look. This step enhances your drawing and brings the deer to life on the page.
Refining the head details of your deer drawing is crucial for bringing your artwork to life. This stage focuses on the most expressive parts of the deer: the eyes, ears, nose, and mouth. Mastering these features will create a captivating character in your drawing.Eyes And Ears Placement
The placement of the eyes and ears can dramatically affect the deer’s expression.Start with the eyes. Position them slightly above the center of the head. This gives the deer a gentle and alert look.Next, the ears should be placed on top of the head, slightly tilted outward. Remember, deer have large, expressive ears that can show their mood.Take a moment to observe real deer; notice how their ears react to sounds. This can inspire you to position them in a way that adds life to your drawing.Drawing The Nose And Mouth
The nose and mouth are essential for conveying the deer’s personality.Begin by drawing a small oval for the nose at the end of the snout. Make it slightly wider than it is tall to mimic the deer’s natural shape.For the mouth, draw a gentle curve beneath the nose. This small detail can suggest whether your deer is calm or curious.As you refine these features, ask yourself: how does the expression you create reflect the deer’s environment? A relaxed deer might have a more open mouth, while a startled one may show a tight line.By focusing on these specific details, you create a more lifelike representation of your deer. Take your time, and remember that small adjustments can make a big difference in the overall feel of your drawing.Constructing The Legs
Constructing the legs of a deer is crucial for a realistic drawing. Pay attention to their structure and movement. Understanding the anatomy helps bring your drawing to life. Let’s break it down into two main parts: front legs and back legs.
Front Legs Anatomy
The front legs of a deer have a unique shape. They are long and slender. Start with two parallel lines for each leg. Add a slight curve for the joints. This gives them a natural look. The front legs support the deer’s weight.
The shoulder area connects to the body. It is wider than the leg itself. Draw a rounded shape here to show muscle. At the bottom, create a small hoof shape. This should taper down gently. Make sure the legs appear strong yet graceful.
Back Legs Movement
The back legs are powerful and built for jumping. They are thicker than the front legs. Begin with two strong lines angled slightly backward. This shows movement and strength. Add curves at the knee joints for realism.
At the bottom, draw the hoof. This should be larger than the front hoof. The back legs help the deer run quickly. Position them slightly apart for balance. This gives your deer a stable appearance.

Credit: www.wedrawanimals.com
Antlers And Tail
Drawing a deer involves attention to detail. Antlers and tail are key features. They add character and realism to your drawing. Understanding how to shape these parts is essential.
Shaping The Antlers
Start by sketching the base of the antlers. They grow from the top of the head. Use curved lines to create a natural look. Antlers have various shapes. Some are wide, while others are tall.
Draw branching points on the antlers. This will give them depth. Make sure the antlers are symmetrical. Balance is important for a realistic appearance.
Refine the lines as you go. Add texture with gentle strokes. This creates a more lifelike effect. Erase any unwanted lines. The antlers should stand out clearly against the head.
Adding The Tail With Proper Length
The tail of a deer is small yet distinct. Position it at the back of the body. Start with a curved line for the tail shape. Make it slightly fluffy for realism.
Ensure the tail is proportional to the body. It should not be too long or too short. A good rule is to keep it around one-third of the body length.
Add some details to the tail. Light lines can represent fur texture. This adds interest and complexity. Keep the tail simple but expressive.
Finalizing The Outline
Creating a clear outline is essential for drawing a deer effectively. Start by sketching basic shapes to define the body, head, and legs. This organized approach simplifies the drawing process and helps in capturing the deer’s unique features accurately.
Finalizing the outline of your deer drawing is a crucial step that can elevate your artwork from a simple sketch to a more realistic representation. This phase involves refining your initial shapes and ensuring that everything is in proportion. With just a few adjustments, you can create a polished outline that sets the stage for the details to come.Cleaning Up The Sketch
Start by carefully reviewing your initial sketch. Look for any lines that appear too heavy or unnecessary. Use an eraser to lighten or remove these lines, as clarity is essential for the next steps.Take a moment to assess the overall shape of your deer. Are the legs too short or the body too wide? Adjust these areas by gently redrawing them, ensuring you maintain a smooth line. This cleanup is your chance to enhance the flow and structure of your drawing.Consider how each part connects to the other. For instance, the neck should smoothly transition into the head, while the legs should anchor firmly to the body. Achieving this flow will give your deer a more natural appearance.Adjusting Proportions
Now, focus on the proportions of your deer. A common mistake is to have the head too large or the legs too thin. Take a step back and compare the different parts of your drawing to a reference image. This practice can help you spot any discrepancies.You might find it helpful to use a grid system. Lightly divide your drawing into sections to ensure each part aligns with the overall shape. This method can be particularly useful for maintaining balance in your proportions.Don’t hesitate to make bold changes. Sometimes, a simple adjustment to the angle of the ears or the length of the legs can make a significant difference. Your goal is to create a deer that looks realistic and appealing. Are you ready to take your sketch to the next level?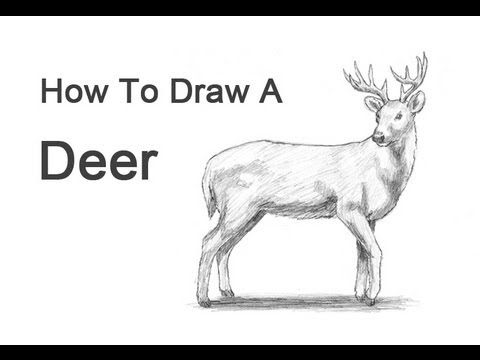
Credit: www.youtube.com
Shading And Texturing
Shading and texturing bring your deer drawing to life. These techniques add depth and realism. Proper shading shows light and shadow. Texturing mimics the deer’s fur. Both elements enhance the overall look.
Basic Shading Techniques
Start with a light hand. Use a pencil to create soft shadows. Identify the light source in your drawing. Shadows appear on the opposite side of the light. Gradually darken areas to show depth.
Blend using a blending stump or your finger. This smooths harsh lines. Apply layers of shading for a rich effect. Don’t rush; take your time to build up tones.
Creating Fur Texture
Fur texture adds realism to your deer. Use short, quick strokes to mimic fur. Vary the length and direction of your strokes. This creates a natural look.
Focus on areas with more light. Highlight these spots with lighter pencil strokes. Darker areas can use deeper shading techniques. Practice different fur patterns to improve your skills.
Adding The Final Touches
Adding the final touches to your deer drawing is where your artwork truly comes to life. It’s that moment when simple lines transform into a magnificent creature. Let’s dive into how to refine your drawing and make it pop.
Highlighting Key Features
Focus on the eyes first. Brightening them with a white highlight can create a sense of life and curiosity. A small dot in each eye will make your deer appear more realistic.
Next, consider the antlers. Use a darker pencil or fine-tipped pen to define the edges. This contrast can draw attention to the majestic antlers, showcasing their intricate shapes.
Shading plays a critical role too. Lightly shade the areas under the belly and around the legs. This adds depth and dimension, making your deer look like it’s standing in a three-dimensional space.
Background Considerations
A simple background can enhance your deer drawing without overwhelming it. Think about adding some trees or grass to ground your deer in its natural habitat.
Use soft, light strokes to create a blurred effect for the background. This technique keeps the focus on your deer while providing context.
Consider the time of day as well. A sunset or sunrise can add warmth to your drawing. Soft oranges and yellows can create a beautiful atmosphere, making your deer stand out even more.
What kind of setting do you envision for your deer? A tranquil forest scene or a sunny meadow can greatly affect the mood of your artwork. Choose wisely to complement your drawing.
Tips For Beginners
Drawing a deer can be fun and easy for beginners. Start with simple shapes to outline the body and head. Focus on details like the ears and antlers to bring your drawing to life. Practice makes perfect, so keep trying!
Drawing a deer can be a rewarding experience, especially for beginners looking to hone their artistic skills. Whether you’re sketching for fun or aiming to create a masterpiece, having a few practical tips can help you get started on the right foot. This section will cover essential advice that can make your drawing journey smoother and more enjoyable.Practice Makes Perfect
Start by dedicating time to practice regularly. Just like any skill, drawing improves with repetition. Set aside a few minutes each day to sketch, even if it’s just rough outlines.Begin with simple shapes. Draw circles and ovals to form the body and head of the deer. This approach helps you understand proportions better.Don’t shy away from mistakes. Every artist makes them. Use them as learning opportunities, and soon, your confidence will grow.Studying Real Deer
Observing real deer can provide you with invaluable insights into their anatomy and movements. Visit a local park or wildlife reserve. Take your sketchbook and capture their poses in real-time.Pay attention to the details. Notice the shape of their ears, the curve of their antlers, and the texture of their fur. Each characteristic contributes to making your drawing more lifelike.You can also study photographs. A well-captured image can highlight features that you might miss in person. Analyze these images closely, and try replicating them in your sketches.In your drawing journey, have you ever considered how understanding your subject can transform your artwork? Let that curiosity drive your practice.Frequently Asked Questions
How To Draw Deer Easily For Beginners?
To draw a deer easily, start with a simple oval for the body. Sketch the head with two circles for the eyes. Add ears and antlers. Draw legs extending from the body. Refine your lines and add details. Erase unnecessary marks and shade for depth.
How To Draw A Cute Fawn?
To draw a cute fawn, start with a rounded body shape. Add a circular head and long ears. Sketch large, expressive eyes and a small nose. Outline slender legs and a short tail. Finally, add spots on the back for detail.
Use soft lines for a gentle look.
How To Draw A Reindeer Easily For Beginners?
To draw a reindeer easily, start with a simple oval for the body. Add a circle for the head and sketch the legs. Draw antlers using curved lines, and outline the ears. Finish with details like eyes and nose. Erase any unnecessary lines for a clean look.
How To Draw The Face Of A Deer?
To draw a deer’s face, start with a circle for the head. Add guidelines for eyes and nose. Sketch the eyes, ears, and muzzle. Shape the antlers if drawing a male. Refine details, erasing unnecessary lines. Finally, shade or color to add depth.
Conclusion
Drawing a deer can be a fun and rewarding experience. With simple steps, anyone can create their own deer illustration. Practice makes perfect. Don’t worry if your first attempt isn’t great. Keep trying, and you’ll see improvement. Use different techniques to add your unique style.
Share your artwork with friends and family. Enjoy the process of learning and creating. Remember, drawing is about expression and enjoyment. So grab your pencil and start sketching today. Happy drawing!
As an Amazon Associate, I earn from Qualifying Purchases.