
Is your Chromebook camera not working? You aren’t alone in facing this issue.
Many users report problems with their Chromebook’s camera, leaving them frustrated. Chromebooks are known for their simplicity and reliability, but camera issues can still arise. This problem can stem from various causes, such as software glitches, outdated drivers, or hardware malfunctions.
Understanding the root of the problem can help in finding a quick fix. In this post, we will explore common reasons why your Chromebook camera might not work and offer practical solutions. Whether you’re using your camera for online classes, meetings, or personal projects, these insights can help you get back on track. Let’s dive into the details and resolve your Chromebook camera issues.
Common Camera Issues
Many Chromebook users face camera problems. These issues can be frustrating. Below, we discuss the most common issues and their solutions.
Camera Not Detected
Sometimes, your Chromebook might not detect the camera. This can happen due to several reasons:
- Outdated software: Ensure your Chromebook is running the latest software version. Go to Settings > About Chrome OS > Check for updates.
- Loose connections: If you’re using an external camera, check the USB connection. A loose cable can cause detection issues.
- Disabled camera: Some privacy settings might disable the camera. Check your settings to ensure the camera is enabled.
Blank Or Black Screen
A blank or black screen is another common camera problem. This issue can occur for various reasons:
- Camera permissions: Ensure the app has permission to access the camera. Go to Settings > Privacy and Security > Site Settings > Camera.
- App issues: Sometimes, the app itself may have bugs. Try using the camera with another app to see if it works.
- Hardware problems: If the above steps don’t work, there might be a hardware issue. Contact Chromebook support for further assistance.
Addressing these common issues can help you get your camera working again. Always keep your Chromebook updated for the best performance.
Credit: www.howtogeek.com
Basic Checks
Is your camera not working on your Chromebook? Don’t worry. Basic checks can solve this issue. Follow these steps to ensure your camera works smoothly.
Restart Chromebook
Start by restarting your Chromebook. This simple step can fix many issues. Click on the time at the bottom right. Select the power icon to shut down. Wait a few seconds. Turn your Chromebook back on.
Check Camera Permissions
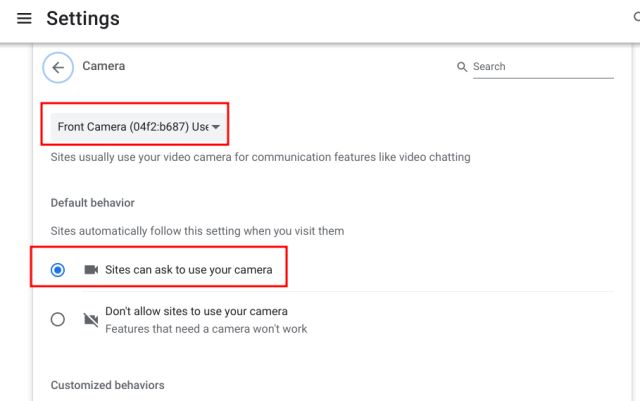
Next, check camera permissions. Open the settings menu. Click on “Privacy and Security”. Then, find “Site Settings”. Look for “Camera”. Ensure your browser has permission to use the camera.
Sometimes, specific websites need permission. Open the website causing issues. Click the lock icon next to the website address. Check if the camera is allowed for that site.
These basic checks can often resolve camera issues. Follow these steps to get your camera working again.
Software Updates
Software updates are crucial for the smooth functioning of any device, including Chromebooks. Updating the software can resolve many issues, including camera problems. Regular updates keep the system and apps running efficiently, ensuring compatibility with new features and security patches.
Update Chrome Os
Updating Chrome OS is the first step to fixing camera issues. Follow these steps to ensure your operating system is up to date:
- Click on the time at the bottom right corner.
- Select Settings.
- Scroll down and click on About Chrome OS.
- Click Check for updates.
- If an update is available, it will start downloading automatically.
After the update, restart your Chromebook. Then, check if the camera works.
Update Camera App
Sometimes, the camera app needs an update. Follow these steps:
- Open the Google Play Store.
- Click on the Menu icon at the top left.
- Select My apps & games.
- Look for the Camera app in the list.
- If there is an Update button next to it, click it.
Once updated, open the camera app again. Check if the issue is resolved. Keeping both Chrome OS and the camera app updated can solve many software-related problems.
Hardware Troubleshooting
Experiencing issues with your Chromebook camera can be frustrating. Before diving into software solutions, it’s essential to rule out hardware problems. This section will help you with some basic hardware troubleshooting steps.
Check Camera Connection
Ensure the camera is properly connected. If you are using an external camera, check the USB connection. Unplug and plug it back in securely. Sometimes, a loose connection can cause the camera to malfunction.
If the camera is built-in, ensure it is not blocked. Dust or debris can sometimes cover the lens, affecting the camera’s performance. Clean the camera lens gently with a microfiber cloth.
Inspect For Physical Damage
Look for any visible damage to the camera. Cracks or scratches on the lens can impede its functionality. If you find any damage, the camera may need repair or replacement.
Check the surrounding area of the camera for any dents or bends. Physical damage to the Chromebook can affect the internal connections of the camera. If the damage is severe, consider seeking professional help.
App-specific Problems
Chromebooks have become popular due to their simplicity and affordability. Yet, users often face issues with their cameras. One common problem is app-specific issues. These issues vary depending on the application in use. Let’s explore some common app-specific problems with popular video conferencing apps.
Issues With Google Meet
Google Meet is widely used for virtual meetings. Sometimes, users find their camera does not work. This can be due to permission settings. Ensure the camera permission is enabled in the Chromebook settings. Also, check the permissions in Google Meet. If the camera still doesn’t work, try restarting the Chromebook. A simple restart can often fix minor glitches.
Another issue could be related to browser settings. Google Meet works best on Chrome. Ensure Chrome is updated. Clear the cache and cookies. This can often resolve camera issues. If the problem persists, check for any conflicting extensions. Disable them one by one to identify the culprit.
Problems With Zoom
Zoom is another popular app for virtual meetings. Users sometimes face camera issues on Chromebooks. First, check the camera permissions. Ensure Zoom has access to the camera. Update the Zoom app to the latest version. This can fix many common issues.
If the camera still doesn’t work, check the Chromebook’s camera settings. Ensure the camera is enabled. Restart the Chromebook if needed. Also, ensure no other apps are using the camera. Close any other apps that might be accessing the camera.
Another common fix is to check for system updates. Ensure the Chromebook is running the latest version. Updates often include fixes for common issues. Following these steps can often resolve camera problems on Zoom.
Reset Camera Settings
If your camera isn’t working on your Chromebook, resetting the camera settings can help. This simple action can fix many common issues. You can do this by resetting Chrome settings and the Camera app. Here’s how.
Reset Chrome Settings
Resetting Chrome settings can solve many problems with your camera. Follow these steps to reset Chrome settings:
- Open Chrome on your Chromebook.
- Click on the three-dot menu in the top-right corner.
- Select Settings from the dropdown menu.
- Scroll down and click on Advanced.
- Scroll down to the Reset and clean up section.
- Click on Restore settings to their original defaults.
- Confirm by clicking Reset settings.
Resetting these settings will not remove your bookmarks or passwords. It will reset your Chrome profile settings to default.
Reset Camera App
Resetting the camera app can also fix camera issues. Here are the steps to reset the Camera app:
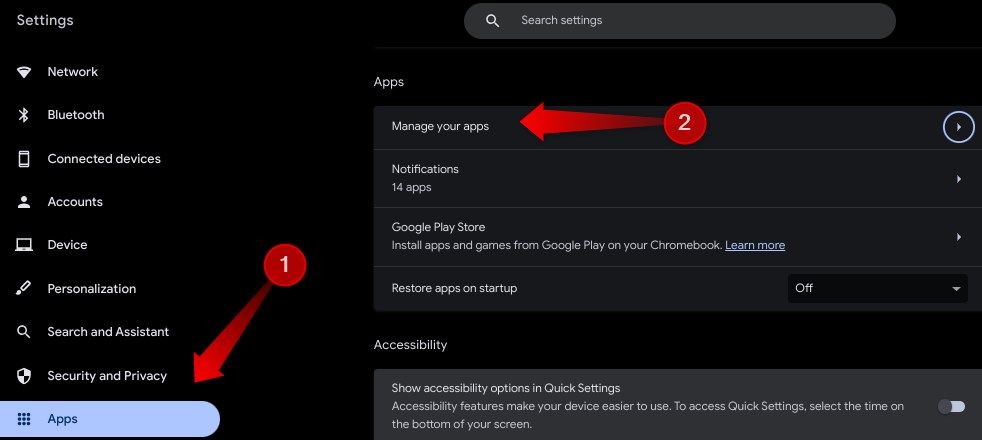
- Open the Settings on your Chromebook.
- Go to Apps.
- Find the Camera app in the list.
- Click on Camera.
- Select Storage.
- Click on Clear cache and Clear data.
This will reset the Camera app to its default settings. It often resolves many camera issues.
| Step | Action |
|---|---|
| 1 | Open Settings |
| 2 | Go to Apps |
| 3 | Select Camera app |
| 4 | Click on Storage |
| 5 | Clear cache and data |
Resetting the settings can often fix the camera on your Chromebook. Try these steps and see if your camera starts working again.
Advanced Solutions
If your camera isn’t working on your Chromebook, basic troubleshooting might not fix the issue. In such cases, advanced solutions can help. These methods can be more effective in resolving persistent camera problems.
Powerwash Chromebook
Powerwashing your Chromebook can resolve many software issues. This process resets your device to factory settings. It removes all local data, so ensure you back up important files before proceeding.
- Click on the clock in the bottom-right corner.
- Select Settings.
- Scroll down and click Advanced.
- Under the Reset settings section, click Powerwash.
- Follow the on-screen instructions to complete the reset.
After the reset, check if the camera is working. This method often resolves hidden software conflicts.
Reinstall Chrome Os
If powerwashing doesn’t help, reinstalling Chrome OS might be necessary. This process ensures a clean installation of the operating system. It can fix deep-rooted software issues affecting your camera.
Follow these steps to reinstall Chrome OS:
| Step | Instructions |
|---|---|
| 1 | Back up important files to Google Drive or an external device. |
| 2 | Download the Chromebook Recovery Utility from the Chrome Web Store. |
| 3 | Follow the instructions to create a recovery USB drive. |
| 4 | Insert the recovery USB drive into your Chromebook. |
| 5 | Follow the on-screen instructions to reinstall Chrome OS. |
Reinstalling Chrome OS can take some time, but it often resolves persistent issues. Once the installation is complete, check your camera again.

Credit: www.youtube.com
Seek Professional Help
If your Chromebook camera still doesn’t work after trying basic troubleshooting steps, it might be time to seek professional help. Sometimes, the issue is more complex and needs expert intervention. Don’t worry, there are several options available.
Contact Manufacturer Support
The first step is to contact the manufacturer of your Chromebook. They have specialized teams that handle hardware issues. You can usually reach them through their official website or customer service hotline. Make sure to provide details about your issue, including any error messages you’ve seen.
- Visit the manufacturer’s website
- Locate the support section
- Fill out the support form or call customer service
Keep your Chromebook’s serial number and purchase date handy. This information helps the support team assist you more effectively.
Visit Authorized Service Center
If contacting support doesn’t resolve the issue, the next step is to visit an authorized service center. These centers are equipped to handle hardware repairs and replacements. You can find a list of authorized centers on the manufacturer’s website.
- Check the list of authorized service centers
- Choose the nearest center
- Schedule an appointment
Bring your Chromebook and any accessories you use with it. The technicians will run diagnostics to identify the problem and suggest the best course of action.
Visiting an authorized center ensures that your Chromebook receives genuine parts and professional care.
Credit: beebom.com
Frequently Asked Questions
Why Is My Chromebook Camera Not Working?
There could be several reasons for this issue. Check if your camera is blocked by software settings. Ensure that your Chromebook’s operating system is up to date. Restart your device and try again.
How Do I Fix My Chromebook Camera?
First, restart your Chromebook. Check for any software updates and install them. Ensure that your camera isn’t being blocked by any apps or extensions. If the issue persists, consider performing a factory reset.
Can I Update My Chromebook Camera Driver?
Chromebooks automatically update drivers with system updates. Ensure your Chromebook is running the latest OS version. If the camera still doesn’t work, there might be a hardware issue.
Why Does My Camera Show A Black Screen?
A black screen could indicate a blocked camera lens. Check if there’s any physical obstruction. Ensure that no other apps are using the camera. Restart your Chromebook and try again.
Conclusion
Fixing camera issues on a Chromebook can be simple. Check for software updates first. Restart your device often. Ensure permissions for camera use are enabled. Try using a different camera app. Troubleshoot hardware issues if needed. Follow these steps for a smooth experience.
Your Chromebook’s camera should work fine soon. Happy video calling!
As an Amazon Associate, I earn from Qualifying Purchases.