
Want to capture stunning photos with your iPhone? It’s easier than you think.
With a few tips and tricks, you can use your iPhone camera effectively. The iPhone camera is a powerful tool. It can take high-quality photos and videos effortlessly. But, many users don’t know how to use it to its full potential.
Whether you’re a beginner or have some experience, learning to use the iPhone camera can enhance your photography skills. In this guide, we will explore different features and settings of the iPhone camera. You’ll discover how to take better photos and videos, use various modes, and apply useful tips. By the end, you’ll feel more confident in your ability to use your iPhone camera effectively.

Credit: www.reddit.com
Mastering The Basics
Using your iPhone camera effectively begins with understanding the basics. Knowing the core functions and settings can improve your photos significantly. This section will help you get started.
Camera Modes
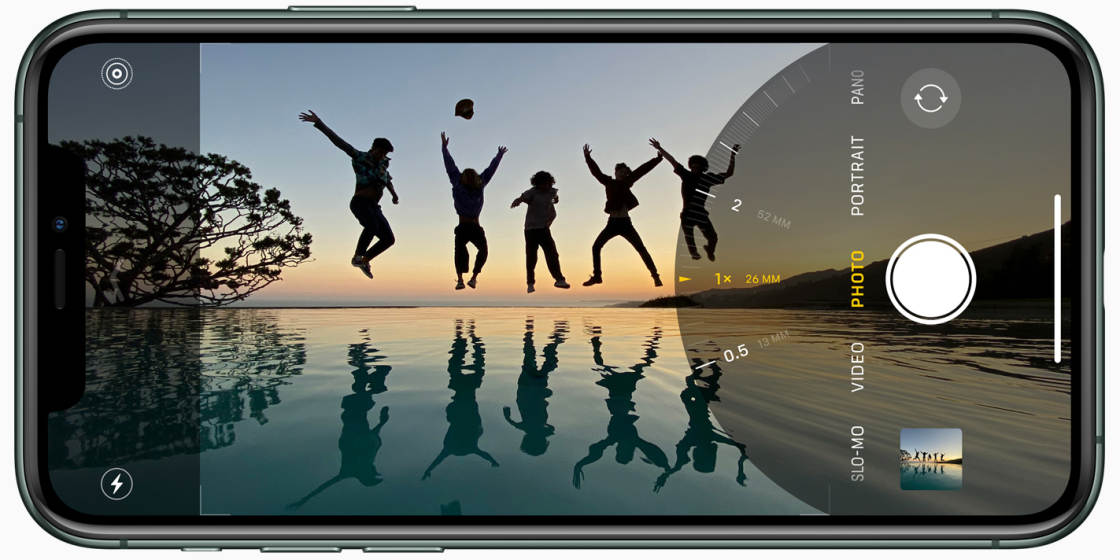
The iPhone camera has several modes to choose from. Each one serves a unique purpose. Familiarizing yourself with these modes will enhance your photography skills.
- Photo: This is the default mode for everyday pictures. It automatically adjusts the settings for a balanced shot.
- Portrait: This mode is great for taking pictures of people. It blurs the background to focus on the subject.
- Pano: Use this mode for wide landscape shots. It stitches multiple images together to create one wide photo.
- Video: Switch to this mode to record moving images. You can adjust the resolution and frame rate.
- Slow-Mo: This mode captures video at a high frame rate. It plays back in slow motion for dramatic effects.
Grid Lines
Grid lines are a handy feature to improve composition. They help you align your shots using the rule of thirds.
To enable grid lines:
- Open the Settings app on your iPhone.
- Scroll down and tap Camera.
- Toggle the Grid option to on.
Using grid lines can make your photos more balanced and interesting. They help you place the subject off-center, which is often more appealing than centered shots.
In summary, understanding camera modes and using grid lines can make a big difference. Start with these basics to take better photos with your iPhone.
Credit: iphonephotographyschool.com
Optimizing Settings
Optimizing your iPhone camera settings is crucial for capturing stunning photos. Whether you’re a novice or experienced photographer, adjusting the right settings can make a significant difference. Let’s dive into some essential settings you need to know.
Resolution Options
Resolution determines the clarity of your photos. Higher resolution means more detail. On your iPhone, go to Settings > Camera > Formats. Select ‘High Efficiency’ for better quality and storage management.
For most everyday photos, the default settings work well. If you need more detail, consider using the ‘Most Compatible’ option. This setting uses more storage but offers higher quality photos.
Hdr Mode
HDR (High Dynamic Range) mode helps balance light and dark areas in your photos. This feature is great for scenes with varying light levels. To enable HDR, go to Settings > Camera > Smart HDR.
When HDR is on, your iPhone takes multiple shots at different exposures. It then combines them to create a balanced photo. This setting works well for landscapes and bright backgrounds.
For more control, you can manually turn HDR on or off within the Camera app. Simply tap the HDR icon at the top of the screen. Experiment with different settings to see what works best for you.
Lighting Techniques
Using the iPhone camera effectively requires understanding various lighting techniques. Proper lighting can enhance photo quality. This section covers essential lighting methods to improve your iPhone photography skills.
Natural Light
Natural light is the best light source. It provides soft and even illumination. Take photos near windows or outside. Early morning or late afternoon light is best. These times offer a warm glow. Overcast days provide diffused light. This reduces harsh shadows.
Avoid direct sunlight. It can cause harsh shadows and overexposure. Use shade for softer light. Experiment with different angles. This helps you find the best lighting for your subject.
Low Light
Low light conditions can be challenging. Use the iPhone’s Night mode. It enhances details in low light. Keep your hand steady. This prevents blurry photos. Use a tripod if needed.
Look for other light sources. Streetlights, lamps, or candles can add mood. Adjust the exposure manually. Tap on the screen and slide up or down. Increase exposure for brighter photos. Decrease it to avoid overexposure.
Experiment with different settings. Practice makes perfect. Learn how your iPhone camera reacts to low light. This helps you take better photos in any condition.
Composition Tricks
Unlock the full potential of your iPhone camera with some simple composition tricks. These techniques can transform your photos from average to stunning. Learn how to use the Rule of Thirds and Leading Lines to capture eye-catching images. Your photography skills will improve with these easy tips.
Rule Of Thirds
One of the most important composition tricks is the Rule of Thirds. This rule helps you balance your photos. Imagine your screen divided into nine equal parts. Place your subject along these lines or at their intersections. This creates a more engaging photo. It draws the viewer’s eye to the most important parts of the image. Most iPhones have a grid feature. Turn it on in your camera settings for easy guidance.
Leading Lines
Leading lines are another great trick to improve your photos. These are lines that guide the viewer’s eye through the image. They can be roads, paths, or even a row of trees. Leading lines add depth and interest to your photos. They help direct attention to your subject. Experiment with different angles and perspectives. See how leading lines can change the feel of your photos.
Using Advanced Features
The iPhone camera offers several advanced features to enhance your photography. These features help you take stunning photos in various conditions. Let’s explore some of these advanced features.
Portrait Mode
Portrait Mode is perfect for capturing professional-looking portraits. It blurs the background, making the subject stand out. To use Portrait Mode, open the Camera app and swipe to Portrait. Ensure your subject is within 2.5 meters for the best effect. Adjust the lighting by tapping the screen and sliding the exposure bar. Experiment with different lighting effects available in Portrait Mode.
Night Mode
Night Mode helps you take clear photos in low light. It activates automatically in dark environments. To use Night Mode, hold your iPhone steady or use a tripod. The camera will suggest an exposure time. Keep your phone still until the capture is complete. Night Mode uses advanced algorithms to brighten the image while reducing noise.
Editing Essentials
Editing Essentials can transform your iPhone photos from ordinary to exceptional. Learning how to edit your photos efficiently allows you to enhance their quality and make them more visually appealing. Let’s dive into the built-in editor and third-party apps to get the most out of your iPhone camera.
Built-in Editor
The iPhone comes with a powerful built-in editor in the Photos app. This editor provides various tools to tweak your pictures.
- Auto-Enhance: This tool automatically improves your photo’s quality. Tap on the magic wand icon to apply it.
- Crop and Rotate: Adjust the composition of your photo. Use the crop tool to remove unwanted parts and the rotate tool to align your image.
- Filters: Choose from various filters to change the mood of your picture. Select the filter that best suits your photo’s style.
- Adjust: Fine-tune your photo’s aspects such as exposure, brightness, contrast, and more. Use the sliders to make precise adjustments.
Third-party Apps
While the built-in editor is robust, third-party apps can offer more advanced features. Some popular apps include:
| App Name | Features | Cost |
|---|---|---|
| VSCO | Advanced filters, manual adjustments | Free with in-app purchases |
| Snapseed | Professional editing tools, selective adjustments | Free |
| Adobe Lightroom | RAW editing, cloud storage | Free with subscription options |
Using these apps, you can access features like:
- Advanced Filters: Apply unique filters that aren’t available in the built-in editor.
- Selective Adjustments: Edit specific parts of your photo without affecting the entire image.
- RAW Editing: Edit photos in RAW format for more control over the final output.
By combining the built-in editor with third-party apps, you can take your photo editing skills to the next level. Experiment with different tools and find what works best for you.
Keeping Steady
Using your iPhone camera effectively requires mastering the art of keeping steady. Shaky hands can ruin the best shots. Keeping your phone still helps you capture clear and sharp images. Let’s explore some tools to help you achieve this.
Tripods
Tripods are essential for steady shots. They hold your iPhone in place. You can adjust the height and angle. This is great for landscape and group photos. Tripods are lightweight and portable. You can carry them easily.
Stabilizers
Stabilizers help reduce camera shake. They are also known as gimbals. They keep your iPhone balanced. This is useful for recording videos. Stabilizers are easy to use. Just attach your iPhone and start filming. They make your videos look smooth and professional.
Exploring Creative Shots
Exploring the creative potential of your iPhone camera can be a fun and rewarding experience. With various features and modes, you can capture unique and stunning shots. Let’s dive into two exciting features: Panorama and Slow Motion.
Panorama
Panorama mode allows you to capture wide-angle photos seamlessly. Here’s how to use it effectively:
- Open the Camera app and select Panorama mode.
- Hold your iPhone steady and tap the shutter button.
- Slowly move your iPhone in one direction, following the on-screen guide.
- Tap the shutter button again to finish.
For best results:
- Use a tripod to keep the camera steady.
- Move at a consistent speed.
- Avoid moving subjects in the frame.
With Panorama mode, you can capture breathtaking landscapes, cityscapes, and large group photos. Experiment with different angles and perspectives for creative shots.
Slow Motion
Slow Motion mode captures high-speed actions in detail. Here’s how to use it:
- Open the Camera app and select Slow Motion mode.
- Tap the record button to start filming.
- Tap the record button again to stop filming.
To achieve stunning slow-motion videos:
- Ensure good lighting for clear footage.
- Focus on fast-moving subjects for dramatic effects.
- Use a tripod to reduce camera shake.
With Slow Motion mode, you can capture impressive action shots, from sports to playful moments. Experiment with different subjects and speeds for creative videos.

Credit: www.youtube.com
Frequently Asked Questions
How Do I Take Better Photos With My Iphone?
To take better photos, use natural light and focus on composition. Clean your lens and use the grid feature. Experiment with different angles and perspectives.
What Are The Best Iphone Camera Settings?
For best results, use HDR, grid lines, and adjust exposure. Explore portrait mode for depth effects.
How Can I Use Iphone’s Portrait Mode?
Portrait mode creates a depth effect by blurring the background. Select portrait mode, focus on your subject, and capture.
How Do I Use The Iphone Camera Timer?
Open the camera app, tap the timer icon, and select 3 or 10 seconds. Press the shutter button.
Conclusion
Using your iPhone camera effectively can greatly improve your photos. Practice the tips shared here. Experiment with lighting and angles. Use the grid feature for better composition. Keep your lens clean for sharp images. Explore the camera settings and modes.
Remember to hold your phone steady. With these techniques, your photos will look more professional. Happy shooting!
As an Amazon Associate, I earn from Qualifying Purchases.