
Learning to use a professional camera can seem daunting. But it’s a rewarding skill.
Mastering a professional camera opens up a world of creative possibilities. You’ll capture stunning images and tell stories through your lens. Understanding your camera’s settings is the first step. This includes shutter speed, aperture, and ISO. Each plays a crucial role in photography.
Knowing how to adjust these settings will improve your photos. You’ll also need to learn about different lenses and their uses. This knowledge will help you choose the right lens for each shot. Finally, practice is essential. The more you use your camera, the better you’ll become. Stay patient and keep experimenting with different techniques. Your photography skills will improve over time.
Credit: www.youtube.com
Choosing The Right Camera
Choosing the right camera is the first step in your photography journey. A professional camera can help you capture stunning photos. But with so many options, picking the right one can be tricky. This guide will help you make an informed decision.
Types Of Cameras
Understanding different types of cameras is key. There are three main types: DSLR, mirrorless, and compact. DSLRs are popular among professionals. They offer great image quality. Mirrorless cameras are lighter and more modern. Compact cameras are small and easy to carry. Each type has its pros and cons.
Key Features To Consider
When choosing a camera, focus on key features. Sensor size is important. A larger sensor captures more light. This means better image quality. Look at the megapixels. More megapixels mean more detail. But it’s not the only thing to consider.
Check the camera’s ISO range. A higher ISO range means better low-light performance. Also, consider the autofocus system. A good autofocus system helps you take sharp photos. Look at the camera’s build quality. A durable camera will last longer.
Think about the lens options. Some cameras have more lens choices. This gives you more flexibility. Finally, consider the camera’s ease of use. A user-friendly camera will make your photography experience better.
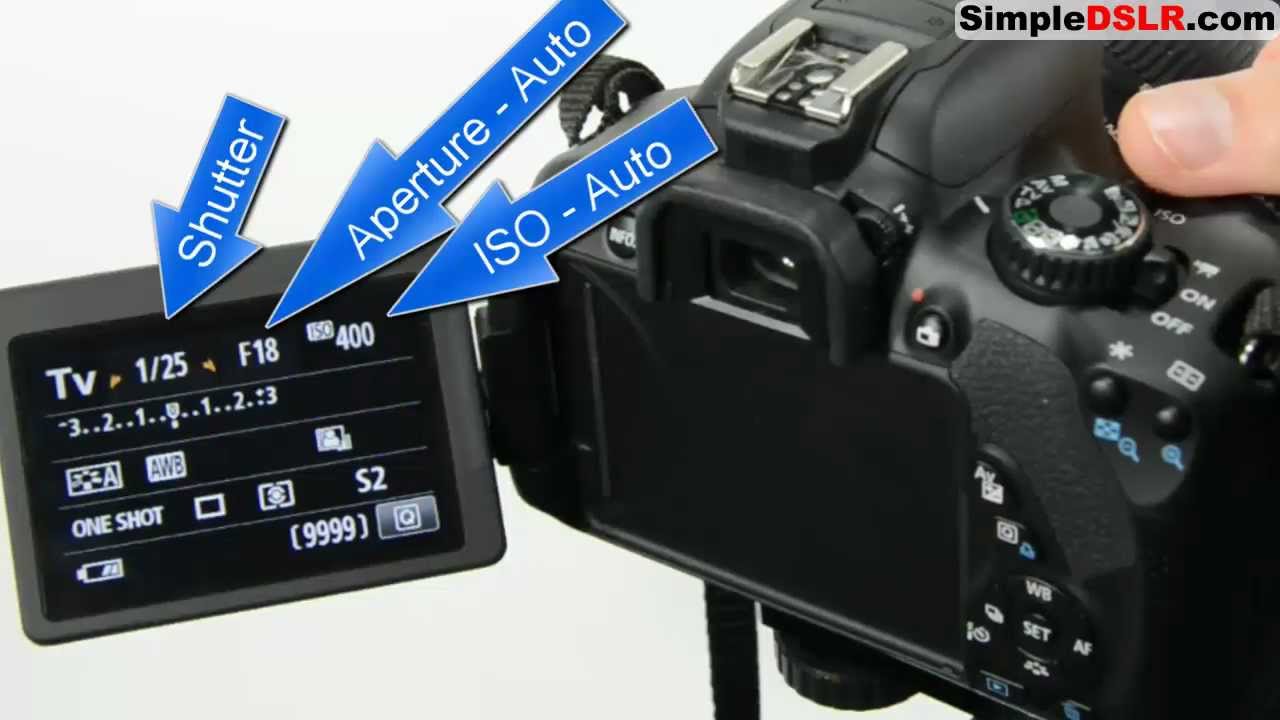
Understanding Camera Settings
Understanding camera settings is crucial for capturing stunning photos. Whether you’re a beginner or an enthusiast, knowing how to adjust your camera settings can make a big difference. Let’s dive into three essential settings: aperture, shutter speed, and ISO.
Aperture
Aperture controls the amount of light entering the camera. It is measured in f-stops. A lower f-stop number means a larger aperture. This allows more light to pass through the lens. A higher f-stop number means a smaller aperture, letting in less light. Aperture also affects the depth of field in your photos. A wide aperture (low f-stop) gives a shallow depth of field. This creates a blurred background effect. A narrow aperture (high f-stop) results in a deeper depth of field. This keeps more of the scene in focus.
Shutter Speed
Shutter speed determines how long the camera’s shutter remains open. It is measured in fractions of a second. A fast shutter speed (like 1/1000) freezes motion. This is ideal for capturing fast-moving subjects. A slow shutter speed (like 1/30) allows more light in and can create motion blur. Use this for creative effects like light trails. Balancing shutter speed with other settings is key. It helps maintain proper exposure in your photos.
Iso
ISO measures the camera sensor’s sensitivity to light. A lower ISO value (like 100) means less sensitivity. This is perfect for bright conditions. A higher ISO value (like 3200) increases sensitivity. It helps in low-light situations. Be cautious with high ISO settings. They can introduce noise or grain to your photos. Adjust ISO along with aperture and shutter speed. This ensures the best image quality.
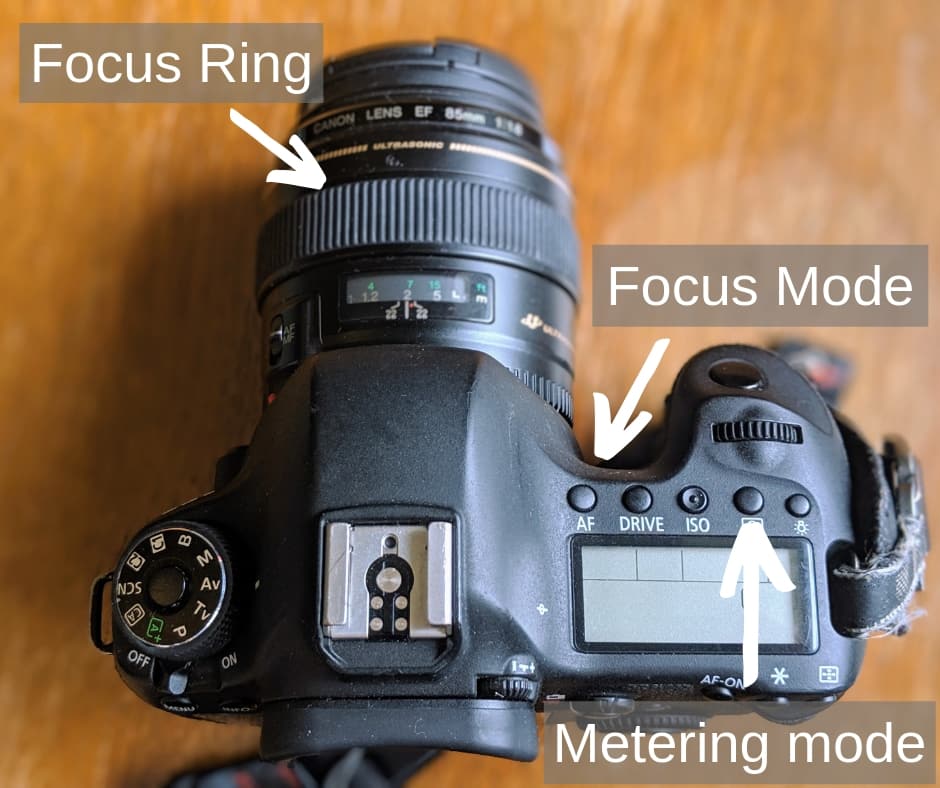
Mastering Focus Techniques
Understanding how to focus is crucial for capturing sharp photos. Focus techniques can change how your pictures look and feel. Both manual focus and auto focus have their advantages. Learning how to use them will improve your photography skills.
Manual Focus
Manual focus gives you complete control over your images. It is ideal for shooting in low light or tricky situations. To use manual focus:
- Turn the focus ring on your lens.
- Look through the viewfinder to see the focus.
- Adjust until the subject is sharp.
Manual focus works well for macro photography and landscape photography. You can focus on small details or distant scenes. It also helps when the camera’s auto focus struggles.
Auto Focus
Auto focus is faster and easier for most situations. It uses the camera’s sensors to find the focus. There are different modes of auto focus:
| Mode | Best Use |
|---|---|
| Single-Servo AF (AF-S) | Still subjects |
| Continuous-Servo AF (AF-C) | Moving subjects |
| Automatic AF (AF-A) | Switches between AF-S and AF-C |
Single-Servo AF is great for portraits and stationary objects. Continuous-Servo AF is useful for sports and action shots. Automatic AF can handle a variety of situations, making it versatile.
To use auto focus:
- Set your camera to the desired AF mode.
- Half-press the shutter button to focus.
- Fully press the shutter to take the picture.
Auto focus is quick and efficient. It is often more reliable for fast-paced photography. Understanding both focus techniques will help you take better photos.
Composition Basics
Understanding composition basics is essential for taking great photos. Good composition helps to create visually appealing images. It guides the viewer’s eye and tells a story. Let’s explore some key composition techniques.
Rule Of Thirds
The rule of thirds is a simple yet effective technique. Imagine dividing your frame into nine equal parts. You get two horizontal and two vertical lines. Place the important elements along these lines or at their intersections.
This method adds balance and interest to your photo. It breaks the frame into thirds, making the image more engaging. Avoid placing the subject in the center. Try positioning it off-center instead.
Leading Lines
Leading lines guide the viewer’s eye through the photo. They create depth and draw attention to the main subject. Roads, fences, and rivers are great examples of leading lines.
These lines can be straight, curved, or diagonal. They add movement and flow to the image. Use them to make your composition more dynamic. Experiment with different angles to find the best leading lines.
Lighting Essentials
Understanding lighting essentials is key to using a professional camera. Light affects how your photos look and feel. Whether you use natural light or artificial light, mastering it can make your pictures stand out.
Natural Light
Natural light is light from the sun. It can be direct or indirect. Direct sunlight creates strong shadows and bright highlights. Indirect sunlight is softer and more even.
- Golden Hour: This is the hour after sunrise and before sunset. The light is soft and warm.
- Blue Hour: This is just before sunrise and after sunset. The light is cool and soft.
- Midday Sun: The light is harsh and creates strong shadows. It can be challenging to work with.
Use reflectors to bounce light onto your subject. Position your subject near a window for soft, natural light. Experiment with different times of the day to see how the light changes.
Artificial Light
Artificial light is any light source that is not natural. It includes lamps, studio lights, and flash. Mastering artificial light can give you more control over your photos.
| Light Type | Description |
|---|---|
| Continuous Light: | This light is always on. It is easy to see how it affects your subject. |
| Flash: | This light fires in short bursts. It is powerful and can freeze motion. |
| LED Lights: | These lights are energy-efficient and cool to the touch. They come in various colors and intensities. |
Use diffusers to soften harsh artificial light. Adjust the position and angle of your lights to reduce shadows. Experiment with different types of artificial light to find what works best for you.
Remember, both natural light and artificial light have their advantages. The key is to experiment and practice. Over time, you will learn how to use light to create stunning photographs.
Advanced Shooting Techniques
Taking your photography to the next level requires mastering advanced shooting techniques. These methods help you capture stunning images with your professional camera. Understanding long exposure and HDR photography can make your photos stand out. Dive into these techniques to enhance your skills.
Long Exposure
Long exposure involves keeping the camera’s shutter open for an extended period. This technique captures more light and shows movement in a unique way. Use a tripod to keep the camera steady. Select a low ISO setting to reduce noise. Set a small aperture to keep the scene in focus. Perfect for night scenes or moving water. Create dreamy, surreal effects with long exposure.
Hdr Photography
HDR stands for High Dynamic Range. This technique captures a wider range of light and dark areas. Take multiple shots at different exposures. Combine them in post-processing to create a balanced image. Use a tripod to avoid movement between shots. HDR photography is great for landscapes and interiors. It reveals details in shadows and highlights. Achieve more realistic and detailed photos with HDR.
Post-processing Tips
Once you have captured stunning photographs with your professional camera, the next step is to enhance them with post-processing. This step is crucial for achieving a polished and professional look. Below are some key tips to help you get started with post-processing.
Editing Software
Choosing the right editing software is essential. Many professionals prefer Adobe Lightroom or Photoshop. These tools offer a range of features for different needs. If you are looking for a free option, consider GIMP. It provides many of the same features as paid software.
Basic Adjustments
Start with basic adjustments to improve your photos:
- Brightness and Contrast: Adjust these to make your photo stand out.
- White Balance: Ensure the colors look natural.
- Exposure: Correct underexposed or overexposed areas.
- Sharpness: Enhance details in your image.
- Cropping: Remove unwanted areas and improve composition.
These basic adjustments can significantly enhance the overall quality of your photos.
Credit: www.youtube.com
Maintaining Your Camera
Maintaining your professional camera is crucial for its longevity and performance. Proper care ensures that your camera stays in optimal condition. This, in turn, allows you to capture stunning photos. In this section, we will discuss how to maintain your camera effectively.
Cleaning Lenses
Cleaning your camera lenses is vital. Dirty lenses can ruin your photos. Follow these simple steps to keep your lenses clean:
- Use a blower to remove dust and debris.
- Apply lens cleaning solution to a microfiber cloth.
- Gently wipe the lens in circular motions.
Do not use regular tissue or your shirt. These can scratch the lens. Always carry a lens cleaning kit. Clean your lenses regularly for the best results.
Proper Storage
Storing your camera correctly is essential. Proper storage protects it from damage. Consider these tips for storing your camera:
- Keep your camera in a dry, cool place.
- Use a camera bag with padding for protection.
- Store your camera with the lens cap on.
- Avoid direct sunlight and extreme temperatures.
Humidity can damage your camera. Use silica gel packs in your camera bag. These packs absorb moisture and keep your camera dry.
Proper storage and cleaning of your camera extend its life. Follow these tips to keep your professional camera in top shape.
Credit: www.findingtheuniverse.com
Frequently Asked Questions
What Are The Basic Settings On A Professional Camera?
The basic settings include ISO, aperture, and shutter speed. ISO controls light sensitivity. Aperture affects depth of field. Shutter speed determines motion blur.
How Do I Focus A Professional Camera?
To focus, switch to autofocus or manual focus mode. Use the viewfinder or LCD screen. Adjust until your subject is sharp.
What Is Iso In A Professional Camera?
ISO measures the camera’s sensitivity to light. Lower ISO is for bright conditions. Higher ISO is for low-light.
How Do I Properly Hold A Professional Camera?
Hold the camera with both hands. Keep elbows close to your body. Use the viewfinder for stability.
Conclusion
Using a professional camera takes practice and patience. Start with basic settings. Experiment with different lighting and angles. Don’t be afraid to make mistakes. Learn from them. Keep the manual handy for quick reference. Consistent practice will improve your skills.
Join photography forums for tips and advice. Share your photos and get feedback. Remember, the best camera is the one you have with you. Enjoy capturing moments and telling stories through your lens. Happy shooting!
As an Amazon Associate, I earn from Qualifying Purchases.