
Is your laptop camera not working? Let’s fix that right away.
Whether you’re trying to join a video call or snap a quick photo, a malfunctioning camera can be frustrating. Laptop cameras can stop working for various reasons. It could be a software issue, driver problem, or even incorrect settings. Understanding these issues is crucial for resolving them.
In this guide, we’ll walk you through easy steps to troubleshoot your laptop camera. You don’t need to be tech-savvy to follow along. By the end of this post, you’ll know how to diagnose and fix common camera problems quickly. Ready to get your camera working again? Let’s dive in.
Check Camera Connection
If your laptop camera is not working, the first step is to check the camera connection. This step ensures there is no physical or software issue. Both external and built-in cameras might face connection issues. Below are steps to check each type.
External Camera Check
Ensure the external camera is plugged in properly. Check the USB port for any dust or damage. Try plugging the camera into a different USB port. Sometimes, the issue is with the port, not the camera.
Make sure the camera is turned on. Some external cameras have a power button. Check if the camera light is on. This indicates it is receiving power. If your camera has a software, open it and see if it recognizes the camera.
Built-in Camera Check
For built-in cameras, ensure the camera is not physically blocked. Sometimes, there is a privacy shutter. Make sure it is open. Check the camera settings on your laptop. Go to the device manager and find the camera. Ensure it is enabled.
Update the camera driver. Outdated drivers can cause connection issues. Right-click on the camera in the device manager and select “Update driver.” Follow the prompts to update it. Restart your laptop to see if the camera works.
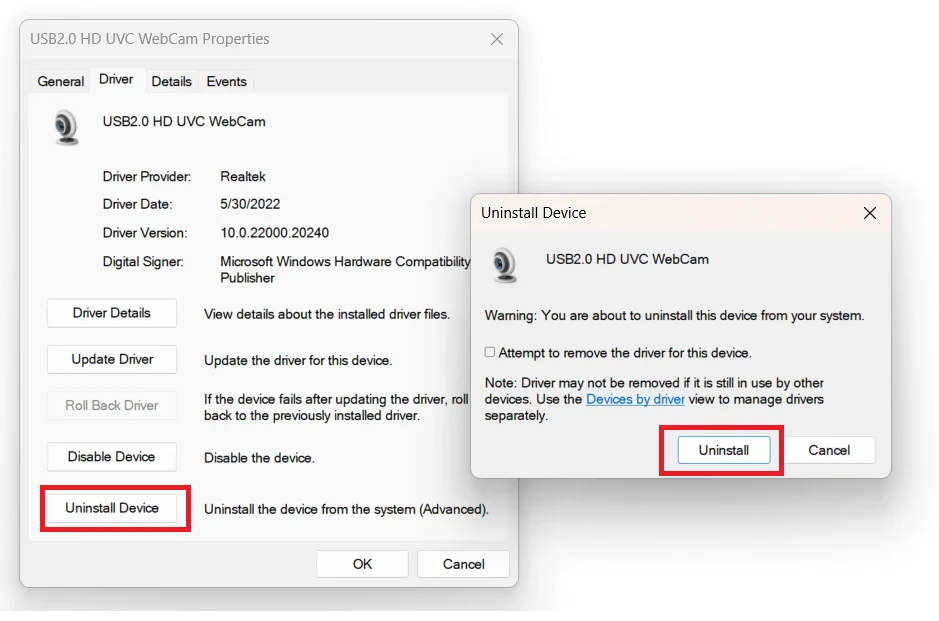
Credit: www.auslogics.com
Update Camera Drivers
Updating camera drivers can resolve many issues with your laptop’s camera. Outdated drivers often cause software conflicts and hardware malfunctions. Learning how to update these drivers is essential for troubleshooting.
Using Device Manager
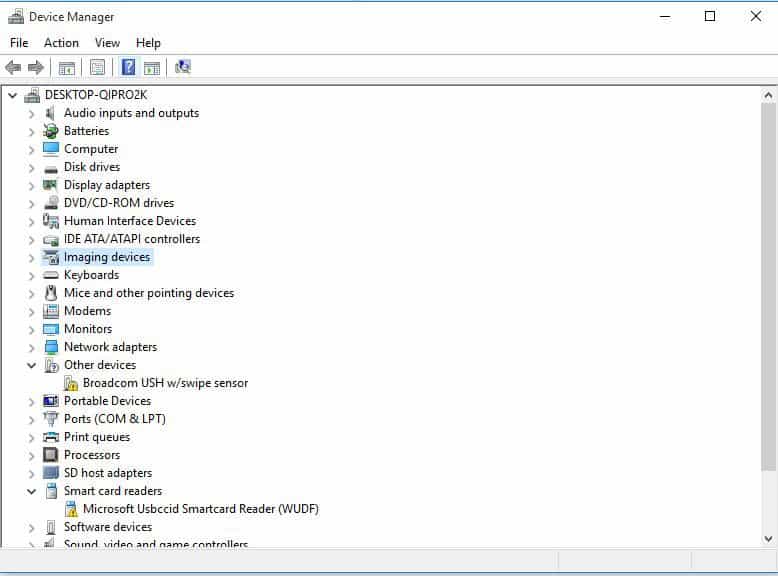
First, access Device Manager. Right-click on the Start button. Choose ‘Device Manager’ from the menu. In Device Manager, look for ‘Imaging devices’ or ‘Cameras’. Click on it to expand the list. Find your camera in the list. Right-click on your camera name. Select ‘Update driver’. A new window will appear. Choose ‘Search automatically for updated driver software’. Windows will search and install any available updates. Restart your laptop to apply changes.
Automatic Driver Update Tools
Automatic driver update tools simplify the process. Download a reliable tool from the internet. Install the tool and open it. The tool will scan your system. It will identify outdated drivers, including your camera driver. Follow the prompts to update the drivers. These tools usually download and install updates automatically. After updating, restart your laptop. Check if the camera works properly.
Camera Privacy Settings
Camera privacy settings help control which apps can access your laptop’s camera. Adjusting these settings can resolve many common issues. Whether you use Windows or Mac, knowing how to manage these settings is important.
Windows Privacy Settings
Open the Settings app on your Windows laptop. Go to “Privacy.” Select “Camera” from the left-hand menu. Check if camera access for this device is on. Ensure “Allow apps to access your camera” is also enabled. Scroll down to see which apps have camera access. Toggle the switch next to each app to enable or disable access. Restart your laptop to apply the changes.
Mac Privacy Settings
Click the Apple icon in the top-left corner. Select “System Preferences.” Choose “Security & Privacy.” Click the “Privacy” tab. Select “Camera” from the list on the left. Check the box next to the apps that need camera access. Ensure the settings are correct. Close the window and restart your Mac. This will help apply the new settings.
Test With Different Applications
Experiencing issues with your laptop camera can be frustrating. Testing it with different applications can help identify if the problem is with the camera or the specific software you’re using. Here’s a guide on how to troubleshoot your camera by using various applications.
Video Conferencing Apps
Video conferencing apps like Zoom, Skype, and Microsoft Teams are common tools. Open one of these apps and navigate to the settings menu. Look for the camera options and check if the video feed is working. If the camera works in one app but not another, the issue might be with the app settings. Ensure the right camera is selected in the app’s settings.
If you don’t see the video feed, try restarting the app. Sometimes, a simple restart can fix minor glitches. Also, update the app to its latest version. Outdated apps can have bugs affecting the camera functionality.
Camera Utility Software
Many laptops come with built-in camera utility software. These programs are designed to help you test and adjust camera settings. Open the camera utility software and check if it detects the camera. If the video appears, your camera is likely working fine.
Check for any updates for the camera utility software. Updating the software can resolve compatibility issues and improve performance. Also, explore the software settings for any disabled options that might be affecting the camera.
| Application | Steps to Test Camera |
|---|---|
| Zoom | Settings > Video > Check Camera Feed |
| Skype | Settings > Audio & Video > Check Camera Feed |
| Microsoft Teams | Settings > Devices > Check Camera Feed |
By testing your camera with different applications, you can pinpoint the source of the problem. This helps in fixing the issue more efficiently.
Check For Software Conflicts
Having trouble with your laptop camera? It could be due to software conflicts. Sometimes, other applications or programs can interfere with your camera’s functioning. Resolving these conflicts can help get your camera back on track. Below are some steps to identify and address software conflicts.
Close Background Applications
Many applications running in the background can cause camera issues. These programs can use up your system resources, leading to performance problems. Here’s how you can close background applications:
- Press Ctrl + Shift + Esc to open Task Manager.
- Navigate to the Processes tab.
- Check for applications that might be using the camera or system resources.
- Right-click on any unnecessary app and select End Task.
By closing these applications, you free up resources and may resolve camera issues.
Disable Startup Programs
Many programs start automatically with your computer, which can create software conflicts. Disabling unnecessary startup programs can help:
- Press Ctrl + Shift + Esc to open Task Manager.
- Go to the Startup tab.
- Review the list of programs that start with your system.
- Right-click on programs you don’t need at startup and select Disable.
Disabling these programs ensures that they do not interfere with your camera when you start your laptop.

Credit: www.ir.com
Run Troubleshooter Tool
If your laptop camera is not working, running the troubleshooter tool can help. This tool can diagnose and fix common camera issues. It is a simple process and can save you time and frustration.
Windows Troubleshooter
For Windows users, the troubleshooter tool is built into the system. It can identify and resolve camera problems quickly.
- Click on the Start menu.
- Go to Settings.
- Select Update & Security.
- Click on Troubleshoot from the sidebar.
- Find and click on Camera.
- Click Run the troubleshooter.
The tool will scan for issues and provide solutions. Follow the on-screen instructions to complete the process.
Mac Troubleshooter
Mac users can also troubleshoot their camera issues using built-in tools.
- Click on the Apple menu.
- Select System Preferences.
- Go to Security & Privacy.
- Click on the Privacy tab.
- Choose Camera from the left sidebar.
- Ensure the checkbox next to your apps is checked.
If the camera is still not working, try resetting the SMC (System Management Controller). This can fix hardware-related issues.
- Shut down your Mac.
- Press and hold the Shift, Control, and Option keys.
- While holding these keys, press the Power button.
- Hold for 10 seconds, then release all keys.
- Turn on your Mac.
Running the troubleshooter tool can often fix camera problems with ease. Whether you use Windows or Mac, these steps will guide you.
Check Antivirus Settings
Having trouble with your laptop camera? Antivirus settings could be the issue. Antivirus software sometimes blocks camera access for security reasons. Checking and adjusting these settings may solve your problem.
Camera Access Permissions
First, ensure your antivirus software allows camera access. Sometimes, antivirus software blocks camera usage without notification. To check this:
- Open your antivirus software.
- Navigate to the privacy or settings section.
- Look for camera protection settings.
- Ensure the settings permit camera access for necessary applications.
If your camera is still blocked, you might need to change permissions in your laptop’s operating system.
Temporarily Disable Antivirus
If adjusting permissions doesn’t help, try temporarily disabling your antivirus software. This can help you identify if the antivirus is causing the issue. Follow these steps:
- Locate your antivirus icon in the system tray.
- Right-click the icon to open the context menu.
- Select the option to disable or pause protection.
- Test your camera to see if it works.
Remember to re-enable your antivirus software after testing. Your computer’s protection is important.
By checking these settings, you might solve your camera issues quickly.
Perform System Updates
Keeping your laptop’s system updated is crucial for the smooth functioning of its hardware, including the camera. System updates often come with bug fixes, performance improvements, and enhanced security features. Neglecting these updates can result in malfunctioning hardware, such as a non-responsive camera. Below are steps to perform system updates for both Windows and MacOS.
Windows Update
Updating your Windows system can resolve many hardware issues. Follow these steps to update your Windows operating system:
- Click on the Start button.
- Open Settings (the gear icon).
- Navigate to Update & Security.
- Select Windows Update from the left sidebar.
- Click on Check for updates.
If updates are available, Windows will download and install them. Your system may require a restart to complete the installation.
Macos Update
Updating MacOS ensures your laptop’s camera works flawlessly. Here’s how to update your MacOS:
- Click on the Apple menu in the top-left corner.
- Select System Preferences.
- Click on Software Update.
- Check for available updates.
- Click on Update Now to install any updates.
Your Mac may need to restart to complete the installation process. Always ensure your device is plugged in and has a stable internet connection during updates.
Physical Camera Issues
Physical camera issues can disrupt your laptop’s performance. Identifying these problems can be simple. Focus on two main areas: lens obstruction and hardware damage. These are common problems that can affect your camera’s functionality.
Lens Obstruction
Check if anything is covering your camera lens. This could be a sticker or dust. Use a soft cloth to clean it. Ensure no objects are blocking the lens. Even tiny particles can affect the camera’s clarity.
Some laptops come with a built-in lens cover. Make sure it is open. If you wear glasses, reflections can cause issues too. Adjust your position to avoid glare.
Hardware Damage
Inspect the camera for visible damage. Cracks or dents can affect performance. If the laptop has been dropped, internal components may be damaged. Check the camera’s connection to the motherboard. Loose connections can cause the camera to malfunction.
Use the following table to identify common physical issues and their solutions:
| Issue | Solution |
|---|---|
| Lens is dirty | Clean with a soft cloth |
| Lens cover is closed | Open the cover |
| Visible damage | Consult a technician |
| Loose internal connections | Check and secure connections |
If none of these solutions work, consider professional help. A technician can diagnose and fix hardware issues. Regular maintenance can prevent many physical problems. Keep your laptop clean and handle it with care.
Credit: www.winxdvd.com
Seek Professional Help
Sometimes, troubleshooting your laptop camera can be overwhelming. If you have tried all other solutions and nothing works, it might be time to seek professional help. Professionals can diagnose and fix issues you might not be able to handle on your own. This can save you time and frustration. Here are some options to consider:
Contact Manufacturer Support
Contact the support team of your laptop’s manufacturer. They have the expertise to help you resolve camera issues. Provide them with details about the problem and your laptop model. They might offer solutions over the phone or through email. Sometimes, they may ask you to send your laptop in for repairs. This is a good first step for professional help.
Visit A Repair Center
Visit a local repair center if contacting manufacturer support does not solve the issue. These centers have technicians who can diagnose and fix hardware and software problems. Explain your issue clearly to ensure they understand what needs to be fixed. They can provide you with a repair estimate. Visiting a repair center can be faster than waiting for manufacturer support.
Frequently Asked Questions
Why Is My Laptop Camera Not Working?
Your laptop camera might not work due to outdated drivers, software conflicts, or privacy settings. Update the camera driver, check privacy settings, and restart your laptop.
How Do I Enable My Laptop Camera?
To enable your laptop camera, go to Settings > Privacy > Camera. Ensure the camera is turned on and apps have access.
Why Is My Camera Showing A Black Screen?
A black screen can be caused by driver issues, software conflicts, or hardware malfunctions. Update drivers and ensure the camera is enabled.
How Can I Test My Laptop Camera?
Test your laptop camera by using the built-in camera app or online webcam testing tools. Ensure the camera is enabled in settings.
Conclusion
Solving laptop camera issues can be straightforward. Follow the steps carefully. First, check your settings. Next, update drivers if needed. Restart your laptop. Also, test with different applications. Lastly, seek professional help if problems persist. By following these tips, you can fix most camera issues.
Enjoy clear video calls and meetings. Your laptop camera will work smoothly again.
As an Amazon Associate, I earn from Qualifying Purchases.