
Hiding a trail camera can be tricky. But it’s essential for capturing wildlife.
Trail cameras are amazing tools for observing nature. They help you capture the hidden lives of animals without disturbing them. But, if not hidden well, animals or other people might spot them. This can scare off wildlife or lead to your camera being stolen.
In this guide, we will explore effective strategies to hide your trail camera. These tips ensure you get those perfect shots without being detected. Whether you’re a wildlife enthusiast or a hunter, learning how to conceal your trail camera is key. Read on to discover the best ways to keep your trail camera hidden and secure.
Credit: reolink.com
Choosing The Right Camera
Choosing the right trail camera is essential for capturing clear and useful images. The right camera will blend seamlessly into its surroundings and provide reliable performance. It should have features that suit your specific needs and preferences.
Features To Look For
Look for a camera with good resolution. High-quality images are important for identifying animals. Night vision is crucial. Many animals are active at night, so clear night images are a must. Battery life matters. A long battery life means fewer trips to change batteries. This helps keep your camera hidden. Trigger speed is another key feature. A fast trigger ensures you capture the animal in the frame. Check the detection range. A wider range means the camera can cover more area.
Best Brands
Some brands are known for their quality and reliability. Bushnell offers excellent cameras with long battery life and clear images. Browning cameras are known for their fast trigger speeds and high resolution. Another great brand is Moultrie. Their cameras are durable and have good night vision. Stealth Cam provides affordable options with good features. All these brands offer models with varying features to suit different needs.

Credit: www.youtube.com
Location Selection
Choosing the right location for your trail camera is crucial. The location affects the quality of your photos and videos. A well-hidden camera captures more natural behavior of wildlife. Here’s how to select an ideal spot for your trail camera.
Ideal Spots
Pick areas where wildlife is likely to pass. Animal trails, water sources, and feeding areas are great choices. Look for signs like tracks, droppings, or chewed plants. These signs indicate frequent animal activity.
Avoiding High Traffic Areas
Avoid placing your camera in spots with high human traffic. These areas can scare off animals. Humans can also tamper with or steal your camera. Choose secluded spots away from paths or roads. This ensures animals feel safe and act naturally.
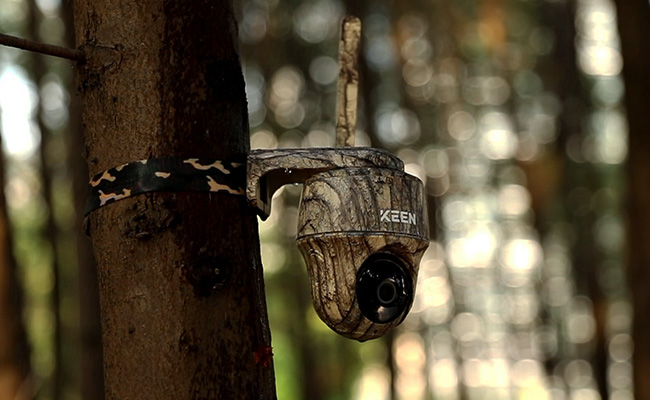
Camouflage Techniques
Hiding a trail camera effectively can be a game changer for monitoring wildlife. Camouflage techniques play a crucial role in ensuring that your camera remains undetected. Below, we explore some practical methods to disguise your trail camera.
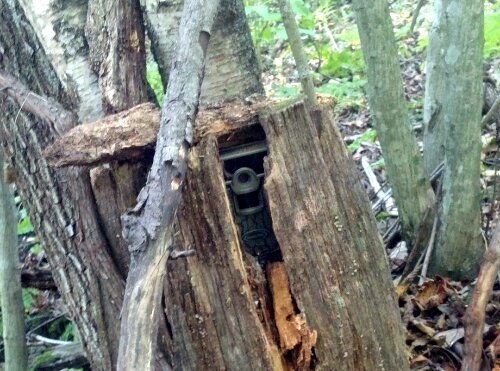
Using Natural Cover
One of the easiest ways to hide your trail camera is by using natural cover. Trees, bushes, and foliage provide perfect hiding spots.
- Place the camera inside dense shrubs.
- Attach it to the trunk of a tree.
- Hide it behind large rocks or tree roots.
Make sure the lens has a clear view. Avoid obstructing it with leaves or branches.
Diy Camouflage Ideas
Creating your own camouflage can be both fun and effective. Here are some DIY camouflage ideas you can try:
| Materials | Techniques |
|---|---|
| Spray Paint | Use natural colors like green and brown to paint the camera. |
| Camouflage Tape | Wrap the camera with tape that matches your environment. |
| Leaves and Twigs | Attach real leaves and twigs to the camera using glue. |
These methods can make your trail camera blend seamlessly with its surroundings. Experiment with different techniques to find what works best for your location.
Mounting Strategies
Mounting a trail camera effectively can greatly improve your wildlife monitoring success. Your camera’s placement and stability are essential for capturing clear, valuable footage. This section will cover the best mounting strategies to hide your trail camera, ensuring it remains unseen by both wildlife and potential thieves.
Height And Angle
Choosing the right height and angle is crucial for optimal footage. Mount your trail camera about 3 to 4 feet off the ground. This height mimics the perspective of most animals and reduces detection.
Adjust the angle to avoid direct sunlight. Aim slightly downward to capture a broader field of view. This approach minimizes blank shots and maximizes animal presence in your footage.
Securing The Camera
Securing your trail camera prevents theft and damage. Use a strong, weather-resistant strap to attach the camera to a tree or post. Ensure the strap is tight and secure.
Consider using a locking mechanism for added security. Many trail cameras come with lockable cases. These cases protect against theft and tampering.
Camouflage your camera to blend with its surroundings. Use natural elements like leaves, branches, or bark. This strategy helps the camera remain undetected by both animals and humans.
Here is a table summarizing the key points:
| Aspect | Recommendation |
|---|---|
| Height | 3 to 4 feet off the ground |
| Angle | Aim slightly downward, avoid direct sunlight |
| Securing | Use strong straps, lockable cases, and camouflage |
Reducing Human Scent
Hiding a trail camera can be tricky. One of the biggest challenges is reducing human scent. Animals have a strong sense of smell. They can easily detect human presence. Therefore, minimizing scent is crucial for effective camera placement.
There are several strategies to reduce human scent. These include using scent control techniques and scent blockers. Let’s dive into each of these methods.
Scent Control Tips
First, always wear gloves when handling the camera. This prevents oils from your skin transferring to the device. Change your clothes before entering the area. Avoid using strong-smelling detergents and soaps. Opt for scent-free options instead.
Another tip is to avoid eating spicy or strong-smelling foods. These can cause your body to emit stronger scents. Use scent-eliminating sprays on your clothing and gear. These sprays can neutralize human odors effectively. Finally, store your trail camera in a scent-free bag when not in use. This keeps the camera free from unwanted scents.
Using Scent Blockers
Scent blockers are another great tool. These products mask human scent, making it harder for animals to detect you. You can find scent blockers in sprays, wipes, and even clothing. Apply scent blocker to your hands before touching the camera. This helps reduce the transfer of human scent.
Consider using scent-blocking laundry detergent. This can help keep your clothes scent-free. You can also wear scent-blocking clothing. These garments are designed to trap and neutralize human odors. Place scent-blocking wafers near your trail camera. These wafers emit scents that mask human odor, making it harder for animals to detect the camera.
By using these strategies, you can greatly reduce human scent. This will help you capture better images with your trail camera.
Credit: www.whitetailhabitatsolutions.com
Minimizing Light And Noise
To avoid scaring wildlife, it’s vital to minimize both light and noise from your trail camera. Animals are sensitive to sudden flashes and unexpected sounds. By reducing these, you can capture more natural behavior and increase the chances of getting great shots.
Infrared Flash
Using an infrared flash helps in capturing images at night without startling the animals. Unlike a white flash, it emits a soft red glow that is less likely to be noticed. This allows the camera to take clear pictures in low-light conditions while remaining discreet.
- Choose a camera with an invisible infrared flash.
- Test the flash range to ensure it covers the desired area.
- Position the camera to minimize direct exposure to animals.
Silent Operation
Ensure the trail camera operates silently. Any noise can alert animals to its presence. Many modern cameras are designed with silent shutters and minimal operational sounds.
- Select a camera labeled as silent or quiet.
- Regularly check for any noise it might produce.
- Place the camera on stable surfaces to avoid vibration sounds.
By focusing on minimizing light and noise, you can increase the effectiveness of your trail camera. This approach ensures you gather more natural and candid shots of wildlife.
Regular Maintenance
Regular Maintenance is crucial for keeping your trail camera in top condition. It ensures the camera captures the best possible images and videos. Let’s explore the key aspects of regular maintenance, including battery check and memory card management.
Battery Check
Checking the batteries regularly is essential. Weak batteries can cause the camera to malfunction or miss capturing important events. Follow these steps for an effective battery check:
- Open the camera and remove the batteries.
- Use a battery tester to check each battery’s charge.
- Replace weak or dead batteries with fresh ones.
- Ensure the battery compartment is clean and free of corrosion.
Consider using rechargeable batteries to save money and reduce waste. Always carry spare batteries when you are out checking your camera.
Memory Card Management
Proper memory card management ensures your camera functions smoothly. A full or corrupted memory card can lead to lost data. Follow these tips to manage your memory card effectively:
- Check the memory card’s capacity and free space regularly.
- Use a high-quality memory card with sufficient storage.
- Format the memory card in the camera after transferring data to a computer.
- Handle the memory card carefully to avoid damage.
Using multiple memory cards can be beneficial. Rotate them to ensure you always have a clean card ready for use.
Legal And Ethical Considerations
Understanding the legal and ethical considerations of hiding a trail camera is essential. This helps in avoiding legal troubles and respecting others’ rights. This section will guide you through the necessary steps.
Respecting Privacy
Always consider privacy when placing a trail camera. Avoid areas where people expect privacy, such as backyards or private land. Respecting others’ privacy is crucial to maintain trust and prevent conflicts.
Here are some key points to keep in mind:
- Never place cameras near homes or private property without permission.
- Avoid areas where children play or gather.
- Ensure the camera does not capture private activities.
Following Local Laws
Every region has specific laws regarding the use of trail cameras. Research your local laws to ensure compliance. This helps avoid fines and legal issues.
Below is a table of general guidelines:
| Region | Key Regulations |
|---|---|
| United States | Permission required on private property |
| Canada | Prohibited in National Parks |
| Australia | Permits needed in wildlife reserves |
Consider the following actions:
- Check local wildlife and game regulations.
- Obtain any necessary permits.
- Consult with local authorities if unsure.
Always stay informed and respectful of both legal and ethical guidelines when using trail cameras. This ensures a positive experience for everyone involved.
Frequently Asked Questions
How To Hide A Trail Camera From Animals?
To hide a trail camera from animals, place it at a higher elevation. Ensure it blends with the natural surroundings using camouflage. Avoid placing it near food sources to reduce attention.
Where To Place A Trail Camera For Best Results?
For best results, place the trail camera on animal trails or near water sources. Ensure it’s at an appropriate height, around three to four feet, and secured to a sturdy tree.
How To Camouflage A Trail Camera?
Camouflage a trail camera by using natural materials like leaves, branches, and bark. Choose a camera with a camo design and avoid shiny surfaces that reflect light.
How High Should A Trail Camera Be Placed?
A trail camera should be placed three to four feet above the ground. This height ensures good visibility and reduces the chance of detection by animals and humans.
Conclusion
Properly hiding a trail camera ensures great wildlife photos. Blend it with the surroundings. Use natural cover like leaves and branches. Choose a high spot for better concealment. Test the camera’s view before leaving. Regularly check and maintain it. Be mindful of its placement to avoid detection.
Follow these tips for successful wildlife monitoring. Happy trail camera usage!
As an Amazon Associate, I earn from Qualifying Purchases.