
Fixing the camera on a Chromebook is easier than you think. Follow these simple steps to get your camera working again.
Is your Chromebook camera not working? This can be frustrating, especially when you need it for video calls or school work. Many users face this issue, but it’s usually easy to fix. Whether it’s a software glitch or a hardware problem, there are several solutions you can try.
In this guide, we will walk you through the steps to troubleshoot and fix your Chromebook camera. By following these tips, you will have your camera up and running in no time. Let’s dive in and resolve this issue together.
Check Camera Permissions
Having trouble with your Chromebook camera? The issue might be with camera permissions. Ensuring that your device and apps have the right access can often resolve camera problems. This section will guide you through checking and adjusting camera permissions.
Adjusting Settings
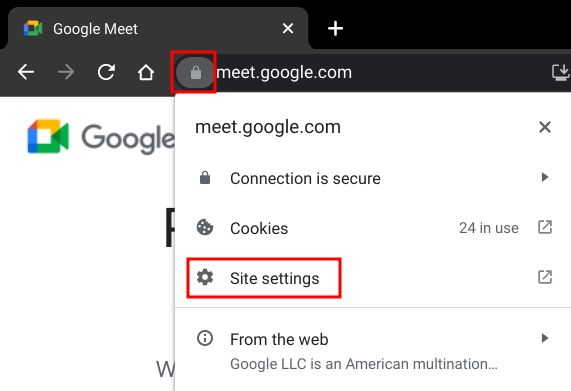
First, check your Chromebook’s settings. Open the settings menu by clicking the time in the bottom right corner. Then, click on the gear icon.
Next, navigate to Privacy and Security. Here, you will find various settings related to your device’s privacy.
Click on Site Settings. Under permissions, locate the Camera option. Make sure the camera is enabled and the right sites have access.
Granting Access
Sometimes, individual apps need permission to use the camera. To grant access, follow these steps:
- Open the app that needs camera access.
- A prompt may appear asking for permission to use the camera. Click Allow.
- If no prompt appears, go back to Settings and navigate to Apps.
- Find the app in question and click on it.
- Ensure the camera permission is toggled on.
This should enable the camera for that specific app. If the problem persists, try restarting your Chromebook.
| Step | Action |
|---|---|
| 1 | Open Settings |
| 2 | Navigate to Privacy and Security |
| 3 | Click on Site Settings |
| 4 | Locate Camera under permissions |
| 5 | Ensure the camera is enabled |
Checking and adjusting camera permissions can resolve many issues. Follow these steps to ensure your camera is set up correctly.
Restart Your Chromebook
Experiencing issues with your Chromebook’s camera can be frustrating. Sometimes, a simple restart can solve the problem. Restarting your device can refresh its system and fix minor glitches. Here are some ways to restart your Chromebook to fix the camera issue.
Simple Reboot
The easiest way to restart your Chromebook is through a simple reboot. Press the power button and hold it until the screen turns off. Wait a few seconds. Then, press the power button again to turn it on. This process can often resolve camera problems.
Powerwash Option
If a simple reboot does not fix the camera, try the Powerwash option. This process resets your Chromebook to factory settings. Before proceeding, make sure to back up your data. To perform a Powerwash, go to ‘Settings’ and select ‘Advanced’. Scroll down to ‘Reset settings’ and choose ‘Powerwash’. Follow the on-screen instructions to complete the reset. This can help resolve deeper issues with the camera.
Update Chrome Os
To ensure your Chromebook camera works properly, updating Chrome OS is crucial. Keeping the operating system up-to-date fixes bugs and enhances performance. It can also resolve issues like a malfunctioning camera. Follow these steps to check and install updates.
Checking For Updates
First, open the settings menu on your Chromebook. Click on the time in the bottom right corner. Then, select the gear icon to access settings. Scroll down and click on “About Chrome OS”. This section shows the current version of your system. Click “Check for updates” to see if new updates are available.
Installing Updates
If an update is available, click “Update” to download it. Your Chromebook will start downloading the update immediately. Once the download is complete, a prompt will appear to restart your device. Click “Restart” to complete the update process. Your Chromebook will restart with the latest version installed.
By following these steps, you can ensure your Chromebook’s camera and other features work optimally. Regular updates are essential for maintaining your device’s performance and security.
Credit: beebom.com
Inspect Hardware Connections
Having issues with your Chromebook camera? Sometimes, the solution lies in inspecting hardware connections. This step is crucial. It can determine if the problem is with the device itself. Let’s break down the process.
Checking Cables
First, check all cables. Ensure they are securely connected. Loose cables can cause the camera to malfunction. Look closely at the USB ports. Dust and debris can interfere with connections. Cleaning them might help. Use a soft brush or compressed air.
Testing External Cameras
Next, test any external cameras. Plug the camera into a different USB port. This can rule out port issues. Check if the camera has a power switch. Make sure it is turned on. Sometimes, an external camera needs its own drivers. Ensure they are installed correctly.
Disable And Re-enable Camera
Having issues with your Chromebook camera can be frustrating. A quick way to resolve many camera problems is to disable and re-enable the camera. This process can reset the camera settings and fix minor glitches. Follow the steps below to get your camera working again.
Device Manager Steps
First, you need to open the Device Manager. Follow these steps to do that:
- Click on the Launcher at the bottom-left corner of your screen.
- Type “Device Manager” in the search bar.
- Select the Device Manager from the search results.
Once the Device Manager is open, locate the camera device. It might be listed under “Imaging devices” or similar categories.
Re-enabling Process
Now, disable and re-enable the camera to refresh its settings:
- Right-click on the camera device.
- Select “Disable device” from the dropdown menu.
- Wait a few seconds, then right-click on the camera device again.
- Select “Enable device” to re-enable the camera.
Check your camera to see if it is working properly. This simple process can often fix minor issues and get your camera back to normal.
Credit: support.google.com
Test Camera In Different Apps
Having trouble with the camera on your Chromebook? Testing the camera in different apps can help identify and fix issues. Here are some steps to test the camera using built-in apps and third-party applications.
Using Built-in Apps
The Chromebook comes with built-in apps that can help test the camera. These apps are pre-installed and easy to use.
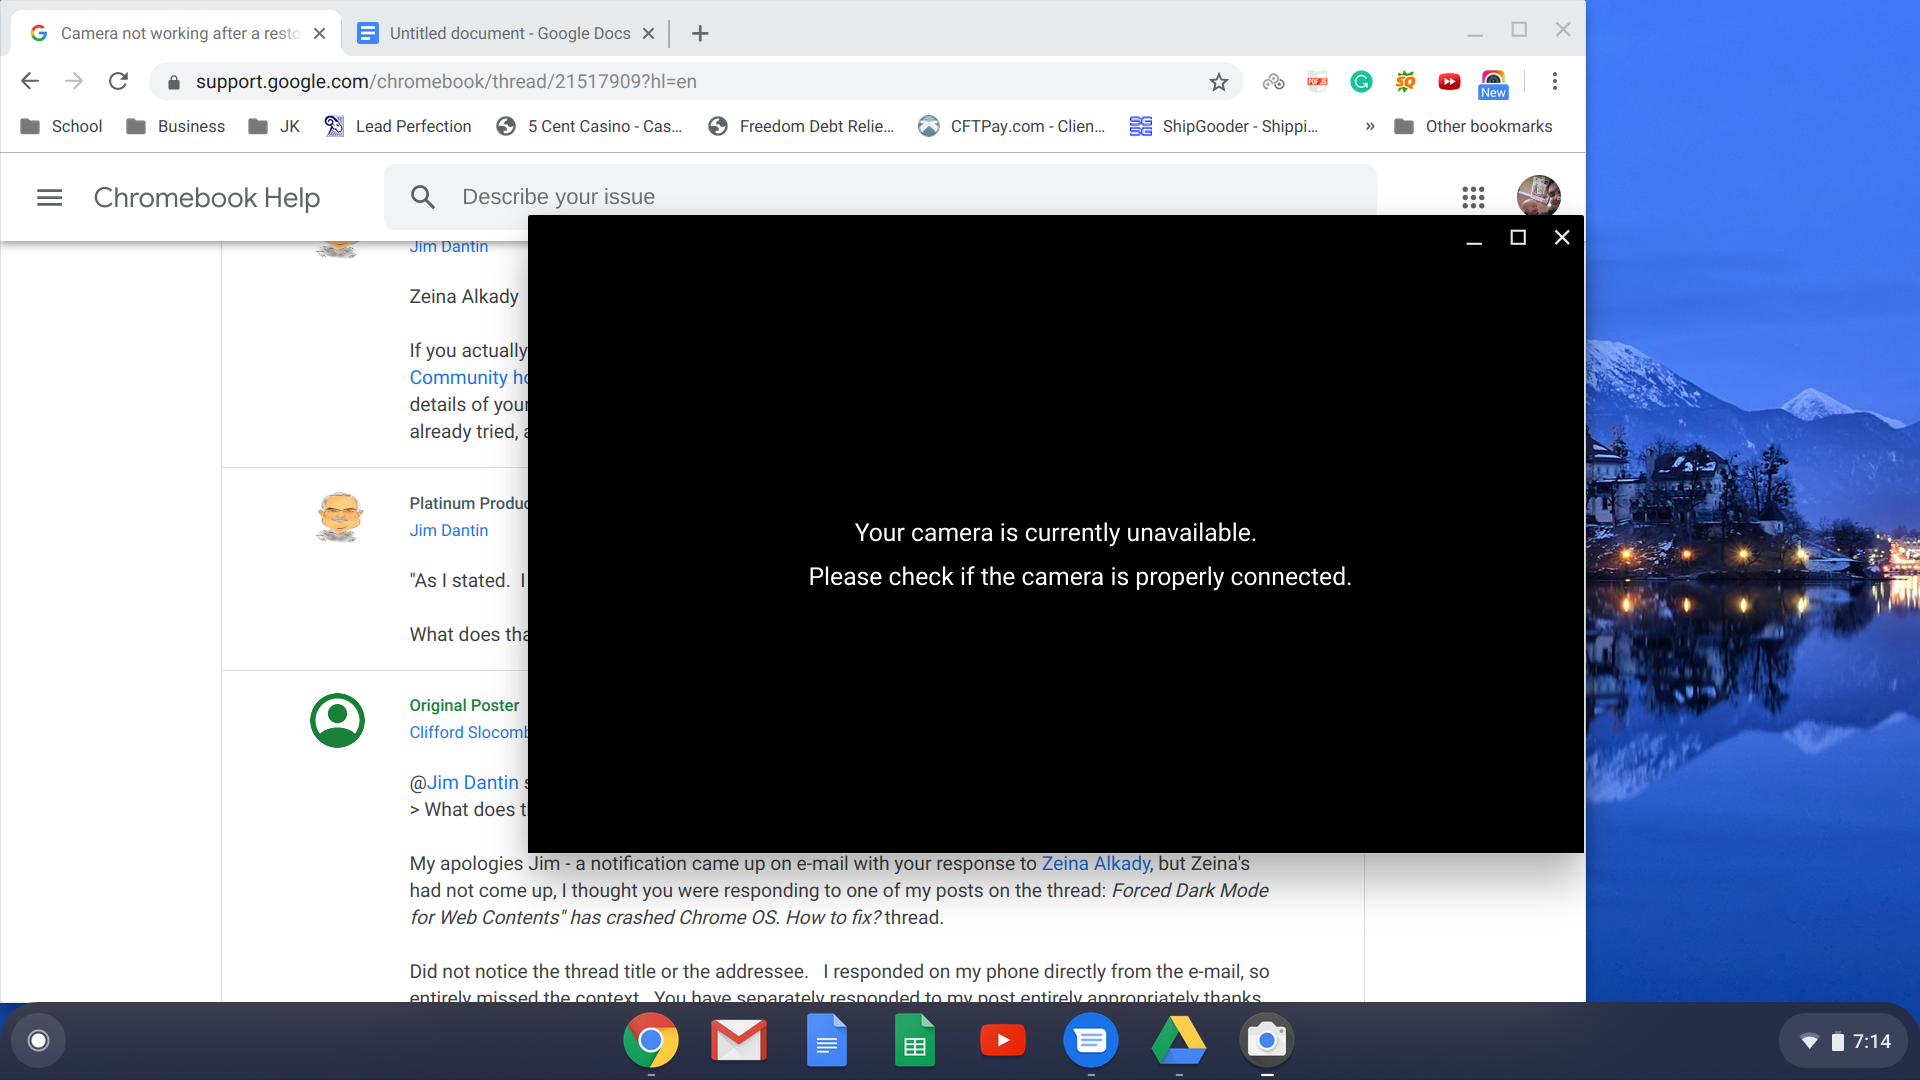
- Camera App: Open the Camera app from the launcher. Check if the camera works. If the screen is blank, restart the Chromebook.
- Google Meet: Open Google Meet and start a new meeting. Check if the camera turns on. If not, check the settings for permissions.
Third-party Applications
Using third-party applications can help test the camera in different environments. These apps provide additional functionalities.
- Zoom: Download Zoom from the Chrome Web Store. Start a test meeting to check the camera. Ensure the camera is selected in the Zoom settings.
- Skype: Install Skype and log in. Start a video call to test the camera. Check the settings to make sure the camera is enabled.
Testing the camera using these methods can help identify the problem. If the camera works in one app but not another, the issue may be with the app settings. Remember to check permissions and settings in each application to ensure the camera is enabled.
Clear Browser Cache
Clearing your browser cache can solve many issues on your Chromebook, including camera problems. Cache stores temporary files to speed up your browsing experience. Sometimes, these files can interfere with your camera’s functionality. Clearing the cache can help reset this and fix camera issues.
Steps To Clear Cache
First, open the Chrome browser on your Chromebook. Click on the three dots in the upper right corner. Select “More Tools” from the dropdown menu. Then choose “Clear browsing data.” A new tab will open. Make sure “Cached images and files” is checked. You can also check “Cookies and other site data” if you want. Select the time range to “All time” for a thorough clean. Finally, click “Clear data” to complete the process. This will clear your browser cache.
Impact On Camera Functionality
Clearing the cache removes temporary files that may cause problems. This can refresh the browser and fix any camera issues. Old cached files can sometimes conflict with new updates. By clearing the cache, you ensure that the browser uses the latest files. This improves the camera’s performance and reliability.

Credit: support.google.com
Reset Camera Settings
Experiencing issues with your Chromebook camera? Sometimes, resetting the camera settings can help solve these problems. This process is straightforward and can help restore the camera to its default settings, ensuring it functions correctly.
Accessing Camera Settings
To access your camera settings on a Chromebook, follow these steps:
- Click on the time in the bottom right corner.
- Click the gear icon to open Settings.
- Scroll down and click Advanced.
- Under Privacy and Security, click Content Settings.
- Click Camera to access the camera settings.
Default Configuration
To reset your camera settings to their default configuration, follow these steps:
- In the Camera settings, click Reset.
- Confirm the action to reset all camera settings to default.
Resetting the settings can fix common issues:
- Camera not turning on.
- Poor image quality.
- Camera not detected by apps.
By following these steps, your Chromebook camera should return to its default state, potentially resolving any issues.
Frequently Asked Questions
Why Is My Chromebook Camera Not Working?
Your Chromebook camera may not work due to software issues, outdated drivers, or hardware problems. Restart your device, update the system, or check camera settings.
How Do I Enable My Camera On Chromebook?
To enable the camera, go to Settings, then Privacy and Security. Next, click on Site Settings and ensure camera access is allowed.
Can I Reset My Chromebook Camera?
Yes, you can reset it by restarting your Chromebook. If the issue persists, perform a hard reset by holding the Refresh and Power buttons.
Why Is My Chromebook Camera Black?
A black screen could be due to blocked permissions or software glitches. Check camera permissions and restart your device to resolve the issue.
Conclusion
Fixing your Chromebook camera can be straightforward. Follow the steps provided, and you’ll likely resolve the issue quickly. Remember to check permissions and restart your device. Keep your Chromebook updated to avoid future problems. If issues persist, seeking professional help might be necessary.
With these simple solutions, you can enjoy uninterrupted video calls and photos. Troubleshooting doesn’t have to be complicated. Stay patient and follow each step carefully. Your Chromebook camera will be back to normal in no time. Happy troubleshooting!
As an Amazon Associate, I earn from Qualifying Purchases.